Friday 27 December 2019

2019 in Review

2019 is drawing to a close. Nystrup Gravel employees have been enjoying the Christmas and a few days of vacation. They are now back working as the warm weather this winter allows gravel extraction. Usually frost puts a stop to the production of gravel at this time of year.
A brief pause while unloading overburden along a road. The relatively warm weather is reflected in the light clothing worn by the men.
2019 was characterized by being my first full year as a modeller in 16 mm scale (or 1/19.05). I'm slowly getting used to the scale and learning to handle the larger objects now on my work table. 2019 has been a relatively productive modelling year and I like to think I have built a solid base of experience for Nystrup Gravel's coming expansion.

In 2019 I managed to add no less than 8 skips to my collection and triple the skip fleet of Nystrup Gravel. I can now run trains of skips with a decent length and combined the skips will make up a train a full meter in length. During the summer I added two Hudson Rugga skips complete with weathering and prototypical coupling chains to the two already in service. The Hudson skips are made from kits brought out many years ago by Binnie Engineering.
4 Hudson skips parked on the Nystrup Gravel main line. All the skips have had minor alternations and extra detail built into them. Decals supplied by one of the small businesses (in this case Skilteskoven) that cares for modellers with special needs.

As skips are what makes the little railway at Nystrup Gravel earn its living, I knew I had to have more than 4 Hudsons. Quite satisfied with both the look and running of the Binnie Engineering Hudson skips, the type was however, never in widespread use in Denmark. Consequently I couldn't bring myself to buy more of them. Fortunately I was able to aquire 6 skips of a standard German type in the autumn bringing my skip fleet to a total of 10. The 6 new skips will have to be painted, numbered and weathered. A task for 2020.

2019 also saw me finish the first Nystrup Gravel locomotive in 16 mm scale. A somewhat rebuilt I. P. Engineering Lister R was taken into service during the late summer and has turned out a very reliable machine. Just what scale the kit is actually made to is an open question though, as the proportions doesn't fit any of the drawings I have had access to. I tried to improve a few things here and there and cut off no less than 7 mm in width to almost match my scale drawings. No matter what it's a great little locomotive.
Lister close up from above. The oil can seems to have leaked a bit.

I have been testing if my library and workshop room could house a small 16 mm scale indoor module. After some reorganizing it turned out that it is possible to cram in a few meters of track and structures on some shelves. It will not be a large layout, but I think I might just squeeze in two points, a small engine shed and perhaps even the legendary flimsy lorry loading ramp over which surprisingly huge amounts of gravel slided down into waiting lorries. At the moment I'm playing around with Peco points and track panels. While it's convenient to be able to aquire track from a quality manufacturer the look of the track isn't particularly to my taste. In 2020 I will have to decide if I will use the Peco track, rebuild it or make my own track from scratch.

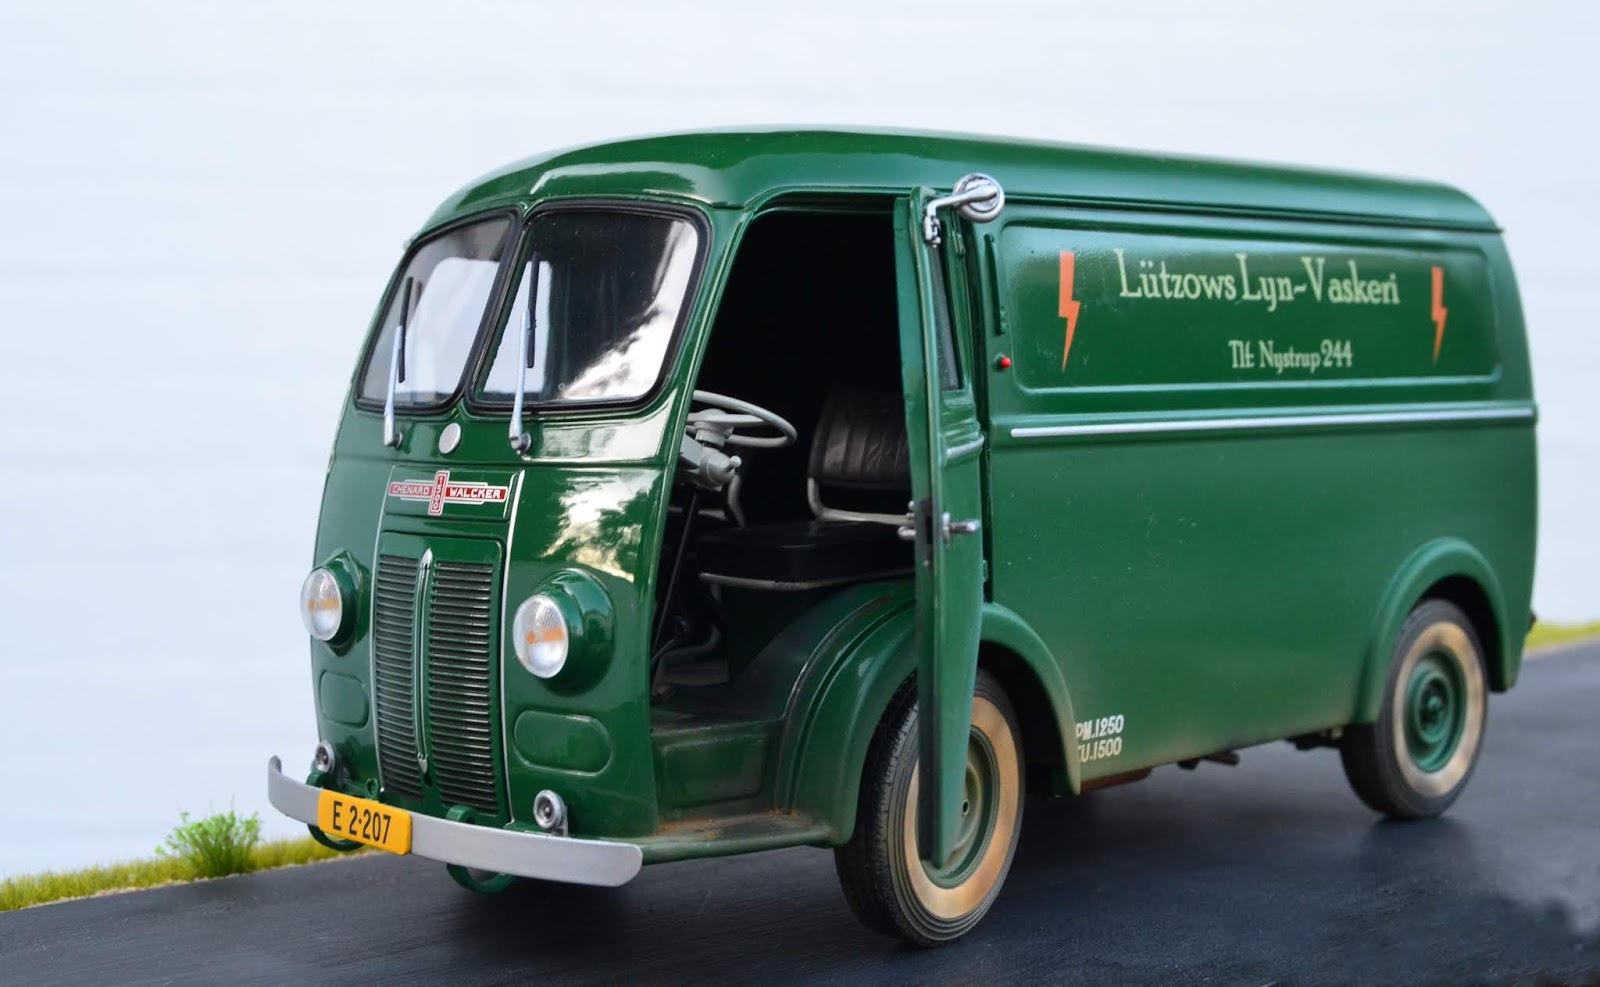
In addition to modelling 600 mm gauge industrial railway equipment I enjoy building and modifying road vehicles that fit my modelling theme and period. In 2019 I finished several road vehicles. I managed no less than 4 cars and one steam tractor. In contrast to my old scale 1/35, road vehicles in 16 mm scale are almost exclusively available as diecast models. I have only seen a few 3D-printed vehicles available for 16 mm scale. Consequently I have been modifying, detailing and weathering die cast cars rather than building full kits as before.
A Tempo Hanseat lorry showed up near Nystrup during 2019. Banke's Bakelite was a small company employing several lorries for transporting raw materials and finished products.

As usual I visited several narrow gauge railways and museums with industrial heritage content. Visits like those are an important inspiration. In 2019 I joined friends from my heritage railway for a trip to the Internationaler Feldbahnertreffen in Ilmenau, Germany.
An O&K Montania loco passing the remains of an ore loading facility near the 'Voller Rose' flour spar mine at Ilmenau.

2019 wasn't the most active year in the Nystrup Gravel blog's existence with two full months without any postings at all mainly due to work obligations. I must have been making up for the missing modelling in other months and followed up with posts as the year's 'production' of blog posts managed to reach a respectable 40. The statistics says the visits are again averaging 2.500-3.000 page views pr month after having taken a dip in the beginning of the year. As me, the readers might have taken some time for adjusting to the new scale.
A new scale takes some time to get adjusted to. Here's a photo to show the size of two 16 mm scale models in comparison with a well known and standardized object to the right.
I hope you enjoyed the stories from Nystrup Gravel in 2019. I wish you a happy New Year and hope to see you again in 2020 for more modelling, fictional history and prototype information.

Tuesday 24 December 2019

Brick Shed Finished

Back in october I finished  the main assembly of the brick shed destined to become my first 16 mm scale building. I had covered the brick walls with a thin layer of polyfilla to represent a rendered surface. Even before I added doors and roof I began to wonder what colour to paint the building. My initial thoughts centered on light off-white or sand tones, but in the end I decided to experiment with a red building with green doors and fascias. 
Prototype shed with charmingly odd angles painted dark red. One of several buildings convincing me that the Nystrup Gravel building complex had to be red. The shed is located in Albertslund close to my home.

I used the original wooden doors from the kit. I fitted home made hinges and handles with AC glue after having distressed the door planks with a sharp knife and steel wire brush. The doors themselves were tacked in place with AC glue but permanently fixed in place with standard DIY silicone. Moving up in scale to 16 mm has enabled me to use many of the tools I usually use for house maintenance in model building.
Rendering finished, paint testing in progress and the first home made lamp works. 
The roof is cut from 6 mm foam board and covered with surgical tape and painted dark grey. The tape was my favourite material for making tarpaper in 1:35 scale. In my new scale the tape really ought to be much wider and I'm now looking for a wider variant.
Red paint on the wall, roof from foamboard in place and door painting in progress. Minor variations in red to create different tones of colour. Further weathering will tone down the almost pink appearance.
Lights over the two doors were constructed from left over parts from 1:35 kits, brass tube and small 12 V bulbs. Wires from the bulbs were routed into the shed and from there extended with longer wires to be positioned under the future layout's surface.

Plasticcard was used to fabricate fascia boards along the roof's edge. I distressed the boards with knife and steel wire brush before painting them in a light green colour matching the doors. With both red walls and green doors and fascias dry, I began to pick out a few bricks in brick red. Not too many, just a few ones here and there particularly around the doors where oil and fuel cans would hit and knock off rendering and paint. The mortar courses were picked out in grey-brown paint.

The doors and fascia boards were given a wash with heavily diluted brown oil paint. The same mix was applied to the lower parts of the building. When dry the exposed parts of the bricks were treated with brick red powdered chalk. Small amounts of rust were added with oil paint around hinges and metal parts on doors and lamps. A covering of matt varnish finished the work on the shed for the time being. When I place it permanently on my future layout I will add further weathering with earth and dust tones to help it blend into the surroundings.
Front and right side of the brick shed with lights on. For safety reason I will probably add signs on the doors warning about the contents of fuel and lubricants.

Left and rear side of the brick shed. My favourite Vespa posters added to the side. The rear side may be fitted later with brackets to carry a ladder.
The shed will now await construction of my small indoor layout. I'm still planning and testing track plan and how tightly I can bend my track and still expect safe running.

Saturday 21 December 2019

Seasons' Greetings

As we are getting closer to Christmas and preparations are intensifying it is time for wishing every reader of the blog a Merry Christmas and a Happy New Year. All my best wishes go out to every reader even if you don't happen to be culturally or religiously inclined to celebrate Christmas.

At this time of year I always take time to appreciate how fortunate I am to be able to have spare time and money to play with model railways. My thoughts go out to all those around the planet struggling to make ends meet, provide for children and basically just survive another day.
My first attempt at a season's greetings image. And a miserable one.

Thursday 12 December 2019

Nystrup Gravel in Print

Nystrup Gravel is mostly living a quiet existence in my study and online, being mostly shared in a language foreign to me, English. Just recently my modelling adventure has been mentioned in a small Danish modelling magazine being distributed to members of one of the oldest railway modelling societies in the kingdom of Denmark. Established in October 1945 the society is still active modelling in 0 gauge.
Front page of the magazine 'Train 60'. The model of Aarhus Central Station is an impressing model in 1:45 scale. 
A brief history of Nystrup Gravel and several very nicely reproduced photos are included in the 3 page article. The article also deals with my change of modelling scale and there is even a small portrait of me and my railway career combining modelling, heritage railway activity and my real job for a railway contractor.
Two pages spread out on the floor. The large photographs are nicely printed.

Factually there isn't much in the article that hasn't already been treated in detail here on the blog. The difference is the nice style that the article's author has managed to add both in and between the lines. And the fact that the information about Nystrup Gravel is delivered directly to some very talented modellers, of course. The author is Nils Bloch, a Danish writer with several books on his CV, a range of university degrees as well as years of active service for railway preservation.
Nils Bloch's latest book about a small Danish standard gauge light railway line. A book packed with facts and countless stories from the line's everyday life until closure in 1968.

Wednesday 27 November 2019

Three Wheeler from Banke's Bakelite

The small company Banke's Bakelite is known from previous posts on this blog. I have built part of the company's factory and one of their lorries in 1:35 scale. Now it's time for a 16 mm version of a lorry from Banke's Bakelite. The factory itself was located right next to Nystrup Gravel's track in Nystrup, but used lorries for transport of both raw materials and finished goods. Only on a few occasions due to flooding of roads did the bakelite factory use the 600 mm railway.

... und noch weiter! German advertisement for the Tempo Hanseat showing a Hanseat with a hefty tire pattern on its front tire.
The Tempo Hanseat in service at Banke's Bakelite is fitted with much a more relaxed tire pattern. The driver has left the cab and is obviously examining the little lorry. A mechanial problem, perhaps?

I decided to keep the vehicle in the colour as supplied by its manufacturer Minichamps. I only air brushed the rear end with yellow paint. This would enhance visibility and traffic safety of the little, slow lorry in the dark months of the long Danish autumn and winter. I had decals custom made using the same artwork as my previous decals in 1:35 scale. The decals were applied on surfaces prepared with gloss varnish. Mr. Hobby decal solutions helped get the large decals integrate well with the surface of the model.
I used a combination of Tamiya masking tape and a plastic bag to make sure I only got yellow paint where I wanted.

Decals being fitted on the lorry. Company name and telephone number. Rear license plate removed awaiting fitting of a new plate in line with my modelling period.
The plastic injected tarpaulin was also gloss varnished in preparation for the decals. After decal application the tarpaulin was air brushed with flat varnish. The tarpaulin was then treated with detail painting and diluted oil paints in very much the same fashion as when I paint clothing on figures. The model's original black license plates were exchanged with new ones made from plastic card, painted yellow and fitted with decals.
Decals are on and the tarpaulin is getting details painted and some general weathering added. The new license plates are glued in place. Next task is to paint details and add weathering to the rest of the little lorry.
I picked out a few details on the lorry with acrylic paint. Windshield wipers were painted with chrome and the head lights also got a shiny chrome ring to keep the lens in place. The exhaust was painted with a thick layer of acrylic paint stippled with a stiff brush while drying. That creates a nice 'ripple' effect on the exhaust looking like a layer of rust. The exhaust's texture was enhanced with a wash of rust coloured diluted oil paint. Several other parts of the engine was treated to somelight wrathering as well. The underside of the opening bonnet wase air brushed lightly with dark grey.

The doors were given an unfair number of dents and scratches to represent a victim of rather careless drivers. The load area was also distressed with both acrylic and oil paints using several sizes of brushes. I gave the car a few light passes with two tones of sand coloured paint to represent dust thrown up from the road surface. I will probably add a bit more later.
The Hanseat was primarily used to ferry finished bakelite products to the standard gauge railway station in Skovby. As most products were shipped out in cardboard boxes the tarpaulin protected them from the wetness of the Danish climate.

A splash of yellow helps to protect the slow Hanseat with dim lights being hit by faster cars on the dark roads around Nystrup.
The driver now seems to have given up all hope getting the Hanseat started again. He will now have to walk to the nearest telephone to phone for a mechanic to help him take his load of bakelite products to their destination.

The Tempo Hanseat is my fourth road vehicle finished as Danish cars matching the Nystrup Gravel universe. Now it's back to finish the brick shed and finishing the build sketches and design planning for my Pedershaab locomotive. And soon it's December with all the associated activities. After more than 15 years of modelling Nystrup Gravel, the company has not once sent out a Christmas Card. Perhaps it's about time?

Monday 11 November 2019

New Skips

My early Christmas present for myself arrived the other day: 6 skips to enhance the carrying capacity of my 1/19 scale gravel line. The skips are of the German type in very widespread use in Denmark. In contrast to the British Hudson type that was only used by very few Danish industries.
Three new skips ready for a test run on some of Nystrup Gravel's temporary track.
A view from Mønsted Chalk Works in the 1950's. The skips are a mix of British Hudsons and German types. As countless German companies made V-skips of the same type regulated under the German 'Deutsche Institut für Normung', it's usually not easy to distinguish one company's product from another. Cropped image from Arkiv.dk
I have again been taking advantage of the falling value of the British pound in relation to the Euro. Consequently every item I have purchased from the UK in the last few months have been almost 20% cheaper than if I had shopped in e.g. 2015. I bought the skips on eBay and being the only bidder I got away with paying the minimum price set by the seller. The price for each skip consequently compares favourably with a new freight wagon in H0. Large scale railway modelling doesn't have to be expensive.

The skips are made in South Korea by Lik Enterprise Inc. for a US company called Car and Locomotive Shop to 1/19.2 scale. At least that is the scale printed on the small label on the box. Skips and a LKM NS2f loco from the same company were reviewed in Narrow Gauge and Industrial Railway Modelling Review 57.

The skips arrived very professionally packed. Skip frame complete with wheel sets and skip body were separately packed in a zip lock plastic bag. Each of these were inserted into custom made foam shapes, keeping the skip parts safely in place in their solid cardboard box. In the box were also a small bag with two sets of coupling chain, each with 3 links and a small bag with moisture absorbing material.

New skip of German DIN 0.75 m³ type just out of the box compared with a Hudson 'Rugga' type.


With a length of 91,5 mm, a wheel base of 31 mm and a height of the skip body of 37 mm the 1/19 model correspond reasonable well with the measurements of a Orenstein & Koppel skip from 1949. The skips are well assembled and the surface is completely smooth with no trace of solder, file marks or other imperfections. The paint is well applied and small details like rivets show up nicely.
Drawing of DIN skip from Orenstein & Koppel dated 1949. The skip is of  'Leichte Bauart' a light version without e.g. a central steel profile providing lengthwise stability. For long trains and mechanical traction the light skip wasn't considered durable enough. My 16 mm scale skips have the central frame beam.
Being made completely from metal the skips are surprisingly heavy. The weight will help them to keep the track better even when running unloaded. The skip body is easily tipped with a push of a finger, but sitting stable in its cradle when running. The skips comes in three colours. My order was made up from 4 grey, 1 black and 1 rusty red.

I will be painting my skips in weathered dark grey/black after having drilled a row of holes in in the bottom of the skip body to allow water to drain out. It will probably last a while before I get to complete that task, as other projects are higher on the priority list. Until then the skips will handle the necessary traffic in their original liveries.

Tuesday 5 November 2019

Visiting Clausthal

When in Germany and not too far away from Clausthal any sane person with my name knows where to go! Considering that the town of Clausthal-Zellerfeld in addition is home to the oldest mine shaft steel headframe in Germany and on the UNESCO world heritage list, a visit was quite unavoidable. I was on my way home from the international narrow gauge meeting in Ilmenau.
Mine shaft headframe from 1876.

The Ottiliae Schacht mine shaft headframe is not only the preserved oldest in Germany, but also appears to be the oldest in Europe. The headframe once served a mine shaft almost 600 m deep. The shaft served workings of lead and zinc and was taken out of service in 1930. Since the workings served as water resevoirs for water turbines. That use terminated in 1980 and in 1984 the shaft was filled with concrete and the buildings turned into a museum. A 600 mm line connects the museum with the former railway station in Clausthal-Zellerfeld.
B 660 tandem locomotive from Betrieb für Bergbauausrüstungen, Aue. The type was built from 1980 to 1990 when the production was closed down due to the collapsing economy of DDR. With a weight of 5.5 t it develops 8.4 kW.

Lots of interesting stuff to explore on the tracks near the headframe. To the left a compressed air powered locomotive.

The B 660 pulling 3 wagons having just left the mine museum.

The Clausthal area is hilly and mountainous and the B 660 has a tough job ahead of it, when returning uphill to the mine shaft. The mine museum is located in a very beautiful area

Sunday 3 November 2019

Brexit and Modelling

I will not be going political here. Only mentioning that for a continental European there is currently a good exchange rate to the pound when shopping in the UK. With a lot of interesting products to 16 mm scale coming from Great Britain now is a good time to buy some of the stuff you think you might need. Without worrying about future risks for custom issues and higher prices.

This week I received a small parcel from Severn Models containing two WD class P kits in 1/19 scale. I'm not exactly planning anything in the way of a military railway, but the wagons' light construction appealed to me. I guess Nystrup Gravel used them for light permanent way work, taking materials and tools to work sites along the track. 
Flat packed kits of the WD class P. Quite an advantage as my kits will go into storage for while.

Kit contents unpacked. Etched brass for under frame and strapping, cast parts for detailing in plastic bag, plastic card for wooden parts and Slater's wheels.

See details of the kit on Severn Model's web site, where the kit can also be purchased. I tend to buy kits once I discover them, as I have previously found that waiting too long can result in sold out kits or the company disappearing. Perhaps you should consider that too?

Wednesday 30 October 2019

Van With Danish Markings

Last year I purchased a lovely French Chenard & Walcker van. The van is a charming vehicle in a nice green colour. Unfortunately it was adorned with French markings. Besides the French license plates it was also fitted with what I suspect to be regional markins from the Seine region. On its sides the car producer's name was written with large letters. To be turned into a believable Danish van the markings had to go and new decals fitted.
Straight from the box onto a small garden table for photography.
After adding new markings, license plates and weathering.

Removing unwanted markings without ruining underlying paint is a challenge. In this case there just wasn't any alternative. I chose to test the effect of acetone on an area of paint on the car's underside. It took several applications of acetone and a good deal of rubbing with a swab before I managed to get just a tiny amount of green paint showing on the swab. So far so good: the green paint held up to the effects of acetone pretty well. My hope was that the markings had been printed with a different kind of paint easy to remove without affecting the main colour.

It turned out that the markings dissolved quite readily when treated with acetone. I started with the blue and white 'Seine' markings, progressed to the painted on rear lights and rear license plate. With those markings off, I had developed enough confidence to remove the large 'Chenard & Walcker' lettering on the van's sides. Rather than using swabs I used a piece of soft cloth dipped in acetone. Using swabs to remove the lettering would have taken ages and I was afraid that too many passes with acetone could eventually damage the green paint.
'Seine' in blue and white is destined for removal. The French license plate will be covered by a new Danish one.

The marking is slowly dissolved and wiped away with acetone and swab.

The marking is gone with no damage to the green paint.

I fitted the van with yellow license plates according to the regulations for commercial vehicles. I have previously had the complete license plate made as a decal, but I always had troubles matching the size of decal and homemade plastic card license plate. Now my decals have only letters and numbers. I paint the correct colour (black or yellow) directly on the plastic card license plate and then apply the decal. Having removed the painted on rear lights I fitted a new rear light over the rear license plate. Except from light and license plates no further parts were added.

The large decals for the van's sides slided easily off the backing paper after 30 seconds in water. With the van's gloss sides the decals were also easy to position correctly. After treatment with Mr. Hobby decal fluids I covered the decals with gloss varnish to protect them and blend them into the van's surface. I may need more practice working on large scale glossy vehicles as I'm not quite satisfied with the result...
Snapshot from the worktable. Decals fitted and blended in with gloss varnish. The lower parts of the van air brushd with matt varnish and road dirt colours.

The car's lower parts were air brushed with matt varnish and a thin application of road dirt colours. Small details were picked out and I continued the weathering into cab and cargo hold to enable some realistic scenes to be set up with open doors.
Weathering of cab floor in progress.

Although not completly happy with the varnishing of the large decals on the van's sides, I like the van. It's convincingly Danish looking, fitting the Nystrup Gravel period and theme and isn't overwhelmingly large. Below are som outdoor shots of the van.
The road dirt is primarily done with air brushed matt acrylics with a few spots made with a thin brush. A few oily spots added with oil paint.

The van belongs to 'Lützows Lyn-vaskeri' which in English is something like 'Lützow's lightning fast washing'. A company with a reference to one of my railway friends - always keen on having clean work clothes.

Rear view with license plate and rear light.

Both rear doors open. The inside floor is weathered as well.

Driver's door open. The cab floor got its share of weathering. Apart frm using paints I also used ground up pastel chalk and graphite powder to weather the van.


Friday 25 October 2019

Nystrup Gravel Track Plan

One of the blog's patient readers recently asked if I could provide a map of the Nystrup Gravel company's 600 mm line. I have through the years mentioned how the Nystrup Gravel line winded its way from pits to sorting facility and lorry ramp in Nystrup.  Now a sketch is finally available showing the railway's route. My sketch shows the gravel pits served by 600 mm. tracks with the lines converging east of the town.

The company 'Nystrup Grus A/S' was situated on the Danish island of Zealand, some 80 km. south west of Denmark’s capital Copenhagen. A short history of the company and its railway can be found here.


Legend:
1 Nystrup Gravel sorting facility and lorry loading ramp
2 Old gravel pit and original 600 mm line
3 Loco shed
4 Gravel pit opened 1909
5 Gravel pit 1932-1955
6 Gravel pit opened 1950

A Lille Ã… (Little Stream)
B Mellemåen (Medium Stream)
C Old machine gun positions (from the German WW2 airfield to the north)

Nystrup Gravel's Menck 60 excavator photographed in the pit marked '6' on the map above. The pit remained in service until Nystrup Gravel closed. The area was subsequently aqcuired by a UK based consortium Conglomerated Aggregates and quarried until completely exhausted.
Through the blog's existence I have now and then had the opportunity to find some of the places where the railway was once located. One spot was where the gravel line squeezed between buildings and fences in the small industrial district in the eastern part of Nystrup. A part of the line that I liked so well that I made a small module in 1:35 of the scene.

The road viaduct east of the loco shed. The viaduct carried the road from Nystrup to Ubehage and Dimholt. Here seen with loaded skips pushed by loco no 5.
I'm currently planning to model a small part of the company's Nystrup facility in 16 mm scale. Just a few tracks, two or three points, some buildings and perhaps the ramp for loading lorries. With clever use of relief buildings and fences I hope to be able to make a credible model in a large scale in a limited space.