Tuesday 16 April 2013

Modelling Without Deadlines (1/35)

These days last year I was very busy finishing a lot of modelling tasks. I was preparing for the big Gauge 1 exhibition outside Odense. My 'after action report' is still available on the blog. This year I can fortunately take a somewhat more relaxed attitude to modelling, having no deadline to meet. So all is moving forward in its usual slow pace at my workbench.

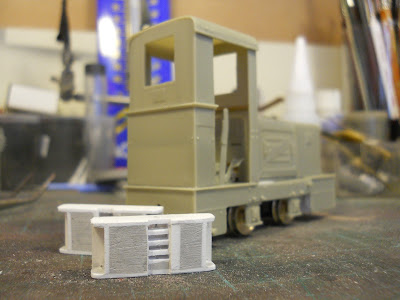
Having a deadline is on the other hand a powerful driver of progress. A deadline helps to bring focus and results usually follows. But really modelling is a hobby and I don't like to let 'real life management'-methods spill over into my modelling hobby. This April I am working primarily on my Jung loco. I have primed all parts of the loco and painted the frame red. Next up is getting a very dark green on the upper parts and fitting an ESU micro decoder. A heavier than usual weathering will finish the model.
Frame painted red and washed with heavily thinned burnt umber oil paint.
It will probably take at least a month to finish as I'm off on a business trip and having a big family event coming up - modelling is just a hobby, you know.


Friday 12 April 2013

All the Nystrup Skips

I have continuosly sought information about Nystrup Gravel's little railway and its locos and rolling stock. Recently I found a veritable tresure trove. A binder full of manuals, maintenance lists, greasing schedules and old marketing folders. I don't think it is the complete workshop archive as much material, that must have existed, isn't in the binder. It is my guess that the binder is a haphazardly gathered stack of paperwork put in an old binder in a hurry. Maybe in the last years of the company's existence during a clean up. At least the Dymo tape lettering on the old binder could point in that direction.

The binder with Dymo tape title. The binder itself was made by the Soennecken company - actually the inventor of this type of binder.
I haven't had the time to go through it all, but stumbled over a list of Nystrup Gravel's skips. The list is unfortunately damaged and thus incomplete. Nevertheless it is a great document and also contains some notes from both the director of the gravel company and its chief mechanic Thorleif Petersen.
 
The damaged list of Nystrup skips. Worth noting is the written debate over skip no. 12. The chief mechanic has written the skip off the list as defect. That note has been crossed over by director Holm demanding that the skip stay in operation. The document is marked with the company's office address at 'Lützowsvej'. Shed and sorting facilities were located on the southern edge of Nystrup and the gravelpits in the nearby woods.
Earlier I have found clippings from the local news paper. One article mentioned the company's two French locomotives. I will show more of what I found in the binder in the months to come.

Sunday 7 April 2013

Jung Assembly Done (1/35)

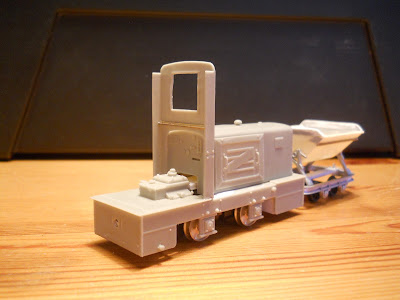
One of the benefits of resin casting is the (relative) ease of production that enables manufacturers to model obscure prototypes. Very fine parts and prototypically thin edges can be made with resin. But most resins are brittle and not particularly well suited to the handling and mechanical stress that is unavoidable on a model railway. I think the Jung kit was designed for military modellers and most likely not intended for motorization. For a static model the resin is durable enough. As I will use the model to pull real trains I braced the frame of the locomotive with heavy plastic strip. It remains to be seen if the model will stand up to the ‘wear and tear’ of daily operation.

The kit parts makes it possible to build a 600 or a 700 mm. version of the loco. As Nystrup Gravel is using 600 mm. gauge the 700 mm. parts accompanied the kit buffers I mentioned in the previous Jung-post to the spares box. Two types of bonnet sides are also provided. I fitted the ones with the large Z-shape impressed into them. And yet more parts for the spares box!

In this Jung fact sheet the ZL114 is fitted with side plates without the flashy 'Z'. I just couldn't miss the opportunity to have 'Z for Zorglub' on the side of a simple industrial locomotive. Readers of the Belgian comic 'Spirou et Fantasio' will know the villain Zorglub.

Cab front fitted. I did work on yet another Scale Link skip while building the Jung.
I added weight to the frame from scraps of brass. I struggled somewhat with a warped cab front, but managed to get it almost straight and glued in place. I will only glue the roof in place after having painted the interior of the cab. I decided not to fit the brake equipment as it would interfere with wires and easy handling of the Black Beetle. Sometimes you have to compromise.

My renditions of the Jung cast metal buffers. They are built from plastic card and Humbrol putty. Next they will receive more sanding and a layer of primer before being sanded again.

Buffers fitted. Still a little sanding to be done before I can prime and paint. I replaced the seat with my own made from plasticcard. The warped cab front could perhaps be used to underline the loco's hard working past?

Friday 5 April 2013

My Workbench (1/35)

Recently a reader of the blog asked how my workbench is arranged. Quite small and very simple is the short answer. In a recent issue of the internet magazine 'Model Railroad Hobbyist' one modeller took the readers for a impressive sightseeing through his perfectly laid out modelling workshop. Imagine, he had a whole room just for building models! The layout was housed in an other, much larger room.

My modelling is done on an area no larger than 100 x 150 cm. The image below was taken by leaning well back in my chair. So if anyone expected my workbench to be huge, well it isn't.
Cleaned up workbench. Building of the Roadcraft Bedford O-tipper in progress. To the left is a small vice (made in the USSR), a mini drill and airbrush (both German). To the right is two cardboard tubes with wood and metal profiles, an assortment of primer and clear varnish in spray cans. Brushes, glues, decal solutions and old film canisters used for mixing paint can be seen as well.
The worktable is actually built into one of the well known IKEA shelf modules called Ivar. As such I sit halfway into my storage of built and unbuilt models. Under the table I keep all my tools in a small plastic tool box next to my near-silent Italian air compressor. In the shelf to the left is a small stock of sheet plastic and profiles as well as prototype info on the models currently being built. The magnetic strip over the table is used for instructions during the building. On the wall behind me is my ever growing collection of books on industrial railways, railways in general, old lorries, construction equipment as well as the result of my own 'research' into Danish industrial railways. The 'cave' is accessed by squeezing past the house's 'stationary' laptop mostly used by me (all other computers and mobile devices in the house are very much mobile - but nevertheless always out of my reach!) and the small rolling cabinet that holds my paints and all parts 'electrical' - wires, switches etc.
Frontpage of the Danish Hobby Magazine, October 1967 showing a pipe enthusiast's workshop arranged in a closet. Looks cosy and notice the enthusiast is wearing shirt and tie while working! While my work area isn't that small, it shows that with imagination you can always find room for your hobby.
If nothing else I hope to prove, that modelling can be done even in very limited space - and that lack of room isn't a good excuse for not building models. Running trains may be difficult with limited space, but building trains can be done in a small closet.