Thursday 24 February 2022

Oil Cans and Tool Boxes

In January I installed a wooden fence next to the fuel shed and I speculated that the area between them would soon fill with used oil cans and scrap. Nothing has so far happened, but I have now aquired some petrol or oil canisters and a few of them are even painted and weathered.  

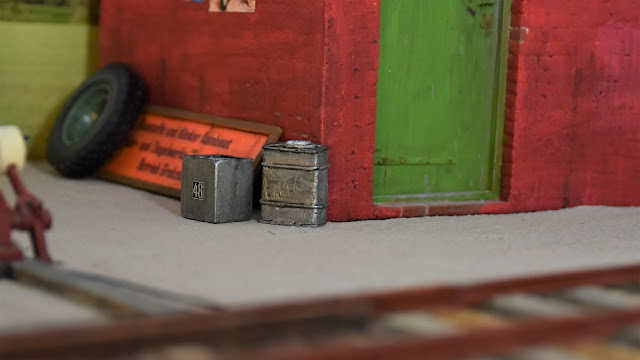
Two canisters placed in front of the brick shed. Along with other parts they are destined for permanent placement between shed and fence.

The canisters are resin items from the German manufacturer Imperial Modellbau that sells its products through eBay. Having not had the chance to handle any products from Imperial Modellbau before, I took the chance and ordered a small selection of items that caught my interest. Some of them needed for a Ford A lorry project, others for use later on the layout and a variety of vehicles.

A selection of items from Imperial Modellbau. The tool box is assembled from resin and white metal parts.

My complete order consisted of 9 bags with the following contents:

  • Ölkanister 5 pieces in resin
  • Kleine Ölkännchen 2 pieces in white metal
  • Schraubenschlüssel-Set 2 sprues in white metal
  • Ölkännchen für Werkstatt 1 large in white metal
  • Werkzeugkasten 1 open in resin
  • Ölkanister 2 pieces in resin
  • Ölkanne für Werkstatt 2 pieces in resin
  • Große Ölkanne 1 piece in white metal
  • Werkzeugkasten 1 piece with lid, resin and white metal


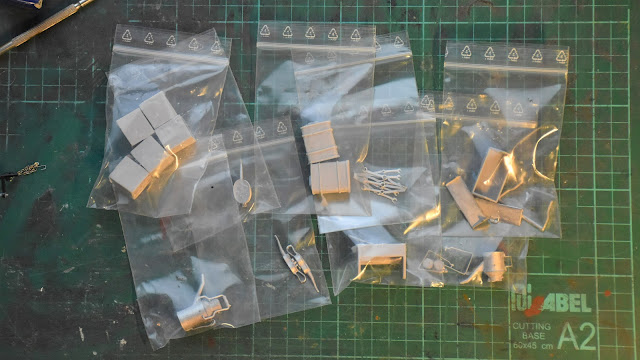
The bags are just out of the DVD cover.

The parts came in small zip lock plastic bags safely packed for transport in an old DVD cover. When examining the parts I noticed a clear difference between the resin and white metal items. The white metal castings are quite good with minimal mould lines and flash. The resin parts on the other hand are to a certain extent marred by holes from air bubbles and other casting flaws. I will no doubt have to work on the resin petrol canisters to make them better whereas the white metal parts basically just needs a coat of primer, paint and weathering.

Painted tool box with oil wash applied. More weathering of the box will follow. Is the box perhaps a bit on the large side?

Friday 18 February 2022

Finished Group of Photographers

My ambition of creating a small group of railway enthusiasts with cameras in 1/19 scale was accomplished when I placed the enthusiast dressed in a dark grey suit next to his mate (in more colourful clothing).

As a skip train is slowly pulled away from the sorting facility two visiting enthusiast try to capture the locomotive in the opposite end of the train.

How I prepared the well dressed enthusiast with box camera for painting was desribed in the previous post. When the primer was dry, it was a simple matter of painting the two part suit dark grey and apply a darkened base colour in the deepest folds of the suit. The shirt was painted white and the narrow tie picked out in black. Then the skin areas were painted and when dry given a wash of oil paint. Hair and the small moustache was picked out in medium grey. With hat painted dark brown and the shoes gloss black the enthusiast could take his place next to his mate. I added no weathering to the figure. I usually do that to figures of workers doing hard manual work. I imagine that two enthusiasts having arrived in a large Citroen Traction Avant all the way from Copenhagen would avoid puddles and leaning against oily equipment and generally be observant not to get their garments soiled.

I usually leave a finished figure (well, any model actually) to rest a few days before I accept it as finished. It allows the paints to fully harden and it gives me the chance to seek out small faults to be corrected.

As mentioned the enthusiast in suit is the Modelu figure 1607 'Photographer with Box Brownie'. Apart from some slight transport damage I only had to work on the line between trousers and shoes. Some work with files and sanding stick produced a clearer line between them. I don't know why this point is a weak spot on all the Modelu 3D-printed figures I have seen. No matter what the figure has a great pose and I'm glad Modelu has been providing a steady stream of nice figures for 16 mm scale during the last few years.

With no advanced optics or shutter speed settings in the simple box vamera, the driver of Nystrup Gravel locomotive no 3 is slowly rolling past the guest from Copenhagen to help produce the best possible image.

"Just one more picture" says the enthusiast before he reaches for his small notebook in the pocket to note date, motif and location. "I like to keep notes of exactly what I photograph, where and when" he casually shouts to the loco driver.

Sunday 6 February 2022

Railway Enthusiast Wearing Suit

Back in August a package with two railway enthusiasts arrived and I have already finished one figure that has seen action in the Nystrup yard. The remaining figure that I have now started working on is Modelu item 1607 'Photographer with Box Brownie'.

Leaning over his camera, the second railway enthusiast is being prepared for Nystrup Gravel.

The figure is wearing a classic two-piece suit, tie and hat. I decided to paint the suit in 'Black Grey' from Vallejo to make the figure a contrast to the far more colourful mate. The description of the figure mentioning a 'box brownie' almost certainly refers to the well known Kodak Brownie sold in huge numbers for low prices. Even in the large scale of 1/19 the box camera is looking pretty much like a lot of other contemporary and later box cameras like the Agfa Syncho Box that Nystrup Gravel chief mechanic Thorleif Petersen used for his railway photography.


German advertisment for the Agfa Box. So easy to use, a child can do it.


Upper right corner shows a 'noble gentleman's suit' of same cut as the railway enthusiast's. Page 28 from the winter catalogue, 1951 from 'Daells Varehus' in Nørregade, Copenhagen. The catalogue provided the backbone of the company's huge mail (old fashioned letters) order business.

A modern day reader may question if the early railway enthusiasts really were that well dressed when visiting motive power depots and other dirty railway locations. A lot of images from several countries confirms that and none better than photos of enthusiasts from the UK. They were some of the earliest to perform the hobby and seem to have had more film to spare than continental enthusiasts, even allowing them to photograph each other. Many images from the 1950's show men of all ages to be usually dressed in suit and tie when visiting and photographing railways.

Very well dressed members of the Railway Photographic Society, captured by founder Maurice Earley in 1937. Photo: National Railway Museum, York.

In a previous blog post I complained about the front of the camera being devoid of any detail. I added the lens and the two small windows for the viewfinders from small dics of plasticcard punched with my little punch and die set. When I inspected the figure before painting, I discovered that the jacket had some front damage that I repaired with putty and repeated sanding. That out of the way, I then worked on the line between shoes and trousers that have been a weak point on almost all my 1/19 scale Modelu figures. Besides minor sanding of chin, upper back and shoulders, the figure was then ready for a wash with how water. When dry it was primed and the first layer of dark grey brushed on.

The classic enthusiast in action with camera fitted with basic front detail. 

For the faithful reader that have kept up the hard work reading this post to the (almost) end, I have included what is often mentioned as the majority of 1950's Danish boys' first glimpse of a female in underwear: a lingerie page from that same 1951 catalogue. Definately suggestive!

Wednesday 2 February 2022

Planning and Designing

With my ambitions of creating a believable 1950's Danish industrial railway in 1/19 scale there isn't much available off the shelves. Almost everything needs to be converted, rebuilt or made from scratch. Naturally I spend a lot of time planning and designing. In periods I'm sketching and searching for solutions more than I'm actually modelling. 

Test printing designs for decals for a Ford AA and Land Rover. I test fonts and size using printing on ordinary white A4. Once I've decided on a design I finalize it and send it off for printing.

Currently I'm designing decals for two road vehicles and circuits for two locomotives - including researching possibilities for their control systems. With Brexit and the global supply of chips challenged that's no easy task. But for a seasoned modeller in odd scales and themes it's nothing unusual. For the tasks in hand I'm having good help from friends and suppliers from as diverse locations as Denmark, Australia, Germany and the UK.

While design and planning work isn't particularly good blogging content, it certainly is a part of railway modelling I really enjoy. Not least because of all the helpful people I get in contact with. Many thanks to them.