Wednesday 30 October 2019

Van With Danish Markings

Last year I purchased a lovely French Chenard & Walcker van. The van is a charming vehicle in a nice green colour. Unfortunately it was adorned with French markings. Besides the French license plates it was also fitted with what I suspect to be regional markins from the Seine region. On its sides the car producer's name was written with large letters. To be turned into a believable Danish van the markings had to go and new decals fitted.
Straight from the box onto a small garden table for photography.
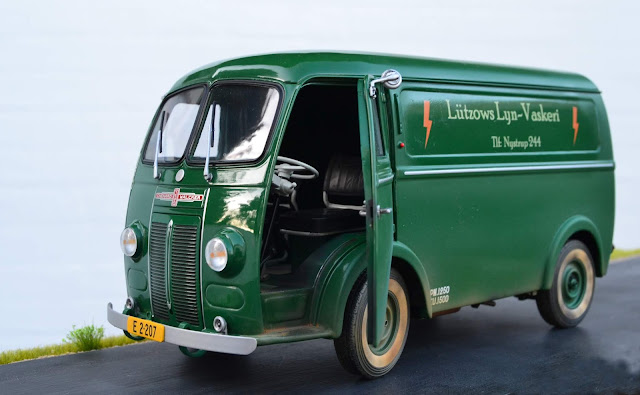
After adding new markings, license plates and weathering.

Removing unwanted markings without ruining underlying paint is a challenge. In this case there just wasn't any alternative. I chose to test the effect of acetone on an area of paint on the car's underside. It took several applications of acetone and a good deal of rubbing with a swab before I managed to get just a tiny amount of green paint showing on the swab. So far so good: the green paint held up to the effects of acetone pretty well. My hope was that the markings had been printed with a different kind of paint easy to remove without affecting the main colour.

It turned out that the markings dissolved quite readily when treated with acetone. I started with the blue and white 'Seine' markings, progressed to the painted on rear lights and rear license plate. With those markings off, I had developed enough confidence to remove the large 'Chenard & Walcker' lettering on the van's sides. Rather than using swabs I used a piece of soft cloth dipped in acetone. Using swabs to remove the lettering would have taken ages and I was afraid that too many passes with acetone could eventually damage the green paint.
'Seine' in blue and white is destined for removal. The French license plate will be covered by a new Danish one.

The marking is slowly dissolved and wiped away with acetone and swab.

The marking is gone with no damage to the green paint.

I fitted the van with yellow license plates according to the regulations for commercial vehicles. I have previously had the complete license plate made as a decal, but I always had troubles matching the size of decal and homemade plastic card license plate. Now my decals have only letters and numbers. I paint the correct colour (black or yellow) directly on the plastic card license plate and then apply the decal. Having removed the painted on rear lights I fitted a new rear light over the rear license plate. Except from light and license plates no further parts were added.

The large decals for the van's sides slided easily off the backing paper after 30 seconds in water. With the van's gloss sides the decals were also easy to position correctly. After treatment with Mr. Hobby decal fluids I covered the decals with gloss varnish to protect them and blend them into the van's surface. I may need more practice working on large scale glossy vehicles as I'm not quite satisfied with the result...
Snapshot from the worktable. Decals fitted and blended in with gloss varnish. The lower parts of the van air brushd with matt varnish and road dirt colours.

The car's lower parts were air brushed with matt varnish and a thin application of road dirt colours. Small details were picked out and I continued the weathering into cab and cargo hold to enable some realistic scenes to be set up with open doors.
Weathering of cab floor in progress.

Although not completly happy with the varnishing of the large decals on the van's sides, I like the van. It's convincingly Danish looking, fitting the Nystrup Gravel period and theme and isn't overwhelmingly large. Below are som outdoor shots of the van.
The road dirt is primarily done with air brushed matt acrylics with a few spots made with a thin brush. A few oily spots added with oil paint.

The van belongs to 'Lützows Lyn-vaskeri' which in English is something like 'Lützow's lightning fast washing'. A company with a reference to one of my railway friends - always keen on having clean work clothes.

Rear view with license plate and rear light.

Both rear doors open. The inside floor is weathered as well.

Driver's door open. The cab floor got its share of weathering. Apart frm using paints I also used ground up pastel chalk and graphite powder to weather the van.


Friday 25 October 2019

Nystrup Gravel Track Plan

One of the blog's patient readers recently asked if I could provide a map of the Nystrup Gravel company's 600 mm line. I have through the years mentioned how the Nystrup Gravel line winded its way from pits to sorting facility and lorry ramp in Nystrup.  Now a sketch is finally available showing the railway's route. My sketch shows the gravel pits served by 600 mm. tracks with the lines converging east of the town.

The company 'Nystrup Grus A/S' was situated on the Danish island of Zealand, some 80 km. south west of Denmark’s capital Copenhagen. A short history of the company and its railway can be found here.


Legend:
1 Nystrup Gravel sorting facility and lorry loading ramp
2 Old gravel pit and original 600 mm line
3 Loco shed
4 Gravel pit opened 1909
5 Gravel pit 1932-1955
6 Gravel pit opened 1950

A Lille Å (Little Stream)
B Mellemåen (Medium Stream)
C Old machine gun positions (from the German WW2 airfield to the north)

Nystrup Gravel's Menck 60 excavator photographed in the pit marked '6' on the map above. The pit remained in service until Nystrup Gravel closed. The area was subsequently aqcuired by a UK based consortium Conglomerated Aggregates and quarried until completely exhausted.
Through the blog's existence I have now and then had the opportunity to find some of the places where the railway was once located. One spot was where the gravel line squeezed between buildings and fences in the small industrial district in the eastern part of Nystrup. A part of the line that I liked so well that I made a small module in 1:35 of the scene.

The road viaduct east of the loco shed. The viaduct carried the road from Nystrup to Ubehage and Dimholt. Here seen with loaded skips pushed by loco no 5.
I'm currently planning to model a small part of the company's Nystrup facility in 16 mm scale. Just a few tracks, two or three points, some buildings and perhaps the ramp for loading lorries. With clever use of relief buildings and fences I hope to be able to make a credible model in a large scale in a limited space.

Sunday 20 October 2019

Brick Shed Building

After some sanding I had the four main pieces of the brick shed kit ready for assembly. I tack glued the pieces with AC glue to make sure everything lined up properly. When dry I built up a good glue seam from the inside with Araldite.
The front of the brick shed.

The kit is designed with a stone lintel over each door. An architetural element rarely seen on humble buildings in Denmark. I sanded the area smooth and fitted a line of bricks made from plastic card instead. As the mortar lines are rather thin I have chosen to build the shed as a rendered structure. I use Polyfilla filler to create the rendering. It's pre-mixed, easily applied with a coffee stirrer and can be sanded slightly to remove unwanted bits.
Rear side of brick shed with first polyfilla render smeared on. I will probably add another layer after a light sanding of the first layer.

Side of the building with rendering in progress. It's obvious that the corners need special attention.
I have made both floor and inner roof in foam board. It helps to reinforce the walls and keep the stucture square. The roof itself will be from foam board too, fitted with tar paper and fascia boards from wood.

Thursday 17 October 2019

29. Internationales Feldbahnertreffen

Four days of trainspotting, more than 100 locos in 600 mm gauge, a guided tour in an old flourspar mine, good German beer and solid oldfashioned food from very large pots. That was the ingredients in this year's Internationales Feldbahnertreffen at the 'Voller Rose' mining museum near Ilmenau in Germany.
Adjacent to the mining museum is a large private collection with a particular focus on O&K Montania locomotives. Truely a unique collection. For those who can't live without steam three visiting locos made the meeting bearable. 

Each year enthusiasts that keep alive narrow gauge railways – almost all of them with an industrial connection – meet for the ‘Feldbahnertreffen’. A gathering of mostly continental, German speaking enthusiasts keep each other updated with their latest challenges and accomplishments. Apart from the networking and exchange of tips and tricks, a lot of train riding on the host society’s railway is on the programme. I enjoy these meetings immensely. Not only as a volunteer on a narrow gauge railway but also as a railway modeller. There is always inspiration and ideas to be picked up on the meetings.
A one cylinder O&K Montania locomotive type RL 1c with two wooden bogie wagons running slowly through a sunny spot in the wood.

The yearly meetings are a great opportunity to meet fellow enthusiasts from around Europe. Here a group of French enthusiasts are photographed together on their WW1 US Army speeder.

The wooded area allowed some quite realistic timber railway images to be made.

A trip into the flourspar mine 'Voller Rose' was made with a two wagon train pulled by a battery electric loco. The the adit was narrow and the speed high. The sides of the adit was no more than 10 cm from my knees, so one had to better keep arms and legs tight to the body. An exiting ride and one wonders how, when there is no end to silly rules applying to a lot of things less risky, a ride like this is allowed. Germans are obviously sensible people. A volunteer driver and guide gave a short tour of the underground workings showing how the pneumatic tools of the trade worked.
A train with mine tourists exiting the adit. The loco is a typical DDR-product from Betrieb für Bergwerksausrüstungen, Aue type 360.

A view of the narrow adit leading into the mine. As the track is 600 mm gauge the narrowness of the adit is made quite clear.
There were no end to the trains running on the circular track stretching for 1,5 km in the woods and on the valley floor. Mine skips, ordinary skips, wooden bogie wagons, open coaches made up the trains while steam and motor locos were used for traction, many running solo or in pairs as the number of locos far outnumbered that of wagons. On the final day of the meeting a train with 50  Montania locos pulling one skip was planned. The locos were started and lined up for the event, but somehow the train never got off.
Part of the loco line up in preparation for the extraordinary train of 50 locos and one skip.
Next year's meeting will be in the Netherlands at the Stoomtrein Katwijk Leiden. More images from this year's meeting are available in my Flickr album ITF 2019.