Picking up where I left after having painted one timber bolster bogie from Rail Print with rust coloured paint, I continued detailing the remaining 3 bogies and giving them the same treatment with paint from a spray can with rust coloured paint with a slight texture. Now the proces has been finalized and all 4 bogies are painted and weathered.
 |
| Lister No 3 with finished bogies 79 and 72 loaded with a single log. |
For me painting is both a blessing and a curse. A curse because it involves a radical departure from the build phase and involves some substantial risks. Paint is put on in large volumes often covering the complete model. If something goes wrong the paint is often only removable with a lot of work and damage to details is often difficult to avoid. On the other hand painting is a blessing as it is a welcome shift to a more artistic part of modelling. I also love how the model evolves from a maze of different colours and materials to a uniform object beginning to look like the prototype.
 |
| Part of Nystrup Gravel's small fleet of timber bolster bogies still unpainted showing the different colours of the printed parts. The most obvious added parts are the footsteps and manufacturer's plates. Hand rails and tiny bolt heads aren't showing as clearly. |
Once the three remaining bogies had the last detail glued on I gave them a layer of rust colour straight from the rattle can from Belton. A standard 400 ml spray can managed to cover 4 timber bolster bogies - a testament to how large 1/19 scale vehicles are. I then added a random number of spots in varying rust tones around the bogies. The bogies were then airbrushed with Vallejo chipping fluid before I added the covering colour. The chipping fluid didn't airbrush well and went on in layers of varying quality. If I did something wrong in thinning it or if the fluid had gone too old I don't know. Before I began painting all wheel treads were protected with Tamyia masking tape cut in appropriate width.
 |
| Four bogies painted with 'Rosteffekt' from Belton posed for a snapshot on the layout before further painting. |
I then added a mix of black and different dark grey colours to the bogies. I tried to avoid covering everything with black or grey pain, leaving some random rust coloured spots to show. That is first stage in representing bogies with flaked and worn paint. Second stage in that proces is wetting the covering paint with tap water and rubbing selected areas with a combination of toothpicks and a stiff brush. This makes the cover paint loose grip on the chipping medium below, causing it to chip away. Quite a clever way of producing rusted vehicles. I have tried the method before on some of my steel skips. I think the results are better this time due to the textured paint.
 |
First couple of timber bogies (74 (closest) and 76) with dark grey paint and a thin twig from the garden. 1/19 scale takes serious twigs to produce a credible looking load!
|
 |
| Close up of chipped paint made with Vallejo chipping fluid. The textured rust paint is clearly recognisable. |
 |
| Hand painting numbers. Best done completely relaxed and with the family out of the house. I did my numbers in 10 minutes between two appointments. |
With the cover layer of dark greys and black applied I continued using brush painting for adding spots of different tones of greys and continued chipping to show more of the rust colours under the cover paint. I also handpainted numbers on the bogies' outer ends on the right side of the buffers with white paint and painted the wooden platforms on the brake bogies with a mix of acrylic colours. When the final chipping had been done, I added a layer of matt varnish to seal the result and applied some weathering with a wash of heavily diluted black oil paint and some rust streaking with burnt sienna oil paint. Worn metal on hand rails, footsteps, buffers and bolsters were done with a soft pencil and graphite powder. Graphite powder was also used to grease the bolster unit and the mating surfaces on the bogie to achieve a minimum of resistance in operation.
 |
| All four timber bolster bogies finished and photographed in the garden. From left to right bogie 76, 74, 79 and 72. All built and painted with little differences to set them apart from each other. |
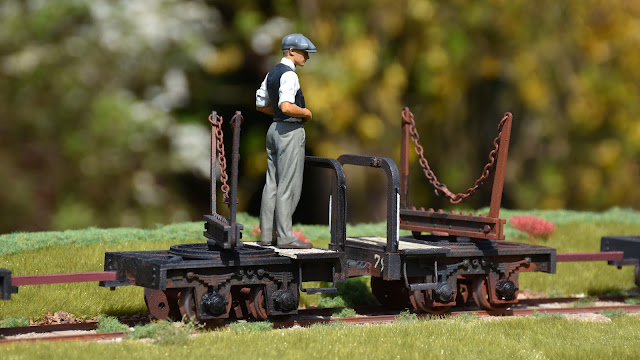 |
| Braked bogies are usually positioned next to each other to allow the brake man to operate brakes on two bogies. Nystrup Gravel removed the brake system on their bogies, but the habit obviously lived on. |
For those wondering how the Vallejo chipping fluid worked I'm glad to report that the initial troubles had no influence on the chipping. In combination with the textured spray paint I think the chipping has produced some nice surface detail.
 |
| Close up of bogie 79 with a heavily rusted top. The textured paint show up well in most placec and the combined effect of chipping fluid and spot painting shows as well. Unfortunately some printing lines are also visible. I guess it's just me doing 3D print modelling - I never fail to loose patience when sanding. |
 |
| One last shot of loco 3 with a set of new bogies on its way from the gravel pits to Nystrup. |
I label the bogies finished, but they still need coupling chains, new coupling rods to replace the 3D printed ones and a few logs for a load.


