Showing posts with label figures. Show all posts

Friday, 27 December 2024

Fowler Driver Finished

Relaxed modelling over the Christmas holidays has produced a finished figure of the driver in the Fowler locomotive. As usual it is a Modelu figure adapted to its role and position on my Nystrup Gravel layout.

You only see the back of the driver. But he is there and he will stay in the cab, even during a derailment.

In the previous post I had begun adding material to the back side of the figure. I converted the figure to fit on the edge of the lower part of the rear wall in the cab. I added enough 'Green Putty' to create an overhang of the figure's jacket and a narrow 'channel' to fit over the cab's edge. This allows me to carefully remove the figure while it will still be held in place during most operating situations. Once the general shape was obtained I added putty to even out the surface and sanded everything smooth. It takes several stages of sanding and putty and a decent amount of patience. 

Rear view of driver test fitted in the cab. The green is added material from 'Green Putty' to the original Modelu figure.

After priming with 'Chaos Black' painting is now in progress.

When I was satisfied with the figure it was washed with hot water and a soft brush. After drying overnight it was primed with my favourite primer 'Chaos Black' from Citadel. For the layers of covering paint I used Vallejo acrylics.  The jacket was painted first in 70940 'Saddle Brown' then the shirt was painted white (70951) the sweater 70837 'Pale Sand'. I then painted the skin areas and shadows in the clothings' folds were accentuated with a darker tones of the colour as appropriate. Once the upper parts of the figure were painted I painted the trousers 900 'French Blue' and the shoes a dark grey. I didn't spent a lot of time on detail painting and facial detail as the figure isn't particularly visible in the cab. Once finished I air brushed a layer of matt varnish over the figure to protect the paint and give the clothing a flat look. Skin areas were given a thin wash of oil paint. 

The finished figure in the cab. Notice the tight fit on the rear wall and wooden blocks for use in case of derailments.

Here the driver is out of the cab for a brief moment to show off in all his glory.

The brake coloumn was finished alongside the figure and I also got it primed and painted. The testing of different shapes of wood for the wooden blocks to be used in case of derailment was worth the trouble. I decided on quite different shapes and sizes than I had originally planned. The blocks were sanded and dyed with light grey wood dye.

The driver is partly visible through the front cab windows. At least as long as there is no glazing.

After the driver figure next up is more interior details like sand boxes, panel with gauges and switches as well as the necessary levers. 

Saturday, 21 December 2024

Fowler Driver Figure and Brake Column

With the Christmas holidays just started after the last tasks were done on the job, I jumped directly to the worktable, cleared away the worst mess and began working on the driver figure for the Fowler and continuing work on the brake column. Christmas will be the time for cab interior on the Fowler!

Brake column needing only final sanding and cleaning before it can be primed and painted. The wooden blocks are test pieces to check what sizes and numbers of jack blocks can be fitted under the cab floor.

The brake column is a simple thing glued together from plastic tubes of different diameters set onto an (almost) eliptical mounting plate and fitted with bolt head imitations of sliced hexagonal plastic profiles. Not entirely prototypically, but good enough for its future hard to see location in the cab. 

Quite fast I decided that the driver on the Fowler locomotive had to be the standing figure in Modelu loco driver pack 11219.  The figure arrived in May among a batch of stuff from Modelu. The figure is almost a perfect fit leaning against the low rear wall in the cab. Initially I have adjusted the figure's height by trimming shoes and cap with knife and sanding sticks. Not much work but the pose improved and taking a milimeter or two of the figure's height also makes it easier to get it in or out the cab once its filled with levers etc.

First stage of 'building up a butt' on the driver figure. The in-progress brake column is just visible in the cab.

The most time consuming work on the figure was adding material to the back side of the figure. As the figure is designed to sit on a flat surface and I'm having my example sit on an edge I was in for some plastic surgery of adding 'tissue'. I used 'Green Putty' from Green Stuff World building it up in layers. I'm working on a good fit between figure and loco, to make the figure removable and yet being able to keep its position while traversing bad track (as all track is at Nystrup Gravel). Currently I'm adding the last layers of 'Green Putty' and smoothing out the surface before sanding begins.

When the figure arrived in May he was photographed leaning against the Fowler loco. After being 'tailored' to fit in the cab he will probably seldom be seen outside. Too bad actually, as it is a lovely scale figure.

With a good start on the holidays modelling wise, I look forward to some time at modelling table. It needs a more thorough cleaning. After working with vegetation and ground cover it is covered in fibres and gravel. Having started on the figure and cab interior I've an urge to finish as much as possible during all the other Christmas activities. 

A few printouts from the article kept safe in plastic chartecues in my 1/19 modelling binder. Easy to see I'm a modeller from the previous millennium!

Besides prototype photos the article by Bill Strickland in the November 1980 issue of 'Merioneth Mercury' is a good guideline for my work on the locomotive. I think it shows how good quality magazine articles are a lasting ressource in modelling. Don't throw away that kind of treasures!

Friday, 31 May 2024

More Modelu Figures

In early May I received new Modelu figures to test as drivers in Nystrup Gravel's Fowler diesel. A lot more was in the package and I also mentioned the figures being sorrounded by supporting web of thin posts. They help the figure to remain firmly supported during printing and initial curing. Here is a closer look of how Modelu figures are looking before the supports are removed.

The two additional figures from the Modelu double figure sets 11208 and 11219 figures and a fox from set 31101. The maze of support sprues are evident. Unfortunately the right figure's right thumb seems to have suffered a fracture not even the supports could avoid.

The supports are easy to remove and shouldn't keep anyone away from investiong in one or several of Modelu's excellent large scale figures. I would count the Modelu figures as one of the most influential additions to 1/19 scale railway modelling. Modelu's figures are light years better than the usual caricature garden railway figures. They may be good enough in the garden, but on a small indoor layout like mine... never!

Apart from the loco crew I had the following sets added to the package:

0134 'Man with spade'

0148 'Man Kneeling'

31101 'Foxes'

'Man with spade' will be a good representation of track worker having been at work tamping a few sleepers with the spade. 'Man kneeling' could be representing a mechanic tending to a problem on a loco with a few tools laid on a piece of old cloth beside him.

Apart from the selected loco driver and a single fox the rest of the figures go back in a cardboard box for storage. I have plenty of other projects.

Friday, 10 May 2024

New Figures

Risk of overstaffing at Nystrup Gravel? It could be the case with the latest delivery from the busy 3D printing maternity clinic in Bristol, also known as Modelu. 6 new employees were included in the package. The figures were accompanied by two foxes to add a little life to the area behind the loading ramp. 

One of the new figures resting againgst the footplate of the Fowler (with added detail parts yet unpainted). Small remnants of the 3D printings supports can still be seen here and there on the figure.

As with earlier purchases from Modelu I've not planned getting all figures ready for service at once. The most pressing need is to get a driver figure for the Fowler locomotive. The idea is to select one or two figures from the two crew packs to be converted to a Fowler driver. I'll probably have to do minor surgery and a little sculpting as I did a lot when I modelled in 1:35 scale.

Modelu crew pack 11208 for the small England engine. Photo: Modelu

Modelu crew pack 11219 for quarry Hunslet engine. Photo: Modelu.

After a switft production time of one week and a one week postal and customs trip to Denmark I couldn't wait to open the package. Safely wrapped in several layers of bubble wrap inside a solid cardboard box the figures waited for me to examine them and test fit them in the Fowler cab. I had a surprise waiting for me. My earlier deliveries from Modelu have been of figures with the 3D printing supports removed. Now the figures are supplied with the complete support structure of a web of thin posts. They help the figure to remain firmly supported during printing and initial curing. The removal of the support posts isn't a difficult task. Only a sharp knife, a side cutter and some time is needed. What surprised me the most is the new level of detail. My 1/19 scale figures from Modelu has been adequate in detail, but I have often been disappointed by weak facial detail, soft and missing detail in clothing and bad demarcation from eg. trousers to shoes. Most of those objections are now gone. I'll be going into detail when I start working on one of the new figures. And by the way: the price has gone down as well!

The right figure from pack 11219 resting his back side on the low rear wall in the Fowler cab. To call him a perfect fit isn't quite true, but it's a close call.

Here the figure is seen from the side.

The left figure from pack 11208 was my second bet on a possible driver figure for the Fowler. He looks good too, but needs something the rest his right arm on. 

Peeking out from the cab. 

I'm quite confident that I now have a decent driver for the Fowler. Adding a little material to the back side of the figure from pack 11219 and adjusting the height (trimming shoes and cap) will obtain a near perfect fit in the cab. And the figure will even be removable and at the same being able to keep its position while traversing bad track (as all track is at Nystrup Gravel).

As for the rest of the figures pictures will have to wait. It's Spring and I'm too busy with the 1:1 scale vintage railway, maintenance of two wooden houses and real work. But one of the Modelu foxes sneaked out and was photographed near the lorry loading ramp.

A Modelu fox in 3D print has crossed the meadow covered by static grass from the photographic rendition of a wood where it usually lives. 


Sunday, 14 April 2024

Boxing People for Safekeeping

The small population of my Nystrup Gravel layout have been kept in storage on the layout and on shelves. That is not a sound long term solution. The figures represent no small investment in modelling time and money so they should be treated with no less respect than locos, rolling stock and cars.

Photographing in the Nystrup Gravel yard. My figures have to have some time off from the layout. But where to put them? I have now solved the problem.

Wanting to fix the problem fast, I didn't bother looking for a fancy wooden box, but found a cardboard box with generous size for my current and well into the future needs for storing 1/19 scale figures. I may upgrade to a wooden box if I stumble over a good sized box. For now the figures are much safer in the cardboard box than before. When I modelled in 1/35 scale I went to great lengths making tailor made wooden boxes for locos and wagons. I haven't quite reached the same level in 1/19 scale.

Cardboard box measuring 26 x 24 cm and 7 cm in height.

Bubble wrap lining inside the box with my figures added. Nystrup Gravel's population is all male.

Soft foam scrap pieces keeps the figures tightly in place when the lid is closed.

'People' written on the lid in stencilled cyrillic letters - just because I can.

The brown paper wrapper for my plastic cyrillic stencils bought in Leningrad, USSR, 1987. 

With about 30 minutes of design and work I now have a simple safe storage box for my figures. No more worries about scratched paint, broken off limbs or other damages. Safely tucked away in the box until picked out when their services are needed.

Friday, 18 February 2022

Finished Group of Photographers

My ambition of creating a small group of railway enthusiasts with cameras in 1/19 scale was accomplished when I placed the enthusiast dressed in a dark grey suit next to his mate (in more colourful clothing).

As a skip train is slowly pulled away from the sorting facility two visiting enthusiast try to capture the locomotive in the opposite end of the train.

How I prepared the well dressed enthusiast with box camera for painting was desribed in the previous post. When the primer was dry, it was a simple matter of painting the two part suit dark grey and apply a darkened base colour in the deepest folds of the suit. The shirt was painted white and the narrow tie picked out in black. Then the skin areas were painted and when dry given a wash of oil paint. Hair and the small moustache was picked out in medium grey. With hat painted dark brown and the shoes gloss black the enthusiast could take his place next to his mate. I added no weathering to the figure. I usually do that to figures of workers doing hard manual work. I imagine that two enthusiasts having arrived in a large Citroen Traction Avant all the way from Copenhagen would avoid puddles and leaning against oily equipment and generally be observant not to get their garments soiled.

I usually leave a finished figure (well, any model actually) to rest a few days before I accept it as finished. It allows the paints to fully harden and it gives me the chance to seek out small faults to be corrected.

As mentioned the enthusiast in suit is the Modelu figure 1607 'Photographer with Box Brownie'. Apart from some slight transport damage I only had to work on the line between trousers and shoes. Some work with files and sanding stick produced a clearer line between them. I don't know why this point is a weak spot on all the Modelu 3D-printed figures I have seen. No matter what the figure has a great pose and I'm glad Modelu has been providing a steady stream of nice figures for 16 mm scale during the last few years.

With no advanced optics or shutter speed settings in the simple box vamera, the driver of Nystrup Gravel locomotive no 3 is slowly rolling past the guest from Copenhagen to help produce the best possible image.

"Just one more picture" says the enthusiast before he reaches for his small notebook in the pocket to note date, motif and location. "I like to keep notes of exactly what I photograph, where and when" he casually shouts to the loco driver.

Sunday, 6 February 2022

Railway Enthusiast Wearing Suit

Back in August a package with two railway enthusiasts arrived and I have already finished one figure that has seen action in the Nystrup yard. The remaining figure that I have now started working on is Modelu item 1607 'Photographer with Box Brownie'.

Leaning over his camera, the second railway enthusiast is being prepared for Nystrup Gravel.

The figure is wearing a classic two-piece suit, tie and hat. I decided to paint the suit in 'Black Grey' from Vallejo to make the figure a contrast to the far more colourful mate. The description of the figure mentioning a 'box brownie' almost certainly refers to the well known Kodak Brownie sold in huge numbers for low prices. Even in the large scale of 1/19 the box camera is looking pretty much like a lot of other contemporary and later box cameras like the Agfa Syncho Box that Nystrup Gravel chief mechanic Thorleif Petersen used for his railway photography.


German advertisment for the Agfa Box. So easy to use, a child can do it.


Upper right corner shows a 'noble gentleman's suit' of same cut as the railway enthusiast's. Page 28 from the winter catalogue, 1951 from 'Daells Varehus' in Nørregade, Copenhagen. The catalogue provided the backbone of the company's huge mail (old fashioned letters) order business.

A modern day reader may question if the early railway enthusiasts really were that well dressed when visiting motive power depots and other dirty railway locations. A lot of images from several countries confirms that and none better than photos of enthusiasts from the UK. They were some of the earliest to perform the hobby and seem to have had more film to spare than continental enthusiasts, even allowing them to photograph each other. Many images from the 1950's show men of all ages to be usually dressed in suit and tie when visiting and photographing railways.

Very well dressed members of the Railway Photographic Society, captured by founder Maurice Earley in 1937. Photo: National Railway Museum, York.

In a previous blog post I complained about the front of the camera being devoid of any detail. I added the lens and the two small windows for the viewfinders from small dics of plasticcard punched with my little punch and die set. When I inspected the figure before painting, I discovered that the jacket had some front damage that I repaired with putty and repeated sanding. That out of the way, I then worked on the line between shoes and trousers that have been a weak point on almost all my 1/19 scale Modelu figures. Besides minor sanding of chin, upper back and shoulders, the figure was then ready for a wash with how water. When dry it was primed and the first layer of dark grey brushed on.

The classic enthusiast in action with camera fitted with basic front detail. 

For the faithful reader that have kept up the hard work reading this post to the (almost) end, I have included what is often mentioned as the majority of 1950's Danish boys' first glimpse of a female in underwear: a lingerie page from that same 1951 catalogue. Definately suggestive!

Wednesday, 29 December 2021

Pioneering Railway Enthusiast Visiting Nystrup

The many photographs of Nystrup Gravel that can't be traced back to the chief mechanic Thorleif Petersen are from two major sources. Local newspapers visited the gravel works regularly due to the company's modern PR strategy of open dialogue and transparency. In addition some of the early pioneers among Danish railway enthusiasts fortunately picked the line for repeated visits, despite the fact that industrial lines weren't high on the agenda for most enthusiasts. A couple of days ago I began the work on this particular enthusiast and he is now ready to see line side service.

My interpretation of an energetic early 1950's industrial railway enthusiast based on a Modelu 3D-printed figure in 1/19 scale. This shot reminds me that I have a most pressing task of getting some of my background photographs fitted to foamboard panels and placed up against the wall.

Contrary to the rather drab workers and mechanics employed by Nystrup Gravel the visiting enthusiast is in colourful clothes and recently shined shoes. He certainly isn't dressed in the practical outdoor clothing like some of today's enthusiasts on field work. That he is in fact relaxing, enjoying his hobby, is nevertheless clearly seen as he isn't wearing a tie and has most informally unbuttoned his shirt's top button. Unusually he isn't wearing a hat either.

Keeping his Leica IIf steady and waiting for the right moment to press the shutter release button.

After priming the figure with 'Chaos Black' I painted it with Vallejo acrylic paints. As usual I have tried to work with matt, satin and gloss paints and varnish to give an impression of the different surfaces on the figure. Matt for clothing, satin for skin and gloss for camera and the shiny brown shoes.

An accompanying enthusiast has sacrified a piece of valuable film for an image of his fellow photographer at the loading ramp in Nystrup. The photo is from the collection of Thorleif Petersen. Perhaps I will one day be able to identify the enthusiast?

Saturday, 25 December 2021

Railway Enthusiast With Camera

Continuing the covid-19 modelling frenzy with a new figure after the recently finished Nystrup Gravel worker with oil can, I picked up one of the railway enthusiasts with cameras from Modelu. I chose the figure 1673 'Photographer with Leica Mk 2' as it is an immensely charming figure with several 'nerdy' features that are stereotypically attributed to 'train spotters'; pullover, shirt and unkempt hair as well as an expensive camera out of reach for the average citizen in the 1950's Denmark. 

Unpainted railway enthusiast photographing Nystrup Gravel's locomotive no. 3 in the yard at Nystrup.

The figure from Modelu is one of the best that I have laid eyes and hands on so far. The details and features of the 3D-printed figure are fine and as the Leica is obscuring most of the face, the usual soft facial detail isn't a problem. I only had to sand a few problematic spots (probably 'sprue' from the printing proces) and repair the camera strap that had broken in two places. I repaired the strap with Micro Kristal Klear that readily produces short a 'string' from one attachment point to another when applied with a wooden toothpick. When the Kristal Klear had dried the 'strings' were reinforced with AC-glue. I also discovered a few annoying depressions on top of the figure's head. Probably they are effects from the printing, too. They were filled with modelling putty and worked with a scalpel blade to resemble the surrounding hair. After a wash in hot water the figure is now ready for priming.

"Hold the position, please"
Apart from modelling and careful visits to other areas of the house to say hello to the rest of the family I had a nice walk in the lovely cold weather. Near my house some new hills have recently been made from surplus earth from the new Greater Copenhagen Light Rail (a project I participated in winning as tender coordinator). The hills give a good vantage point for watching trains on the main line between Copenhagen and Roskilde.

An ET 4-unit from operator DSB in the sparse snow seen from the newly established 'Hyldager Bakker'.

Friday, 24 December 2021

New Modelu Figure in Service

Favourable economic development in the construction business has enabled an expansion of the Nystrup Gravel workforce. In fact the recruitment of the new worker took place some time ago, but 'onboarding' has taken time. The figure is Modelu item no 1001 'Fitter'.

First image of the new figure released. As usual for a Modelu figure the pose is outstanding.

The figure exhibited some of the worst detail I've yet seen on a Modelu figure. The figure's left upper body was one soft, bulging area with no clear demarcation of overalls and shirt. Both arms were also connected to the body much farther down the body where they (in my view, at least) in a scale as large as 16 mm should be separated. While I have done minor work on my previous 3 Modelu figures, the amount of work on this one was more comprehensive. 

Freshly out of the parcel from the United Kingdom shortly before Brexit. 2 Modelu figures with the usual faults - and the well known qualities.

Front view of the worker showing a particularly problematic area of detail on the figure's left upper body.

The figure's back side isn't without issues as well.

On this figure it wasn't enough to work the usually weakly defined line between shoes and trousers with files, sandpaper and a sharp scalpel. The soft detail on this figure demanded deployment of heavier machinery to additional areas: my dremel was used to remove the most annoying material, a saw blade in the scalpel handle helped separate arms and body. The scalpel, file and sand paper were used to remodel the folds and major lines in the clothing. I also added a small etched brass chain to the oil can as often seen on prototype cans. The chain made sure the lid (when screwed off) was kept attached to the can itself. 

The figure on the work table having details enhanced with a selection of tools.

 
During sanding I decided to add some 3-dimensional detail with copper foil and wire as well as buttons punched from plasticcard.

When I had finished the remedial work on the figure it was washed with hot water and a soft brush. After drying overnight it was then primed with my favourite primer 'Chaos Black' from Citadel. For the layers of covering paint I used Vallejo acrylics. The overalls is in home mixed light bluegrey (based on Vallejo Pastel Blue 901) with shadows and highlights accentuated with darker and lighter tones as appropriate. The shirt is 'Pale Sand' 70837.

Painting in progress. The main colours are on and the skin areas next to the shirt are marked in. Next are skin and face as well as shadows and highlights.

Halfway through the painting process I made a swift movement at the workbench and the figure attached to a pin vice fell to the floor. The result was a broken off right leg and oil can. Of course the setback was annoying, but you have to expect a mishap now and then. The leg was reattached with gap filling AC-glue, the seams carefully sanded down and the paint damage repared.

Major mishap! Having rescued all parts from the wooden floor I wondered if a soft carpet wouldn't have been better. On the other hand with no carpet I usually find every item I loose during modelling.

Detail painting commenced with shoes being painted 'Black Grey' 70.862 and the oil can 'Gun Metal'. As the can had broken away from the figure in the fall to the floor, I kept it separate during painting and weathering. Skin areas were done with 'Flesh Base' 341 with differing layers of diluted oil paint. I made a miserable effort at painting eyes. Not a result I'm proud of, but an outcome I can accept. I attached the oil can with AC-glue and then fixed my worst painting faults before giving the figure a spray with clear matt acrylic varnish. I then gave all skin areas a final wash with heavily diluted rust coloured oil paint. This gives the skin a slightly glossy appearance creating a nice contrast to the matt clothing.

 
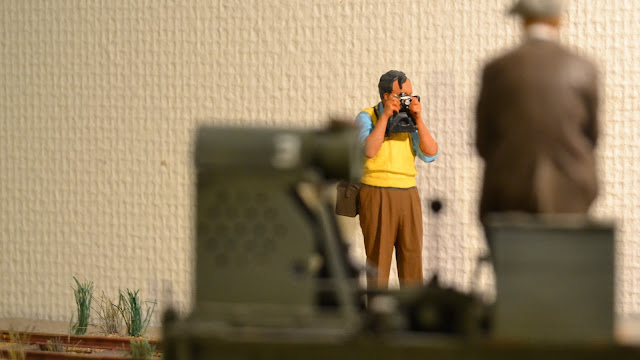
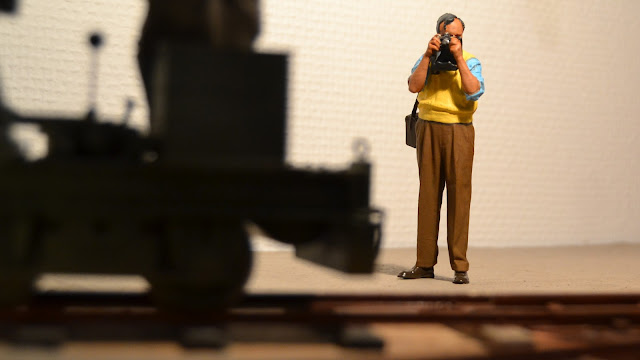
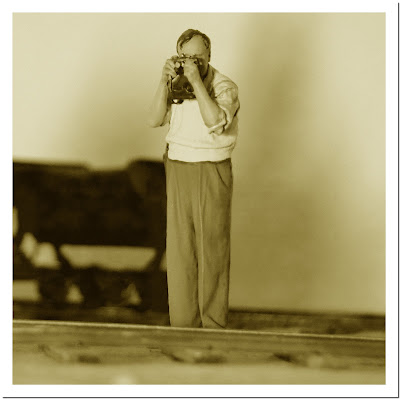
Having just left the oil depot with a filled can, one of Nystrup Gravel's workers checks for passing trains before he proceeds any further.

With full focus on the figure some of its faults shows quite clearly. Once placed in a setting with other items I'm sure the figure will help to create a good, overall impression.

Having been notified here on 24. December that my last pcr-test was 'positive' for covid-19 I'm currently in self isolation in my modelling room, while my family is preparing Christmas dinner and busy gift wrapping. I have no symptoms of the virus having been vaccinated 3 times. I hope to stay asymptomatic and look forward to join the hustle and bustle again in about a week. Merry Christmas!