Monday 27 June 2022

Fowler Arriving at Nystrup

The early narrow gauge diesel locomotives by John Fowler of Leeds have always fascinated me. Back when I modelled in 1:35 scale I was proud to have a Fowler diesel loco for pulling heavy trains from the gravel pits. Having changed scale and sold the loco I have been missing having a Fowler in the house. Now I have a Fowler locomotive on the layout again! 

Having just arrived from the United Kingdom the new locomotive is getting a lot of attention from the employees at Nystrup Gravel.

The loco is a Fowler F 30 in 1/19 scale built by Essel Engineering in Llanidloes, Wales. I ordered the loco in mid 2020 and while the delivery date has probably been challenged by both Covid-19, Brexit and I don't know what, I have had no problems with the production time. This is a working hand built model locomotive constructed from the wheels up with minimal use of prefinished parts. Basically a craftsman's work. It's bound to take some time. On the other hand shipping and customs took only 2 weeks which is the fastest time from the United Kingdom to Denmark I have experienced since Brexit.

The new Fowler has pushed four skips up the loading ramp. A useful locomotive!

While I enjoy building models, I haven't all the time in the world to build nor the talent for every task. Considering how much needs to be scratch or kit built in 1:19 scale it's a luxury to be able to get a loco that is ready to run directly from the box. And yes, Nystrup Gravel is an utterly loss producing activity with not much money to spare. Fortunately the supporting structure behind the company isn't doing too bad financially.

A charming train of skips pulled by a good looking locomotive.

The locomotive is dimensionally a good match to the pictures available, and although I have no drawings to match the model's accuracy I feel it works out as a decent model of a Fowler F 30. The level of detail is mixed. Rivets on cab sides are clearly marked and well made. The prominent rivet and bolt detail on the loco's frame is missing as is most of the raised detail on the bonnet and gearbox cover. On the bonnet's top is 3 filler caps made from unpainted turned brass. The exhaust pipe is used for controlling the loco's speed. By turning it you decide if the loco is going faster or slower along the track.

A major detraction from the model's good looks is the huge battery box protuding into the cab. Add two toggle switches and a charging socket and we're hardly talking fine scale narrow gauge anymore.

Viewed from behind through the open rear plate, switches and socket are in full view.

The loco weighs 1650 g and is powered by an electric motor fed by a substantial battery pack. The motor drives the rear axle via bevel gears. The solid coupling rods takes power to the front axle and the final drive axle. The loco was delivered with a battery charger, although fitted with a UK pattern mains socket.

The Fowler was Nystrup Gravel's most powerful locomotive for many years. Yet the engine looks quite small in this view from the eastern end of the yard.

I have only test run the loco on manual control battery power as delivered. It runs smoothly and the speed control via the exhaust pipe is easier and more responsive than I imagined. I consider the investment in the loco a succes that will serve Nystrup Gravel faithfully for a long time. In the coming months I will be adding a little detail to the model, instal working lights and fitting RC. I also hope to change the battery pack to something that will fit in a more realistic cab setting. Over time I will also fit some of the modifications done by Nystrup Gravel. Numbering will of course also be added according to Nystrup Gravel practise.

Obviously the news of the arrival of a new locomotive spread to railway enthusiasts. Here is one taking a picture of the Fowler. The sun is shining so there's light enough for the simple optic in the enthusiast's box camera. 


Friday 24 June 2022

Test Building

For regular readers with a good memory it's no secret that I plan to fit a small relief building in a corner of my 16 mm scale layout. The building is planned to serve several purposes. First it represents part (a very small part, I know) of the Nystrup Gravel sorting and gravel handling facilities. Second it helps hide the corner and provide an illusion of the track continuing beyond the layout's edge. Third it adds an important vertical aspect to the layout, something a future backscene will also contribute to. 

Cardboard mock up of the building set up for evaluating size, roof slope and the dimensions of the opening for trains. The current opening will accept my Lister and future Pedershaab locomotives, but will have to be signficantly enlarged to accomodate the Fowler and Baguley-Drewry.  

The prototype Nystrup Gravel company had a number of buildings in the usual cheap industrial designs of the early to mid 20. century. When the times were good and the future looked prosperous, the company dared to invest in brick buildings. Consequently most buildings were wooden constructions on low concrete foundations.

Buildings housing crushing and sorting equipment at the Smedeby gravel industry in the early 20. century. In my eyes a very charming little facility with great modelling appeal even in the larger scales. Photo: Bov Lokalarkiv B6585

Through the years I have visited many industrial facilities and picked up inspiration for modelling. In fact exploration of old industrial facilities have long been a favourite hobby of mine in addition to railways, construction equipment, tractors and military technology etc. 

I explored the old and disused Holbæk shipyard in 2010 and was glad to see a wide range of wooden buildings. Some of the buildings have now been restored and put to new use, but have of course lost the derelict charm.

For the moment I'm going to play around with my piece of cardboard, adapting it to locos and track to decide on a final design for the building. A finished relief building isn't a first priority, but once I decide how it's going to look I'm sure I'll get it started quite quick.

Wednesday 22 June 2022

Old Colourized Image

These days several websites offer the possibility to upload a black and white image, klick a button and download a colourized image. Often not very realistic or well done, but quite fun after all. In the bad old days colour images were usually obtained by colouring a black and white image. The colourizing was done by humans (usually women) in a process that required a lot of care.. The quality could be quite good, but very few images were made this way as the price was high. In Denmark I have seen the proces predominantly used for colourizing aerial photographs of farms to be displayed in the property's living room.

A hand colourized photograph of a small farm on the Danish island Bornholm. Photo: Bornholmske bondegårde.

I tried colourizing a digital image myself. As the image was in colour, I first had to make it black and white. I then uploaded it, the computer did its thing and I'm now in possession of the image below. There are several free online services where you can colourize a digital image. The quality is mixed and sometimes the same website gives you one good image and an awfull one. I guess it depends on original image and on the artificial intelligence-system that the site employ to 'guess' the colours of the b/w image.
Next to the line east of Nystrup. The image looks suitably hand colourized and faded. Definately one of the better attempts.

I used the colourizing service https://deepai.org/machine-learning-model/colorizer

Thursday 16 June 2022

Loading Ramp #6

The loading ramp is finished. Well, as if anything ever get's finished on a model railway! Of course I will be able to add more details, extra plants and more of the small finishing touches that will make the ramp area really good looking. For now I'll call it finished.

Not a lorry in sight! Everything else is ready to enable a load of high quality Nystrup gravel to be transported to a construction site.

While a very simple structure, the ramp took a considerable time to finish. Not least because 1/19 scale is still a new scale to me. Getting the feel if a board is the right size for 16 mm scale or too flimsy hasn't quite become habit. Simple or not, the ramp nevertheless contains no less than 234 major parts (I'm not counting the small plastic bolt heads!).

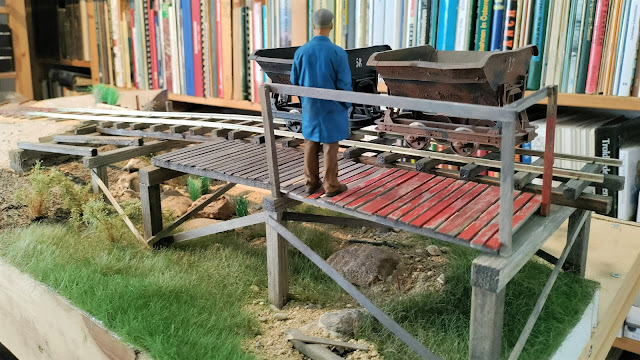
Here the track is almost finished and two skips help me adjust the protective fencing to avoid it interfering with the tipping process. The workers' platform is growing.

As the prototype, my loading ramp is a very simple structure. The Nystrup Gravel lorry loading ramp basically consists of a lot of coffee stirrers, rocket sticks, wooden sticks of different lengths and dimensions. Most of the parts have been (mis)treated with sanding sticks, knife and steel brush to get an aged look. All parts were then given one or more layers of grey water based wood staining fluid. Once dry some of the  boards were given a patchy cover of red acrylic paint to resemble reused boards from a torn company shed. All wooden parts were joined with standard white glue.

Once the ramp, including sleepers were in place, I cut and prepared the Peco Code 143 rails. The track was built as standard track with spikes and soldered fishplates. After a test run with locomotive and skips, I could finally declare all trackwork on the layout for built and working.

Fishplates soldered in place. Painting the rails can now continue.

With the track finished, painted and working, I built the workers' platform next to the track. The platform gave the workers a relatively stabile, spacious and safe working environment for their work tipping the skips. By constantly checking clearances with my two types of skips, I hope not to experience any operating difficulties in the future.


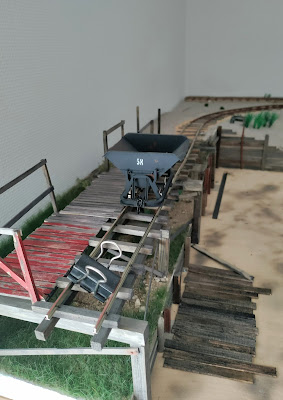
As an interim solution I used a metal clip to avoid trains accidentally falling over the ramp's end. Here the walkway is under construction.

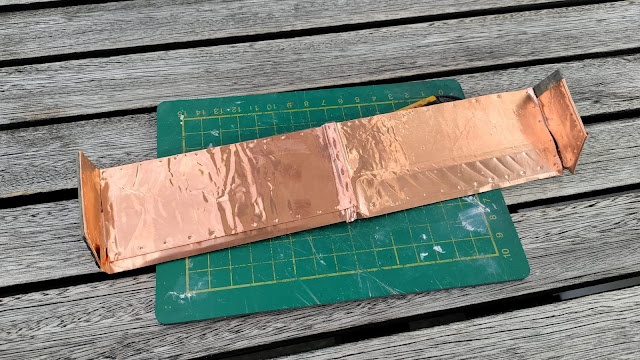
To allow the gravel to easily transit from skips to lorry, the loading ramp is fitted with a slide overhanging one side of the ramp. The construction of the slide on the prototype seems to have been a simple slanted wooden platform clad with steel sheeting. With the limited height on my ramp there isn't much room for a slide. Nevertheless I added a short slide made from wood dressed with some copper foil I had in a drawer. I added subtle height differences under the cladding to underline the primitive construction. 

The slide in progress. One half fitted with copper cladding, the other half still in naked wood. The edges have been stained light grey to avoid unrealistic natural wood showing through.

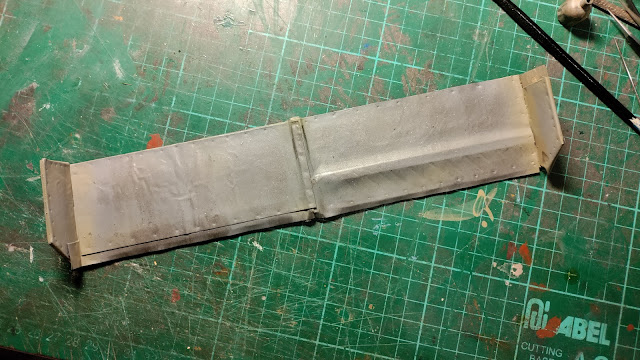
Completely copper clad. Ready for primer.

The slide is primed, painted and weathered.I used several grey colours that was air brushed thinly over the primer. Light earth paint was applied in corners and crevices. The large areas were rubbed with graphite powder.

Weathering of the ramp was accomplished in stages as some parts of the ramp would be inaccesible if I had left all weathering jobs until the whole structure was finished. Most of the weathering consisted of applying wear on the wooden walkway, rust around the few steel parts and a general covering of dust of horizontal surfaces. Regarding painting of the rails on the ramp, they got the usual cover of '113 Rust' from Humbrol's acrylic range. I also used some new waethering products from Green Stuff World on the rails - more about that later.

Not really a part of the ramp, I took the opportunity of using some of scrap wood parts to reinforce the gravel and dirt road surface immidiately below the ramp with heavy wooden planks. This is one area where a lot of work is still required.

A closer look at the ramp from the road side. I'm glad I got the vegetation in place before building the ramp's upper part. It would have been impossible to fix grass and plants with track and slide in place.

The loading ramp seen from the works side. It's obviously that the ramp was erected from whatever was at hand. Countless dimensions and boards from old sheds can be seen in the construction.

The lorry loading ramp has been an enjoyable task. I'm glad to have it finished (even though I have already found a few spots that could need a little more work) and will now give my worktable a good clean up. There are pieces of wood and sawdust everywhere and that has to go before the next project arrives.

Thursday 9 June 2022

Vegetation From New Source

I have used both natural and artificial products for vegetation during 20 years of large scale railway modelling. I have had good experience with German products from Heki, but as I began modelling in 1/19 scale almost all the regular landscaping materials from the traditional railway modelling manufacturers seemed far too small. I have now tried a new supplier and look forward to properly test the products. One of them could easily be tested. See below.

The greenery contained in my package from Spain. I also had some tools, weathering powders and paints sent up north to test.  

Spanish Green Stuff World supplies a wide range of materials primarily targeted to Warhammer-modellers. Apart from some bizarre colours and weird names for some of the products, I got the impression that several items could perform well in 16 mm scale. I was particularly glad that I could have tufts with a grass height of 12 mm. More height than is usually found in tufts from other companies.

Two 12 mm tufts and one 6 mm tuft installed near the track. Properly bedded in, they will no doubt look good.

After having fitted a few tufts in 12 and 6 mm versions, I must conclude that the height written on the packs may be just a tiny bit exaggerated as not all 12 mm tufts could be measured to 12 mm height over terrain. The 6 mm tufts measured out quite close to 6 mm in height. Aside from the variation in height (to the low side, unfortunately) the tufts are well worth their price. For longer tufts I may have to experiment with homemade ones.

Some tufts will be installed around the loading ramp and other products from Green Stuff World will also be used near the ramp. I'm looking forward to develop the area further soon.