Monday 28 August 2017

Modelling Inspiration

Ideas aren't coming from nothing. My inspiration comes from a wide range af sources. I have previously written about one particular book that has inspired me. In this post I will take you through a few other sources of inspiration.
A small narrow gauge peat railway in Klosterlund, Denmark. It's summer, the air is hot and I can almost hear the larch singing in the sky. The flowers are in full bloom and from the moor in the distance a little locomotive is pulling three simple wagons with peat over light and crooked rails. Behind the train you can just about see a few cows resting and enjoying the good weather. Just the kind of railway I love!

Obviously reality is a primary inspiration for me. Who wouldn't be inspired by the above photo? There are more great prototype locos and scenes than I can ever manage to model even if I lived to be 100 years.


Other modellers' work surely inspires too. I pick up that inspiration from several sources. The work of many talented modellers appears in Narrow Gauge and Industrial Railway Modelling Review and I honestly don't know where I would be modelling wise if that magazine wasn't available. A huge 'thank you' to editors, helping staff and authors. If you are not a subscriber, consider becoming one. Find out how to order a subscription here.
From my 'Review' collection. I'm still looking for issue 1. The open magazine is issue 47 with a briliantly written story of a small 0-16.5 slate quarry. Shows that inspiration doesn't have to come from one's own scale or theme.


However great a real paper magazine is, online inspiration can be found as well. A myriad of sites offer images, films and descriptions of real industrial railways (usually long gone, unfortunately) and advise on how to model them. The best I know is the NRGM-forum. You have to acquire a login, but that tiny trouble will repay endlessly. The forum is frequented by friendly expert modellers from all over our planet - some of them known from the 'Review'.


On my work bench I'm learning new things. Last evening I practised my weaving techniques as I was making revetments for my French artillery position. I used tooth picks and cheap wire from a hobby shop.
A short section of weaved revetment in 1:35 scale. My test worked out rather well. More sections are on their way.

Tuesday 15 August 2017

Gun Emplacement Progress (1/35)

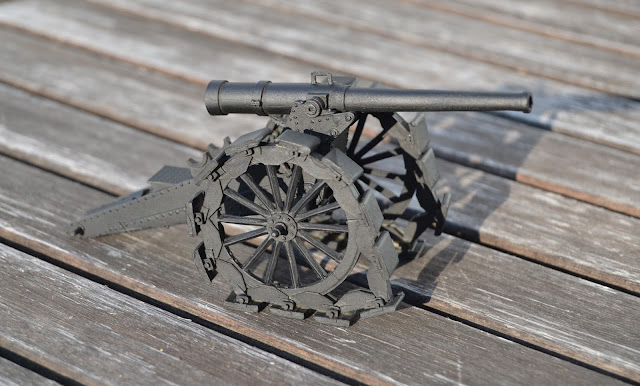
I have continued working on the French gun for my World War 1 diorama. The gun is now completely assembled, primed and painted. The kit went together well although there was a casting seam along the barrel that I didn't succeeded getting completely rid off. I left the wheel assemblies unglued as I wanted to be able to finetune the wheels' positions when fitting the gun into its emplacement.
The gun and recoil ramps ready for primer.

Gun primed with 'Chaos Black'.

The cover paint was mixed from several Vallejo greys and blues with a little white added. The shoes on the wheels were air brushed a light earth colour.
The gun painted.
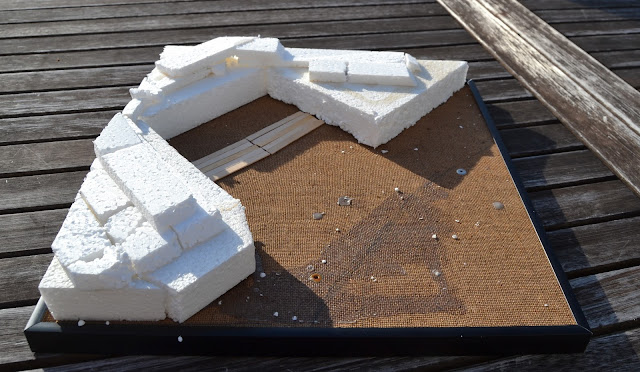
With the gun well in progress I turned my attention to the diorama. I pulled out a picture frame the size of an old fashioned (or retro if you like) vinyl 33 rpm. LP record. With the glass removed it is a good starting point for small diorama in 1:35 scale - and a handy size for storage.


I played around with the gun and length of track to decide how to position them best. With everything settled I started building up trench walls and cutting timber for the gun pit.
Building up trench sides and test fitting floor timbers. The track will cut across the open ground in a gentle curve.
In my research on French trench design I stumbled over a modeller - Andrew Belsey - who does the most beautiful trench dioramas.
One of Andrew Belsey's trench cross section dioramas in 1:32 scale.
See his work on this blog. There is a lot of good tricks on how to do detailed groundwork and small details. My dioaram will not be as finely detailed as Andrew's!


Thursday 10 August 2017

Refitting switch panel (1/35)

After having finished the switch panel on the factory module, I thought the panel on the loco shed module could do with a little refurbishment. I had removed half the switches when Nystrup Gravel turned to digital command and control.
The old panel removed, the cut out cleaned up and ready for a new panel with no surplus holes in it.
The new panel in place, although I will have to correct its crooked angle. The panel is kept in place with double sided tape so it's no big thing to fix.

While I had the module out in the garden I took the opportunity to take a few snapshots as darkness settled over the loco shed.