Saturday 22 January 2022

Turntable for Nystrup Gravel

No, it's not a substantial infrastructural upgrade for the little gravel line! I seldom receive Christmas presents with a railway modelling content. My interests in scale and theme are too narrow and specialised. Christmas 2021 was a different year as my father presented me with a wooden turntable from IKEA. The turntable is designed as a 39 cm diameter rotating tray for smaller dishes etc. I will not be using it for its intended purpose, but as a useful tool for air brushing difficult to handle models in 1/19 scale.

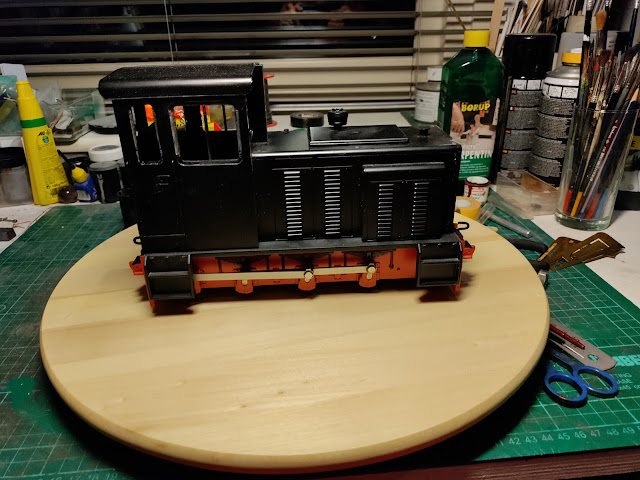
A brand new IKEA turntable with the Accucraft Baguley-Drewry posed for an illustration of the turntable's function as an easy and cheap painting accessory in the larger scales.

I received the turntable as a gift, but should you want to aquire one yourself it's quite affordable at 10.5 € in IKEA stores worldwide under the name 'Snubba'. The turntable spins easily even when loaded with a heavy locomotive. The diameter is sufficient for every model that can be put in service on my little gravel line and doesn't take up too much room on the worktable. When stored it can be squezed in between two boxes.

As the IKEA designer meant it to be. I will be mistreating my turntable as an air brushing platform. Photo: IKEA.

Wednesday 19 January 2022

Fence

During the last months I have from time to time built, painted and installed a humble wooden fence on my little layout. Not the most celebrated type of structure, but very fitting to the simple prototype I model. The fence is acting as a view blocker at the layout's right end. In that way it is possible to diminish a spectator's impression of the small layout abruptly coming to an end. Some careful work with a photo backdrop will hopefully help to produce a good result. Using structures to channel a spectator's view and to conceal the background can be expertly executed by talented modellers like Swedish Anders Runnholm in 1/35 scale. I'm inspired by the ingenuity and modelling and try to use some of the tricks on my own layout.

With the fuel shed removed the new fence is clearly visible. 

The fence was built from coffee stirrers on a framework from wooden profiles and assembled with standard PVA glue. I aimed for a slightly crooked appearance without it looking completely ready to overturn. When the glue had dried I painted the fence red with a few boards standing out in grey natural aged wood. The painted fence was then mistreated with a knife blade and sandpaper and a different shade of red painted over a few of the boards. The fence was then given a wash of heavily diluted dark brown oil paint. Once dry the fence module was coated with a layer of matt varnish from a spray can. I resisted the temptation of painting political slogans on the fence or fitting posters.

The fence during construction. The materials are ultra cheap: coffee stirrers bought in bulk and the wooden sticks used as tails in fireworks rockets picked up on a morning walk on New Year's Day. 

The fence is placed at a slight angle to the fuel shed to avoid structures and track all being at right angles to the baseboard edges. For the time being the fence is only fitted loosely into the holes poked in the soft baseboard. Once detailed ground cover, grass and vegetation are in place I may eventually glue the fence in place.

Brick shed and fence is angled to create perspective and avoid everything being placed at right angles to the baseboard front. I expect scrap and empty oil cans soon to accumulate between shed and fence.

Tuesday 11 January 2022

Static Grass Experiments and Ground Preparation

My fingers were itching to test the new RTS Greenkeeper and between Christmas and New Year I managed to try the gadget and 2 lengths of grass on a few scraps of cardboard. As it was my first use ever of a static grass applicator I was of course very interested if I could get the machine to produce a decent result.


I carefully unpacked the suitcase, fitted 9 V battery to the Greenkeeper and 'loaded' it with one container with a little static grass. I then smeared a layer of my standard unthinned white PVA glue on a piece of cardboard and connected it with the wire from the Greenkeeper. I pushed the little blue button on the top of the Greenkeeper and shook the machine carefully over the cardboard at a height of ca. 10 cm. A thin cloud of grass seemed to be 'sucked' out of the Greenkeeper and drawn towards the cardboard. The grass that landed in the glue stayed perfectly upright. During the proces I heard a low crackling sound and wondered if it came from the Greenkeeper. In fact it was the grass strands hitting the cardboard with such a force as to actually make a sound.
My first try at sowing static grass. The glue is still wet, but the grass strands keep their upright position quite well. For the test I used 2 and 4 mm long grass fibres. 

With the preliminary experiments succesful, I have ordered and received a further supply of grass in lengths of 9-12 mm. In combination with the grass supplied with the Greenkeeper, I hope the mix will provide a good variety for making the unkept and irregular grass around the tracks on the layout.

In advance of the work with adding grass I have begun further ground detailing under the lorry ramp.

First layer of gravel under the loading ramp. 

Embedded into the gravel are twigs, straw and an old torn steel cable.

To achieve a rough surface under the vegetation I covered the areas outside of the gravel with used ground coffee. I dry a portion on an old newspaper and glue the coffee in place with undiluted white glue. As the coffee is much too dark in colour, I flowed a diluted mix of lighter earth colours over the coffee areas to lighten up the colour but still making it darker than the gravel areas.

A supply of RTS-grass in 12 and 9 mm lengths and jars of glue of differing thickness; 'cremig' and 'flüssig'.