Tuesday 29 December 2015

2015 In Review (1/35)

Usually when New Year is approaching we tend to evaluate the old year - did we accomplish what we had planned? I do that too - and not only in my professional life. Nystrup Gravel also gets its share of New Year's reflections. For a start one major factor has been influencing Nystrup Gravel in 2015: a change in location. While Nystrup is still situated in a semi-fictional spot in south-western Zealand some 80 km. from Copenhagen, my 1:35 model of the gravel company moved to a new wooden house in December 2014. As everything began to settle it turned out that the new house provided a bit more room and useful facilities for modelling. Consequently I now have a new module under construction and another in the planning.
Ah! The joy of modelling outside on the porch in summer! One of the new possibilities taken advantage of in 2015.
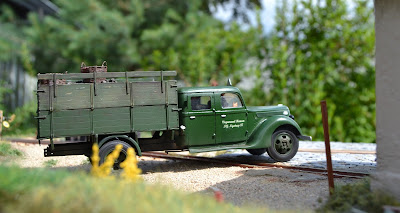
As usual I couldn't resist the temptation to add to my collection of road vehicles. I built a Tamiya Citröen 'Traction Avant' and added a gas generator from a Blitz Model's resin kit. A lorry kit with a resin cab from Brazil provided me with some challenges, but turned out a nice model after all.
Haulage contractor Hansen's Ford double cab manoeuvring in front of Nystrup Gravel's loco shed to deliver a load of brown coal. Photographed outside with some of the garden's shrubbery in the background.
In 2014 I had very little time for researching Nystrup Gravel's past. This year I managed to dig up interesting facts (though some historians will probably dispute my findings) about Nystrup's first diesel locomotive and two events along the gravel line during the German occupation of Denmark 1940-1945. I found evidence that at least two German steel pill boxes were transported on Nystrup Gravel's stone wagons to their destination. As the exact type of pill box was available in kit form, I just had to build a model of them.

I know of two Danish modellers with a narrow gauge industrial railway built in 1:35 or 1:32 scale (I'm one of them!). Possibly two others have models or layout in planning. That means most of my fellow modellers with an interest in industrial narrow gauge in 1:35 are from the rest of the world. The statistics of my blog points the fact our quite clearly: visits from Denmark makes up less than 20 % of the total number of page views. In July I had a visit from an Australian narrow gauge modeller. Four Nystrup Gravel modules were erected in my garden shed in advance of his visit. A few hours passes surprisingly fast when you meet someone with good knowledge of modelling, fellow modellers, interesting techniques and new ideas.
My four modules erected in the garden shed. Not a large model railway, but mine!
As I write these lines a new 1:35 scale model for Nystrup Gravel is on its way to Denmark from Australia. Several models stored in boxes await building and a lot of work still has to be done on the new module - not to mention the one still being planned. Consequently this blog will continue to report from rural Nystrup with news of both small and significant occurrences.
Diesel loco no. 8 crossing the bridge with a train of empty skips. Just a normal summer's day of hard work for the little railway.

Sunday 27 December 2015

New DCC Power for Nystrup Gravel (1/35)

Surely I'm no great expert when it comes to electrical matters or the mysteries of DCC. I can solder two wires together and I have managed to fit DCC decoders in most of my locos - in one case even succeeding in adding lights to the installation. I think my skills in understanding a DCC system are very similar - let's call them basic. My first step into the world of DCC was a Zimo MX1/MX2 combination. Probably way too advanced for my little gravel railway. I struggled with its less than intuitive layout. Add to this that I, despite being rather competent in both English and German, never quite got the finer points of the instructions. Lately the Zimo station has been refusing to allow me adding and operating new locos so a replacement was due. Despite all the above the Zimo unit took me a long way and as I acquired it rather cheap second hand I won't label it as a failed relationship. I have no plans of going back to run my railway without DCC. When it comes to operating locos on DCC I have found that locos runs smoother and slower - a very important thing on a narrow gauge industrial railway.

Contents of the Roco Multimaus DCC set. Visually the hand held controller isn't exactly to my taste. I'd rather have it black or a decent shiny bakelite finish. 

The Multimaus is a much simpler system than my old Zimo. During the Christmas vacation I have had a test track circle set up and tried out the Multimaus with several locos. It's easy to operate and I'm rather confident there is not much that can go wrong in daily use on Nystrup Gravel. Even though the system is probably less capable than my old Zimo, I can't image that my use will see it used to its full potential. I'm only running a few trains back and forth... One thing I really appreciate is, that the Multimaus is less bulky and and a lot lighter than the Zimo. I'm looking forward to learn the 'Maus' better - despite its ugly red shell.

Thursday 24 December 2015

Hesketh Fuel Bowser (1/35)

There was only limited road connection to several of Nystrup Gravel's pits in the woods East of Nystrup. Consequently fuel for machines in the pits were usually delivered via rail. Especially so after 1945 where the last horses were phased out in favour of a huge tracked tractor. Originally the company used an old wooden flat wagon with jerry cans. In the 1950's it was supplanted by a cut down skip fitted to carry a 200 l. oil barrel. A hand pump was placed on a rather flimsy stand of steel profiles.

Fortunately I received a half built kit of a fuel bowser wagon from an Australian railway modeller when he visited me this summer. In an hour I had assembled the kit from Hesketh Scale Models completely. I even managed to cut out a hole in the oil barrel and glue in some lead pieces to make the wagon keep the track better.
Barrel, soldered up frame and small detail parts was my starting point for the fuel wagon.

All parts united into one model. I exchanged the kit supplied solder wire (for the fuel hose) with a somewhat thicker from my own supply and reversed the fuel pump, I imagined it rather awkward to manipulate the pump leaning over the barrel.
The Hesketh fuel bowser together with the wooden flat with jerry cans. Nystrup Gravel's fuel train.

I painted the model with Vallejo acrylic paint and will now relax over Christmas with the task of weathering the little wagon. Merry Christmas to you all!

Friday 18 December 2015

Alpha-loco: Building Finished (1/35)

Yesterday evening I finished building my 1:35 scale model Alpha E-10 loco. Most of the work involved fiddly little parts. Small brackets were made from scrap etched metal or plastic strip while bolt and rivet heads were made from sliced stretched sprue.
My interpretation of an Alpha E-10 loco from Frederikshavn Iron Foundy. Back in 1908 the constructors obviously weren't aiming to win a price for best design! While the loco may not be pretty or practical I find it very charming.

On the left side I installed oil tank and water funnel. The associated oil piping were made from thin electrical wires and bits of their insulation. I found a left over resin water tap and glued it to the bottom of the radiator's water tank. I suspect the tap was used to empty the tank when necessary.

A 'hat' over the radiator pipe (the loco's front chimney) was fabricated from a scrap part found in the spares box (I think it is from an old H0 lamp) and two pieces of brass wire. All very simple - at least a lot easier than if I had to make a 'hat' from thin brass.
The loco's right side complete with closed barn door and plenty of small brackets. One of the brackets on the rear wall looks perfectly ready to receive a model of a bucket in etched brass. It will add a little interest to the otherwise quite bare right side.
All locos from the manufacturer were most likely fitted with an upper body of galvanised steel plates. Some locos seems to have been painted a semi gloss silver/zinc while others were probably left in bare greyish galvanised steel. I am currently  trying to come up with a method of painting a 1:35 model in something that resembles galvanised steel (as I'm still not quite comfortable having a silver loco trundling back and forth on Nystrup Gravel). I have had the advice to use silver and dark grey with one of the colours roughly 'spattered' on through an air brush at low pressure. Glazing over this mix with several very thin coverings of light grey could probably resemble a galvanized surface. I'll test the method, but with paint applied with a teased out kitchen sponge. The sponge will (I speculate) give a random pattern of paint in a more controlled way. I'm testing several other options on scrap pieces of plastic card. Perhaps the Christmas holidays will provide enough time to allow the loco to be painted and equipped with DCC decoder?

Tuesday 1 December 2015

Digging Up History

Apart from modelling a small Danish industrial narrow gauge railway in 1:35 scale and assisting in building and running a full scale heritage narrow gauge railway, I'm always on the look out for info on Danish industrial railways. On a flea market this summer I was leafing through old popular science magazines. In one of them was an article on how to make a peat bog fit for agriculture. The Danish government ran several such programmes in the 1920's and 1930's - most of them employing narrow gauge railways for transport. By keeping eyes open a visit to a flea market turned out to be a pleasant afternoon activity.

A very charming little train ready to venture out in the bog with a supply of fertilizer in steel barrels. The last wagon is loaded with barbed wire for erecting cattle enclosures. The loco is one of the very first models from Pedershaab Machineworks - the largest Danish producer of locomotives for industrial railways. Later models were fitted with chain drive and much studier frames. Pedershaab-locos are still in service today at the Danish peat producer Pindstrup in Latvia.
My first home built 1:35 loco was in fact a Pedershaab. Built from plastic card it has since had parts added several times to keep up with my increased demands for detail. I'm planning to replace my current Pedershaab model with a new one in the coming years - perhaps using 3D-printed and etched parts.

Nystrup Gravel's loco no. 14 built by Pedershaab. The loco is from type FD or BWD and is here seen pushing empty skips to the gravel pits.

Friday 20 November 2015

Roof, doors, windows and a chimney (1/35)

No, it is not a house I'm building but an ancient internal combustion engine locomotive. After having finished most of the tasks on the frame, I progressed to the upper body of my Alpha E 10 loco. I decided to make the roof from plastic card despite my worries that it would turn out too fragile. I threw all caution to the wind, cut a piece of plastic and stuck it to a can of spray paint with tape and rubber bands. The can was repeatedly doused with boiling water followed by cold water from the tap. The plastic card took on the can's radius and fitted quite nicely on the loco. It was glued to the roof ribs with my standard Revell plastic glue and held in place over night with a generous amount of tape while drying.

Here is the loco seen from above before the roof was fitted. The many holes in the plate under the roof supporting ribs allow the fumes from the plastic glue to escape. Without holes there is a risk of the glue flumes distorting the plastic. The buffers are not yet fitted in this picture.
Roof and yet another chimney fitted. Some door strapping added. The window frames are turned brass port holes from Polish company RB-Model.
Left side of the loco with one of the two front 'port holes'. The upper body is only fitted temporarily on the frames and the brass window frame just push fitted in the hole.
In my last post on the loco I mentioned that it had a tendency to 'lean forward'. I added thin shims of plastic card under the front attachment point on the frame and gradually I got the loco to sit level to the rails. The shims were glued to the frame while making sure gears and wheels still turned freely.
A ghastly sight! My model seen from below before painting.
To fit a driver figure I glued a small platform below the open top door on the inner left side of the loco. Through a hole in the platform I can fix a bolt (my standard M2, of course) into a nut glued into the figure. This enables the amputated figure (mentioned previously on the blog) to be removed when the loco is parked idle. It may seem an awful lot of work, but I really think driver figures have to be removable in 1:35 scale. If not they attract far too much attention. Parked locos aren't supposed to be crewed by vigilant drivers!
The driver's platform can be seen above the door opening. Some of the loco body's internal structure is visible as well.
Close up af 9 mm. RB-Model brass port hole (item 04809) fitted in a front window.

Sunday 15 November 2015

Models Coming Apart - UMSLTPS-Syndrome (1/35)

This is not about glue malfunction rather the result of 'Unintended Mechanical Stress Leading To Parts Separation'. I have finally begun to repair the damage inflicted on some of my models during my move last December. The damage list was as follows:

  • Menck excavator - broken off stabiliser on the bucket wire
  • Scammel recovery lorry - broken off left rear etched brass mudguard assembly
  • Bedford Q - broken off right rear view mirror
  • Skip loading chute - completely shattered (repair not possible)
  • Steam roller - roof and small details broken off


Two Danish army lorries ready for repair on my workbench.
I had expected worse things to happen. I wouldn't hesitate to conclude: the move has been kind to my modelling. What's even more important the list isn't showing a single loco or piece of rolling stock. Most of that is kept in foam lined wooden boxes and as such are much safer to move. I think it shows that good quality boxes for one's cherished models is a good investment.

My home built loading chute beyond repair. A new one will now have to be designed and built.
Repairing wasn't too difficult. Only the steam roller repair presented  a fair challenge. After the fallen off pieces were united with their models again I touched up with a little colour where paint had fallen off or glue had seeped out. The problem is to remember exactly what paint I used when I built the models.

My South Eastern Finecast white metal kit of an Aveling & Porter steam roller suffered some damage during the move to a new house.
With the damage repaired the roller is back in action again. Here seen outside Banke's Bakelite


Friday 6 November 2015

Armoured Car 'V 4' of the Nystrup Patriots (1/35)

In the months leading up to the liberation of Denmark in May 1945 a group of the local resistance movement north of Copenhagen built their own improvised armoured car. They named it 'V 3' (a reference to the German 'Vergeltungswaffe' V 1 and V 2). Not known by many, another armoured car was built by a group of resistance fighters from Nystrup and neighbouring Skovby.


Two shots of V 4 in the early hours of May 5, 1945. The armoured car is ready to move out of Nystrup toward the German air field. Both images are from Nystrup Gravel employee Thorleif Petersen's family archive.

The resistance movement probably expected fighting around the large German air field at Mellemaaen. It turned out that the air field presented no problem, but V 4 saw action when it stopped a car full of fleeing 'Hilfspolizei' HIPO at a check point. The HIPO was manned by Danes in German service, spreading terror and fear in the last years of the German occupation.

An image from May 5 1945 of V 3 having returned from a raid against a platoon of HIPOs. The homebuilt armoured car is preserved at The Museum of Danish Resistance in Copenhagen. The V 4 that I built a model of was scrapped in 1946/1947, probably considered too heavy for preservation - all the more reason for me to honour it with a model!
The group must have been in contact with the designers of V 3 as the cars' layouts are very similar and the Nystrup car was named V 4. In some ways V 4 was more advanced, taking advantage of a three axled lorry to carry more weight and thus better armour. In places the armour was spaced to provide better protection for the 5 man crew.
Front view of my 1:35 model of V 4. The loudspeaker is in resin from Plus Models.

The left side of V 4 was completely devoid of markings on May 5. In the days that followed the crew added another Danish flag and the slogan 'HIPO killer' to celebrate their successful (for them) encounter with a car full of HIPOs.
My model of the V 4 was built completely out of the box - the spares box! I used an old GAZ-AAA lorry chassis and the front mud guards are leftovers from a ICM-kit that came with two sets. The rest is basically plastic card with only the hatches added - again from the spares box. Armament consists of two German MG34's and a British Lewis machine gun.

The Lewis machine gun is a Scale Link kit. I made the sandbags on the roof from Miliput. The plastic sheet is to avoid the Miliput sticking to the roof.

In contrast to V 3 the V 4 was elaborately camouflaged with green and brown dots on a light grey background. As the unit building it was a combined conservative/communist group it sported both the British colours of the resistance movement and a red star - along with the Danish flag. With such prominent markings the idea of camouflaging it escapes me, but I suppose the painters had a lot of fun!

Here I'm half way through hand painting the markings. I marked out the Danish flag with pencil before starting to paint.

V 4 during construction. Most of the build is from plain plastic card - the rest is from the spares box. The gas torch marks on the plates were made with a hot needle.

The crew manning the car had fighting experience, a rare thing in the Danish resistance movement. A period newspaper mentions that two of the communists had fought for the Republic in the Spanish civil war, while one of the conservatives had been in Finland in 1940 to help defend the country against the Soviet attack. Another from the conservative group had fought in a British financed Danish 'private army' against the Soviets in Estonia in 1920 (it's his Lewis on the roof). 

Saturday 24 October 2015

Marking Module Legs (1/35)

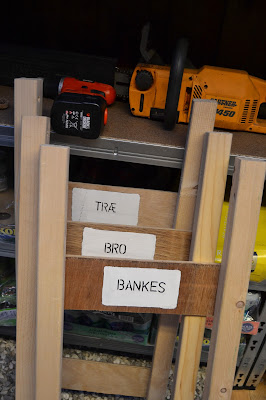
Last time I had my modules set up I got the legs mixed up during assembly. As I have built all legs and some of the modules myself they are not perfectly identical. In other words: Not all legs will fit under every module. As a consequence of my limited precision wood working abilities I have now marked all sets of legs to clearly indicate where they fit.
The risk of grabbing the wrong set of legs for a module should now be seriously diminished. From back to front the Danish words means: tree, bridge and Banke's (as in Banke's Bakelite).

I expect my next 'setting up session' will take less time with the legs marked. 

Friday 23 October 2015

Updated: Placing Buildings now with original documentation

My post on construction profiles from June has been updated with an original document from Maribo sugar factory. The document shows how little clearance a particular steam loco had in relation to buildings and telegraph poles along the line. The document can also be viewed below:

Scan of the document from Maribo sugar factory with notes of distances from the new loco to stationary objects near the track. The document mentions a farm building on the Bukkehave-Nebbelunde line where the remark in brackets says (translated to English): "The windows must be closed when passing."

Wednesday 21 October 2015

Alpha Driver Figure (1/35)

In my last post you probably noticed a somewhat cut down figure among the two fitted with a full set of limbs. The image used by Frederikshavn Jernstøberi in an advertisement for the Alpha E 10 had inspired me to fit my 1:35 scale version of the loco with a similar driver figure. In a box I had a MK35 kit (F072) of a suitable subject for conversion. I wanted to show a bit more of the driver, so I placed him square in the door opening.

Fitting the driver in the cab wasn't easy. There is very little room for a figure because of the way I designed the loco's upper body to make it removable. The interior takes up a lot of space, too. Consequently the figure had to have its legs cut off above the knees and the top of the hat sanded off to fit in. I donated a new left arm to the figure from the spares box. Other than that he received nothing but my usual average attempt at a paint job.
The rebuilt MK35-figure fitted in the cab. The loco is progressing but I have been temporarily stopped because I used up my supply of appropriate plastic strip.

Friday 16 October 2015

Figuring it out (1/35)

Perhaps the greatest challenge for me in 1:35 scale is the figures. They are large enough to be models in their own right. Anyone with ten minutes to spare can assure them self of that by visiting a military modelling web site like Missing Lynx. The miniature figure work there is not any good for my modelling ego...

15-10 years ago you had to convert military figures in 1:35 if you wanted more than two or three civilian figures on your layout. Today you have a good supply of civilian figures of excellent quality. Even considering that I prefer figures in static poses I still have a large selection to choose from.
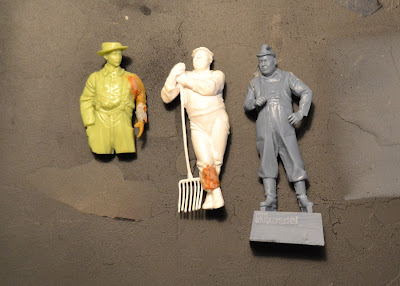
Unpainted figures assembled, but still undergoing modifications. The white Preiser figure photographs a lot worse than the two others. I received the Preiser figure as a part of a set of 5 from a friend. The detailing is not as good as the two other figures, but you get five Preisers for the price of 1½ MK35's.

This week I have been relaxing building a few figures. All three of them part of the gravel company work force - one of them slightly amputated to fit my Alpha E 10 loco. The loco driver (from French MK35) had his legs chopped off and his left arm replaced by a spare part. The relaxed worker (from German Preiser) had his leg remodelled with Miliput. The grey figure (from SKP Models) has featured in this blog before and was assembled as per the instructions.
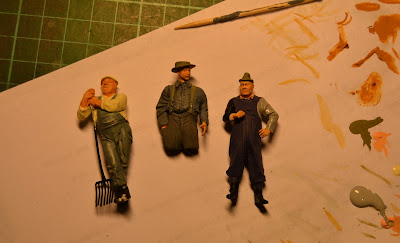
A snap shot of the figures during painting. The white paper acts as a palette for my paints. I used acrylic paints from Vallejo and topped up with some very light washes of oil paint.

Almost done. I still need to paint the rubber boots a green colour. I haven't attempted to paint any facial details. Instead I used different hues of paint to highlight parts of the face and hands combined with a very restrained wash of heavily diluted burned sienna oil paint. I marked the eyes with a tiny line of black oil paint.

The slightly chubby relaxed worker from Preiser beginning to look finished. Shoes still needs paint. As the facial details are not as sharply defined as on the SKP Models-figure it is much harder to paint properly. There are no crevices for the thinned oil paint to flow into. Despite the soft detail nevertheless a charming figure that looks suitably different from most of my figures that have a surprisingly 'fit' look to them.
You have probably seen much better painted model figures (and I'm not sure these two are among my best results) but this blog isn't written to make me look a better modeller than I am. Perhaps my figure painting will have improved with a few more years of practice. I'll then be able to link to this post and show my progress.


Monday 5 October 2015

A Visit From Down Under (1/35)

Most Europeans my age know the song 'I come from a land Down Under' by Men at Work. Australia has always held a special place in my heart. Why is a long story and completely irrelevant to model railways (and not being the least royalist it has absolutely nothing to do with Denmark's crown princess being of Australian origin). Late last year I had an e-mail from a fellow railway modeller in Australia asking if he could come visit Nystrup Gravel - "of course" was my answer - and my self confidence as a modeller jumped a point or two higher on the scale.

Having moved house not long ago and having had to spend time on a lot of the follow up work that entails, I hadn't had my modules set up for running in the new house. It turned out that my garden shed could easily accommodate Nystrup Gravel in its current form - without fiddle yard at least. 
Nystrup Gravel's four modules set up in my garden shed. On the left is the factory building of Bankes Bakelit still in white foam board.
The visit was as relaxing and informal as expected. Although informal there was an exchange of gifts as I was fortunate to receive a semi-built Hesketh & Snoodyk fuel pump on a skip chassis and an issue of 'Narrow Gauge Down Under'. In return I offered cold beer from a Danish micro brewery.
Here is a finished fuel bowser 'harvested' from the web site of Hesketh Scale Models. I plan to build mine just a little differently. I can't resist making small changes to a kit.

Much too soon the time set aside for the visit had expired and we had to say good bye. Hopefully my Australian friend is now home again on the other side of the planet.

Wednesday 16 September 2015

Frame Detail on Alpha-loco (1/35)

The frame on my Alpha-loco is now fitted with axle boxes, frame ends and couplings. Everything is made from plastic card and profiles. I'm struggling a bit with the many types of materials in the frame of the loco - choosing the right type of glue seems to be critical. I will be fitting a backing piece to each axle box to 'beef' them up (they seem to be lacking depth) which will also help to keep them more safely attached to the frame.

End plates and axle boxes during construction. I used Tichy Train bolt heads on the axle boxes.

Test 'running' past the loco shed. Apart from thickening the axle boxes I will have to work a bit more to get the loco's frame adjusted to level. Surely I can work a bit with the lights over my modules too...
The images and drawings I have of locos from Frederikshavn Jernstøberi show very primitive couplings not unlike those on a skip. I wanted to have something a bit more sturdy and have fitted my model with a homemade design. Possibly the original coupling was too weak and was replaced by the gravel company? I will paint the end plates/couplings a contrasting colour to the black frame to high light them as a later addition.

Sunday 6 September 2015

Trailer from Solvang Construction (1/35)

The trailer from 'Solvang Entreprenørforretning' (Solvang Construction) is almost finished. It still lacks the final weathering, which will only be applied when I unite the trailer with the Bedford O. Both kits are from MMK-models.

I added hand rails from brass wire and a wooden board to divide the tool holding area over the saddle from a piece of plastic card. The black spot at the rear is a plastic repair of a damage I made while distressing the boards with a steel brush. The resin was ultra thin at the spot and didn't stand up to my rough treatment.
Trailer primed. I still need to fit mud guards to the trailer's wheels. To ease the painting of the tires I will only fit the mud guards after the tires are painted. The cab is finished and primed, but other than that not much progress on the Bedford.
Trailer painted and weathering of the load area in progress. The paint is Vallejo 'Silver Grey'.

I will not portray the trailer as a worn out vehicle, but the load area of trailers take a serious pounding and paint has a hard job clinging to the timber floor. First I scratched the floor with the tip of a scalpel and followed up with a wire brush. After a coat of grey paint I worked the worn areas with oil paint in several colours and added scratches with different grey and light brown acrylics.

The trailer mud guards had some flimsy resin parts to hold them attached to the axle. I made my own replacements from brass profiles. They can be seen in front of the decal'ed trailer together with a heap of stuff to be added to the trailer.
Mud guards fitted to the trailer. Track panels ready for the transport of a loco. The specially designed decals are from my usual supplier - 'Skilteskoven' (Forest of Signs) from Odense, the birth town of H.C.Andersen.

Monday 31 August 2015

Screaming wheels and clanking coupling chains

Sunday August 30. trains of skips were added to the running of the two usual passenger trains on Hedelands Veteranbane (HVB). Beside the 16 regular departures of passenger trains a short train of five skips made several trips to Rubjerg station. Once again the old gravel pits around Hedehusene filled with the sounds of skips being propelled over narrow gauge tracks.
Petrol mechanical M 2 from 1943 racing through Brandhøj station with a train of five skips and a crew of three.
Fitting in an extra train in HVB's usual Sunday traffic is not the easiest of tasks. Everything went according to plan and all procedures were adhered to. Quite a few enthusiasts had shown up and could be seen from the train taking up positions to achieve good photos of the day's varied traffic.
M 45 (Jenbach, 1967) crossing the day's last passenger train with Da 7 (Henschel 18449/1921) on Sølund station.
From a modelling perspective the day surely provided a lot of inspiration. Having served on a 1:1 skip train makes it so much easier to attempt to recreate one at home in 1:35 scale.
Most of the crew had dressed for the occasion. Here is one of them on the platform of the train's braked skip.
Not directly inspired by the above image, this photo from Nystrup Gravel nevertheless resembles a bit..
A view over the skips as the train passes through a birch forest. A fine day!