Showing posts with label construction equipment. Show all posts

Friday, 23 September 2022

Modelling and InnoTrans

The railway exhibition InnoTrans in Berlin attracts more than 100.000 visitors every two years. Every concievable product and service related to railways are represented at the exhibition and fills the huge Berlin exhibition area completely. On the exhibition ground's own tracks new rolling stock, locomotives and permanent way equipment stand buffer to buffer. Last exibition was 2018 as 2020 was cancelled due to covid. Nystrup Gravel wasn't present but as my job in a railway contracting company is PR and sales I participated in the design of the company's stand and marketing focus as well as being a part of the team manning the stand. As always my professional life seeks to dimish progress on my small model railway.

As far as the relief building got before I went to InnoTrans 2022. Windows are only loosely fitted in the openings and the roof still needs some work.

The large red relief building has its exterior walls completely clad with boards made from coffee stirrers. Three windows are being prepared for the top floor openings and interior light is in planning. It will be a very simple installation. Work on windows and light as well as roof had to be put on hold due to the four days in Berlin and InnoTrans 2022. The exibition is not without modelling interest as several rolling stock and loco manufacturers use models to illustrate their products. Unfortunately the lighting in the exhibition halls aren't the best for model photography.

A Multi Tasker rail crane from Techne Rail & Mill GmbH. The model is close to 1 m in length. It has probably been professionally built with a mix of 3D-printed and machined parts.

On the outdoor area large machinery and rolling stock was being exhibited. Here a Caterpillar M323F road/rail excavator. It's a type I know well from my own company.

A Windhoff RL60 AEM shunting locomotive was among the more conventional shunting equipment exhibited. A large number of more or less exotic looking road/rail shunting equipment was shown at InnoTrans.
InnoTrans is an important part of many students' way into the field of transport and railways. Here a group of Finnish engineering students wearing their characteristic 'teekkarilakki' caps pose in front of a hydrogen powered locomotive.


The marble table at my fancy hotel room in the embassy district in Berlin. With a free supply of magazines at the exhibition there will be no long winter evenings that I can't chase away with reading. These three were followed by many more.

Besides the magazines what am I taking with me that can be used in my modelling from an exhibition like InnoTrans? Not much but the fact that despite all the technology available for showing off your newest product on screens and with Virtual Reality, models are still used in surprisingly large numbers. The models represent physical presence, a chance to imagine the product in real size and an easy way to quickly view the object from all angles. It may be that old fashioned modelling is giving way to 3D-printing, but models are still sought after in a professional context. 

With that said I better get on with mounting windows in my building! Strictly amateurish and just for fun.

Saturday, 8 December 2018

Traction Engine Progress

The Garrett traction engine is the focus of my attention for the moment. I'm waiting for a delivery of hexagonal plastic strips from the UK for fitting my Lister locomotive with some much needed bolt detail. In the meantime I'm busy assembling the traction engine.
Many parts have raised lines presumably to help decal placement. I'm sanding the lines off. Pipes coming from nowhere and endning on the middle of the water tank are dealt with at the same time. New pipes with proper functions will be fitted later. The sanding is mentally soothing. Nothing really to think about, just make sure a piece of plastic is worked into a flat surface. I'm using files and really cheap sanding sticks from the make-up section of my local super market.
I had a few title on the shelves of my library to help me get in 'traction engine mode'. Despite the books there are still a gadget or two on the model I don't what's for.
The wheels aren't fixed yet, but I've got the water tank and front wheel suspension glued in place. The cylinder assembly is glued, but can still be separated from the boiler. That will ease assembly of the motion and gears.
The Nystrup pixie finally caught on a photopgraph? No, it's one of my 1:35 figures posing with a 16 mm scale figure and traction engine to show what my change of scale means size wise.

Monday, 3 December 2018

Hansen's Traction Engine

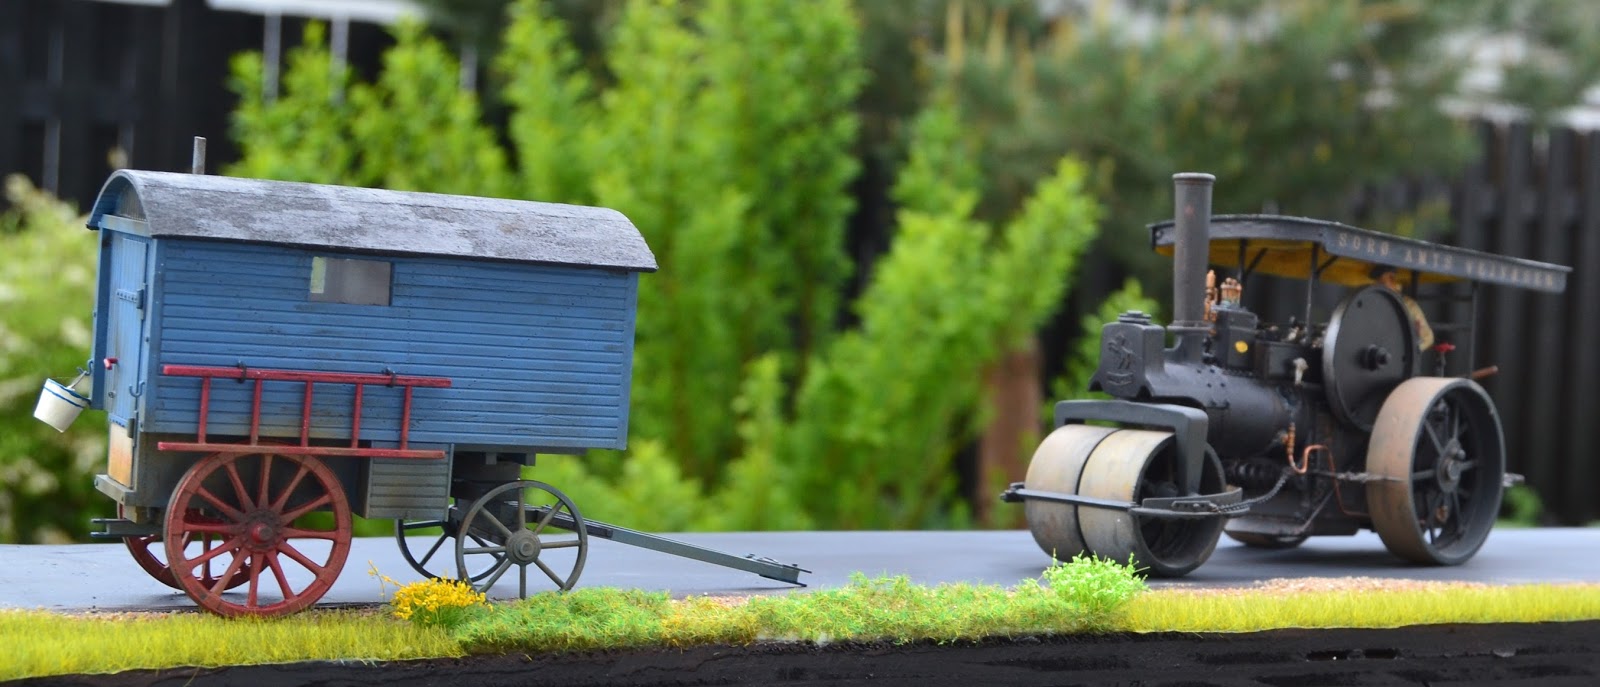
The local haulage contractor Hansen in Nystrup had a long history, even going back to owning a large number of horse drawn wagons and a traction engine. Their Garret steam tractor was the only from that manufacturer in Denmark and unusual in being service until after World War 2. The last year of operation is unknown, but the boiler inspector approved it for last time in Feburary 1950. When I saw a fellow 1:19 modeller assemble a 1:16 kit of a traction engine, I immediately started looking for a kit myself.

I was fortunate to win a kit on an auction on Ebay. Considering what I have seen other winners pay for their kits, I seem to have been lucky. Some of the prices seen are horrendously high! The kit from Japanese manufacturer Bandai is an ancient kit and much indicates that my particular kit was issued before 1978 (when I was in 2. grade). A historic kit in more than one sense!

Despite being an old kit the instructions are quite good and well laid out, although the assembly sequence is a little odd.
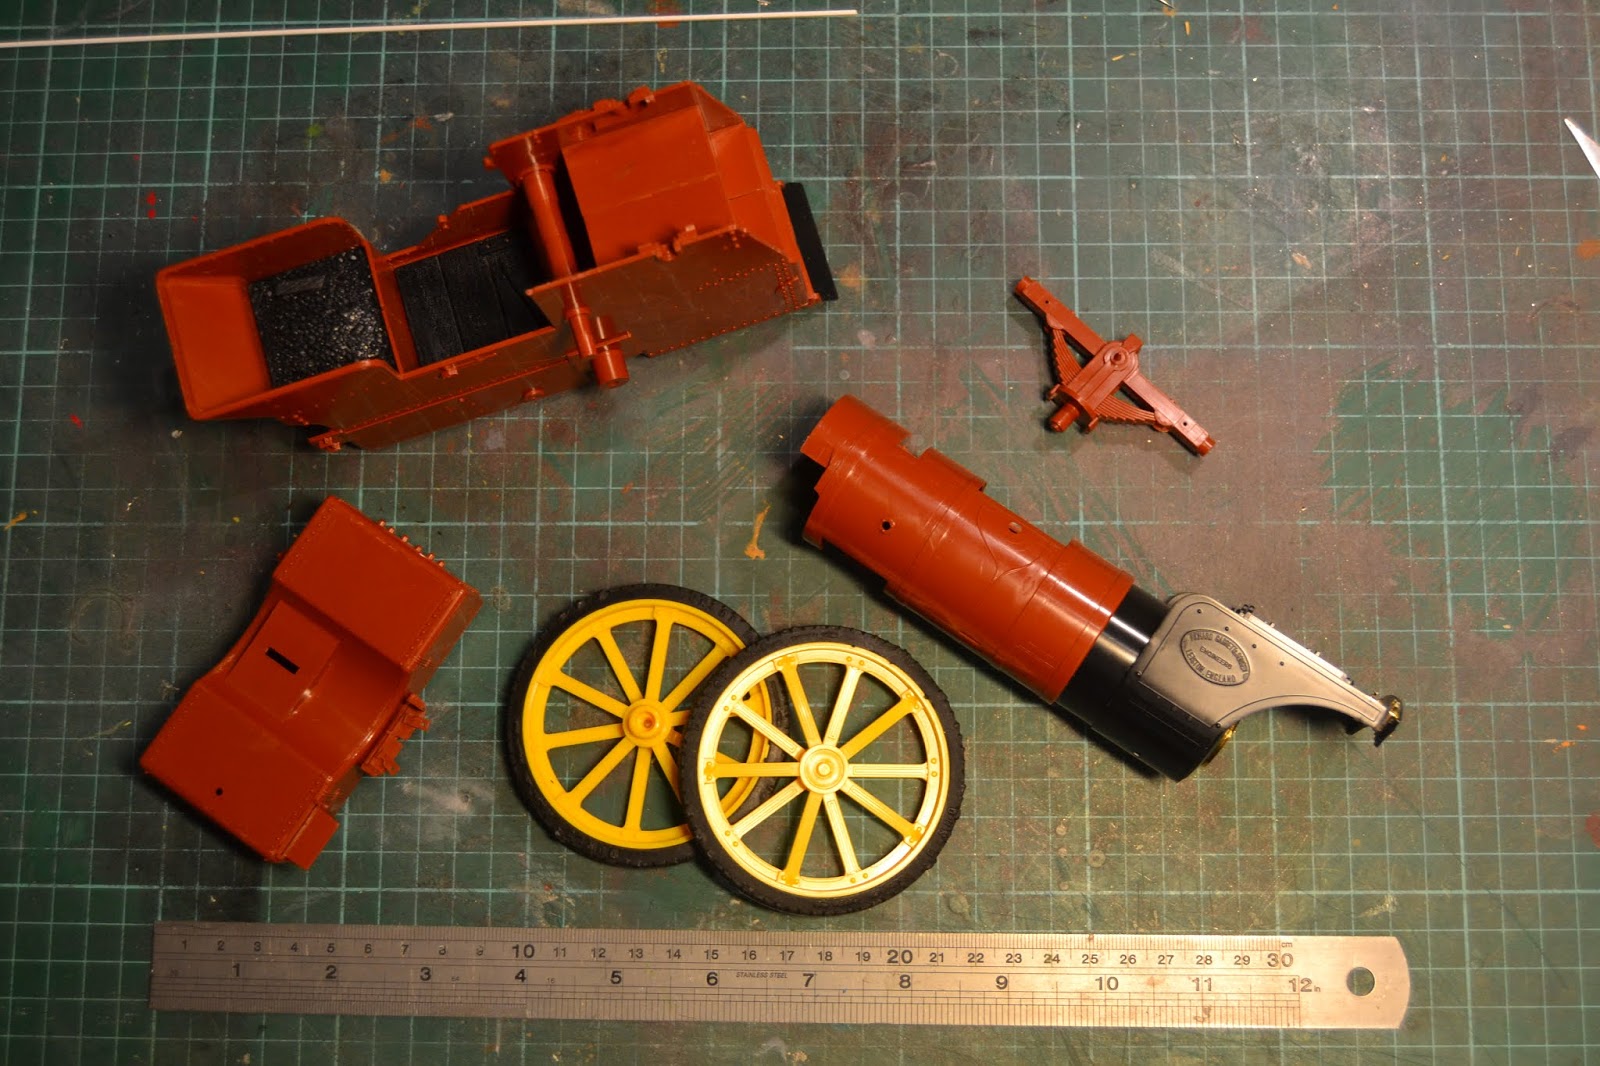
The kit had been started and some of the major components was glued together when I opened the box. A few of them will need separating as I will not build the model as a showman's engine with generator, roof and colourful paint scheme, but rather as a worn haulage contractor's machine. The kit is a fraction too large for my scale of 1:19, but that will only help to make the model more impressive.
The lid is off and I can begin to sort parts into those I will use and those I can donate to the bin. The kit is in several colours and one sprue is even gold plated. 
In addition to the build on the Narrow Gauge Railway Modelling Online forum, I have also found a series of images on a Canadian blog. The Canadian traction engine is much like how I want mine to look, only without the lengthened chimney.
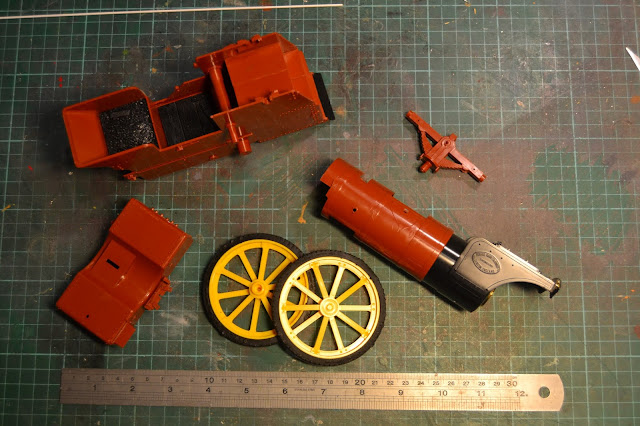
The main assembled parts: frames, fron suspension, front wheels, water tank and boiler incl. smokebox.

I'm currently assembling the large rear wheels. I will be building the kit in a different sequence than prescribed in the instructions. I will build the model into a large structure first and then add the details.

Monday, 9 July 2018

Heavy load trailer and tractor (1/35)

I have had a few requests for more info on the trailer and tractor seen on 'road plank' in an earlier blogpost. Both are more than 10 years old now and both of them are suffering moderately from age.
Ruston & Bucyrus excavator

The trailer is a German army Sonderanhänger 116 with a 22 t load capacity built from a resin kit from the French manufacturer DES Kits. I built the trailer back in 2003 as part of a project to build the transport seen on the image below.
Danish contractor O. M. Hougaard transporting a O&K excavator with what is most likely former German army equipment left behind in Denmark after the occupation.

The trailer is ready for primer and paint. The DES Kits resin parts were thin and nicely cast with no warpage. Over the years the wheel axles have begun to warp a bit under the weight of the model. Perhaps it's time to exchange the model with a Tamyia trailer, where the injection plastic parts are mixed with an aluminium profile reinforced load bed.
Trailer in German Panzer Grey and tyres with basic weathering.
The Faun ZSR was a heavy tractor designed for the German army with a 150 hp engine. Special versions of the tractor could be fitted with railway wheels. I built the Elitemodell resin kit in 2004, replacing a considerable number of parts with home made ones. Contrary to the trailer, where there is now an injection plastic version available, the Faun is still only available in resin.
Quite a few home made parts in this view of the model in an unpainted stage. The cab has been detailed and painted.

A short break during the transport of an excavator. Possibly the crew (driver and helper) is checking if the Ruston & Bucyrus excavator stays safely on the trailer.

Sunday, 3 June 2018

Budget Modelling Water Cart (1/35)

Having finished the living van to accompany the steam roller I couldn't resist taking on building a two wheeled water trailer to be added to the road train. I couldn't find a Danish water cart that suited my taste, but a British one had caught my eye. Very simple and of a lovely 'art noveau'ish' style.


A British steam roller pulling a water cart. The wagon has been fitted with a seat but is otherwise simplicity itself.
My water cart is completely made from left overs from other kits, a few lengths of copper wire and plastick stock. A true piece of budget modelling! My model isn't a direct copy of the British cart, but rather my rough representation simply capturing the main shapes.
Slow transport on its way to the next work site. The sunny and warm Danish summer makes sure the steam roller driver isn't freezing in his exposed position.

Top: Without paint and details. Bottom: Detailed, painted and weathered. The wheels are from an old kit of a Soviet armoured car. Even the suction hose and rolled up firehose came from the spares box. Only the decals were bought for this little project.


The steam roller incl. its road train on my almost finished 'road plank' in the garden. I've fitted simple telegraph poles along the roadside.

"The county's road repair equipment enroute to the deplorable roads between Dimholt and Ubehage. About time." Image and part of the photo caption from an old Nystrup newspaper. 1949.

Friday, 25 May 2018

Old Machinery in Action

On the TimeWinder vintage rally in Northern Zealand 60 km from Copenhagen I had the chance to refresh my motivation to build models of all sorts of old machinery. As if I needed more...


What's not to like? A 700 mm gauge industrial railway locomotive passing an old Ford A car at TimeWinder 2018. Why isn't any of the kit companies bringing out a Ford A in 1:35?
TimeWinder 2018 was the second time this new vintage rally was held. It is a 'break out' event from the well established Græsted vintage rally. Sometimes vintage rally organisers (like everybody else)  have their differences and in this case they decided to split up. That means we now have two vintage rallies in the same weekend only some 15 km apart. Which can't be good for any of the rallies' business.

It was my first visit to TimeWinder and it was a very plesant experience. In comparison with the old location in Græsted the TimeWinder benefits from the beautiful grounds around the old manor of Grønnessegaard. An added attraction is the manor's landing strip for small airplanes and the view over the fjord. The airstrip was base for number of old airplanes during the rally.
One of a number of very old tractors present at the rally. As a possible consequence of the split of the old rally organisation the number of tractors was considerable smaller at TimeWinder in comparison with Græsted before 2017.

Two old steam engines pausing for a brief moment. The Foden steam lorry is a charming vehicle and I will research the relevant archives for the unlikely possibility that a vehicle like it was in service around Nystrup.
 
The most charming views could be experienced around the rally grounds.
In the years to come I will have tough decision to make wether to visit TimeWinder or Græsted in the hunt for close encounters with old machinery. TimeWinder's best cards must be the great surroundings allowing for a land, sea and air experience, the many foreign exhibitors and the fact that they even have their own 700 mm gauge railway. Perhaps I have to visit both rallys next year?
The 700 mm. loco had a remarkably local link being built in Hundested only a few kilometers away from the rally grounds. Almost like coming home!


Friday, 11 May 2018

Finished Living Van (1/35)

With a speedy delivery of decals from 'Skilteskoven' I have finished the living van to accompany my steam roller model. My delivery from 'Skilteskoven' also contained decals for the steam roller which is now recognisable as a roller from 'Sorø Amts Vejvæsen' (Sorø County Road Departement).  Building the van has been great fun and very cheap. Every part except from the decal came ready available from my shelves and spares boxes. A new cheap item is already on its way to join the steam powered road train.
The Aveling & Porter 10 t. steam roller pulling a medium blue living van along a shiny new macadamised local road near Nystrup.

Living van uncoupled and the steam roller is now able to do some road work.
A Fordson lorry slowly passes the work site.
The living van was weathered with diluted oil paints and air brushing after the decals were fitted. A ladder was hung on the brackets on the van's right side and I added a etched brass bucket on one of the rear brackets. I suspect the two rear brackets were used for petroleum lamps during the dark hours.

A rear view of the van. For the warning text on the lower part of the door to be of any use, the steam roller driver should probably remove some of the road grime deposited there.


Front end of the van with the double doors to the cargo compartment holding oil, the most necessary spare parts, fire wood and a small supply of coal for the steam roller.

Friday, 27 April 2018

Paint on Living Van (1/35)

Despite one of the most challenging distractions arriving in the post today, I managed to get the living van primed and covered with the basic colours. Having run out of my favourite primer, I used some left overs from a can of a somewhat lesser quality. Despite that the priming went well.
White primer on the van. The windows are masked with tape. Various brackets are made from copper wire and pieces of left over etched metal.
While the primer dried I leafed through the recently arrived distraction - time flies when you are having fun! I then masked off the underside of the rear door, where I plan to fit a decal warning of a slow vehicle. After readying my air brush I sprayed a layer of medium faded blue on the van and front wheel assembly. I gave the underside a thin spray with dark grey. I brush painted the rear wheels red to create a little variety.
Main colours are on my 1:35 representation of a steam roller accompanying van.
I expect decals to arrive within the next few weeks. Until then I'll  be fitting tarpaper in the shape of painted surgical tape and do some detail painting. I probably also will pick up a new project.

And what was the dangerous distractant? The Narrow Gauge & Industrial Railway Modelling Review of course!

Tuesday, 24 April 2018

Living Van Almost Finished (1/35)

After some slow and relaxing modelling hours the construction of the living van for my steam roller is approaching the time where I can begin priming and painting.

A test assembly of the van's main parts. With only minor details still to fit it is almost ready for primer.


Wheels were fixed on the axles and the front wheel assembly was glued together from Evergreen plastic profiles and parts from the spares box. As not much of the construction can be seen when the van is placed on a piece of road I skipped a lot of detail. Most of the work concentrated on the draw gear that I designed to be movable to allow the van to be posed coupled to a steam roller as well as parked at the road side.
Wheel sets almost ready to be added to the van's underside.

I made the roof from 1 mm grooved plasticcard formed in boiling water.  Usually I tape the plastic to a suitable solid rounded object and pour boiling water over both parts. After a few scoldings the plastic permanently takes the shape of the attached object. Unfortunately I wasn't able to find any object matching the required radius. In this case I simply poured boiling water over the piece of plasticcard and formed the roof's curve by hand. A case where it helps not having too sensitive skin!
The roof being glued to the van. While the glue dries the roof is kept in place by rubber bands.


Decals for the van have been designed and ordered. When I was at it, I took the opportunity to order some for the steam roller as well (and for at future water cart). Next stage is primer.

Thursday, 8 March 2018

Crew Van for Steam Roller (1/35)

This is a story of how the search for some parts in my spares box derailed my planned building schedule. In the spares box I noticed several sets of wheels from horse drawn wagons and guns and it ocurred to me that they wouldn't look out of place under a living van for a steam roller driver. My Aveling & Porter steam roller has been missing such a van for  many years. Now the building is in progress.
A preserved living van restored by members of the Danish Steam Roller Society. Here seen at the Hedelands Veteranbane 40 years anniversary 2017. 

Being a steam roller driver could be a lonely job. You were away from home, sometimes for weeks, while working on roadmaking. The steam roller needed attention also when not working, preparing it for the next day's work. Consequently many steam roller drivers had a little van on tow for sleeping and cooking a humble meal, as well as for storing lubricants, coal and tools.
My model of an Aveling & Porter 10 t roller built from a White metal kit from South Eastern Finecast. The model was built in 2005.
Apart from the four wheels from the spares box the rest of the van will be made from scratch. As I often do I made a quick prototype in cheap cardboard to test size and appearance.
Ultra fast prototyping solution made from cardboard. Tough 1/35 guy for size comparison.

The first plastic card have been cut and glued. The sketch can hardly be described as advanced.

Wednesday, 12 July 2017

Ruston & Bucyrus Excavator (1/35)

In my last blog update in June I showed some new photos of Nystrup Gravel's large Menck excavator. Nystrup Gravel's first excavator (as far as I know) was the Ruston & Bucyrus delivered in 1938. Here are a few images of the machine in one of the gravel company's pits west of Nystrup.
The excavator driver obviously had a hard bicycle ride to the gravel pit. Here he is taking a break before beginning the day's work.

A side view of the Ruston & Bucyrus RB-17.

The R&B excavator is a 1:35 resin kit from Accurate Armour and a brilliant kit. I highly recommend it. Even if the kit is large and looks complicated you don't have to be an expert to put it together and produce an excellent result. I built my excavator in 2003 and made minor changes to the kit parts, primarily to show off some of the detailed interior.
A rear view during construction. I cut out the right rear door to show off the engine and radiator.

The interior during painting. I still haven't fitted wire to the drums.

The finished excavator on a heavy load trailer.


As usual the tracked tractor 'Stalin' was standing in the pit waiting for its next task. The tractor originally belonged to a Soviet Army artillery unit, was captured by the German forces in 1941, brought to Denmark and bought by Nystrup Gravel after the war.
Lovely weather and a robust piece of equipment.