Friday 30 October 2020

Lucky Me!

Sometimes you're just lucky. I had one of those days last weekend. Getting my hands on an classic Danish model railway book. My luck didn't stop there. As I opened the book I noticed an image of a narrow gauge industrial steam loco glued into the book with two strips of christmas stamps.

'Model railways as a hobby' is the title of the book. It was first published in 1971 and I remember reading it at the library as a boy. It was probably the first book I read about scratch building and it didn't take long before I began cutting card board for my own model building. The rest is history, as they say. 

"From me to you" in hand writing and the Danish national christmas stamp from 1975 used to fix the photograph to the book's half title.

The image shows a somewhat dismantled and negleted Orenstein & Koppel 4-wheeled steam loco of a 20-30 hp type. Probably built 1910-25. There are no sidetanks which is unusual for O&K-locos of this model. A lady is waving to the photographer from the cab. Perhaps a Sunday trip turned loco spotting? She is dressed in a style that could be the 1930's-1940's, but probably the style could pass in the early 1950's as well. While the book is Danish, there are no features in the image proving the loco to be a Danish one, although it may very well be so.

"Hi, darling! I'm a loco driver now."

I will pass the image on in my network, and hopefully some expert will be able to help identify the locomotive. 

Thursday 29 October 2020

Sleeper Production

With the coming of Autumn and the traditional peak season for railway modelling arriving, I have been cutting sleepers for Nystrup Gravel. The sleepers are from Wenz Modellbau in Germany. I shortened them from their original length of 80 mm to differing lengths between 60-70 mm  (corresponding to a scale length of app. 1100 mm-1300 mm). I cut the sleepers with a standard junior hacksaw, removing any splinters with a sanding stick.

The major items involved in my first experiment with 16 mm scale wooden sleepers.

I then treated the sleepers with a variety of instruments to create the impression of worn and primitive wooden sleepers. With knife blade, wire brush, sav blade and coarse sand paper I created a rough surface structure to the sleepers. Some got a light treatment, some a rough.

A selection of roughed up sleepers on my worn cutting mat. The two upper left ones are representing emergency sleepers assembled from discarded sleepers cut up and held together with steel rod.

Having produced a batch of 40 sleepers I mixed a small amount of light grey water soluble wood stain and brushed the fluid onto the sleepers. The mix dried fast, and as I had used a decent amount of water, the mix was rather thin. I gave the sleepers from 4-7 coverings of the mix, creating some variation in tone. Some of the sleepers needed another pass with the sanding stick, as the stain had made some of the wood fibres 'stand up'. That created further variation. 

Staining in progress.

The result of several washes with light grey staining fluid. A light grey upper surface, ready for weathering effects.

I will now add a basic weathering to all the sleepers before they are ready for track laying. Further weathering will be applied after the track is finished.

Friday 16 October 2020

Point Lever Assembled

In short breaks in a period of some hectic work schedules I have been able to assemble one of the point levers from Feld-, Garten- und Grossbahn. The white metal castings were well cast and only sporadic mould lines were present. They were removed with sanding sticks and the holes cleaned up with a round file. The casting representing the lever's handle looked a bit odd, and I will be replacing it with a piece of heavy wire.

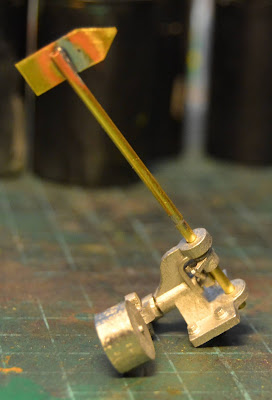
Almost finished point lever with home made direction indicator.

Prototype point lever of the same type photographed on the Hedeland Vintage Railway. The upper bracket for holding the direction indicator has broken off.

Assembly of the cleaned up parts wasn't too difficult. Just remember to test fit now and then to make sure you don't get the holes opnened up too much, which will make the lever wobbly in service. The only real test provided was the drilling of a 0,8 mm hole for a piece of wire to be superglued into the axle holding the weighted arm of the lever. With plenty of light and a pair of steady hands it worked out in the end, producing a working lever.

To indicate which way the point is set, the lever kit is supplied with a lantern that can be fitted with lights. That is a bit too fancy for a simple industrial railway like mine. I chose to fit the lever with a home made direction indicator from a brass pipe and a piece of brass cut to shape with a pair of scissors. Assembled with solder, the job was done in no time.

A large peg allows the lever assembly to be firmly attached to a sleeper.

The pin and arms that operate the direction indicator can be seen fitted to the right hand end of the lever's central axle.

With only a handle missing, the lever will soon be put in a box waiting for track laying at Nystrup Gravel to begin. I'm currenty in the process of cutting ties for my first track.