Showing posts with label 1/35. Show all posts

Friday, 9 June 2023

Scale in Blog Headlines

Having worked and blogged about my model of the Nystrup Gravel 600 mm narrow gauge gravel line in two different scales, I have spent a few minutes on a number of evenings to add the scale in all the posts with content in my old scale of 1/35. According to the statistics my old posts on 1/35 modelling still gets a surprising number of pageviews. I felt those readers needed more guidance to easily  navigate between posts with 1/35 and 1/19 scale content. 

Loco 78 on my 1/35 scale modular Nystrup Gravel layout. A 3D printed loco body mounted on an Australian motor bogie. Now residing on a German layout.

Almost 250 blog posts now have a note in the title clearly marking the scale as 1/35. Not a funny job, but something that had to be done at some point. The 1/35 marking in the title is backed up with a short notice in the right sidebar. 

Screenshot with 1/35 clearly marked in the title making it easy to identify the scale of the models.


Information on Nystrup Gravel's current 1/19 scale and the earlier 1/35 scale.

Hopefully the changes will make the blog a worthwhile visit for modellers in 1/35 scale even if my modelling in the scale is fast becoming 'historic'. At least it will make readers able to quickly recognize the scale.

Friday, 6 November 2015

Armoured Car 'V 4' of the Nystrup Patriots (1/35)

In the months leading up to the liberation of Denmark in May 1945 a group of the local resistance movement north of Copenhagen built their own improvised armoured car. They named it 'V 3' (a reference to the German 'Vergeltungswaffe' V 1 and V 2). Not known by many, another armoured car was built by a group of resistance fighters from Nystrup and neighbouring Skovby.


Two shots of V 4 in the early hours of May 5, 1945. The armoured car is ready to move out of Nystrup toward the German air field. Both images are from Nystrup Gravel employee Thorleif Petersen's family archive.

The resistance movement probably expected fighting around the large German air field at Mellemaaen. It turned out that the air field presented no problem, but V 4 saw action when it stopped a car full of fleeing 'Hilfspolizei' HIPO at a check point. The HIPO was manned by Danes in German service, spreading terror and fear in the last years of the German occupation.

An image from May 5 1945 of V 3 having returned from a raid against a platoon of HIPOs. The homebuilt armoured car is preserved at The Museum of Danish Resistance in Copenhagen. The V 4 that I built a model of was scrapped in 1946/1947, probably considered too heavy for preservation - all the more reason for me to honour it with a model!
The group must have been in contact with the designers of V 3 as the cars' layouts are very similar and the Nystrup car was named V 4. In some ways V 4 was more advanced, taking advantage of a three axled lorry to carry more weight and thus better armour. In places the armour was spaced to provide better protection for the 5 man crew.
Front view of my 1:35 model of V 4. The loudspeaker is in resin from Plus Models.

The left side of V 4 was completely devoid of markings on May 5. In the days that followed the crew added another Danish flag and the slogan 'HIPO killer' to celebrate their successful (for them) encounter with a car full of HIPOs.
My model of the V 4 was built completely out of the box - the spares box! I used an old GAZ-AAA lorry chassis and the front mud guards are leftovers from a ICM-kit that came with two sets. The rest is basically plastic card with only the hatches added - again from the spares box. Armament consists of two German MG34's and a British Lewis machine gun.

The Lewis machine gun is a Scale Link kit. I made the sandbags on the roof from Miliput. The plastic sheet is to avoid the Miliput sticking to the roof.

In contrast to V 3 the V 4 was elaborately camouflaged with green and brown dots on a light grey background. As the unit building it was a combined conservative/communist group it sported both the British colours of the resistance movement and a red star - along with the Danish flag. With such prominent markings the idea of camouflaging it escapes me, but I suppose the painters had a lot of fun!

Here I'm half way through hand painting the markings. I marked out the Danish flag with pencil before starting to paint.

V 4 during construction. Most of the build is from plain plastic card - the rest is from the spares box. The gas torch marks on the plates were made with a hot needle.

The crew manning the car had fighting experience, a rare thing in the Danish resistance movement. A period newspaper mentions that two of the communists had fought for the Republic in the Spanish civil war, while one of the conservatives had been in Finland in 1940 to help defend the country against the Soviet attack. Another from the conservative group had fought in a British financed Danish 'private army' against the Soviets in Estonia in 1920 (it's his Lewis on the roof). 

Saturday, 24 October 2015

Marking Module Legs (1/35)

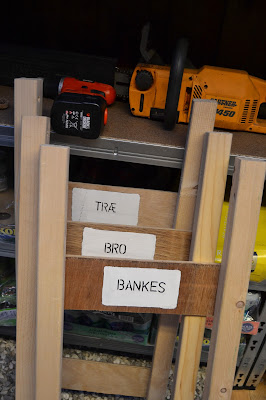
Last time I had my modules set up I got the legs mixed up during assembly. As I have built all legs and some of the modules myself they are not perfectly identical. In other words: Not all legs will fit under every module. As a consequence of my limited precision wood working abilities I have now marked all sets of legs to clearly indicate where they fit.
The risk of grabbing the wrong set of legs for a module should now be seriously diminished. From back to front the Danish words means: tree, bridge and Banke's (as in Banke's Bakelite).

I expect my next 'setting up session' will take less time with the legs marked. 

Wednesday, 21 October 2015

Alpha Driver Figure (1/35)

In my last post you probably noticed a somewhat cut down figure among the two fitted with a full set of limbs. The image used by Frederikshavn Jernstøberi in an advertisement for the Alpha E 10 had inspired me to fit my 1:35 scale version of the loco with a similar driver figure. In a box I had a MK35 kit (F072) of a suitable subject for conversion. I wanted to show a bit more of the driver, so I placed him square in the door opening.

Fitting the driver in the cab wasn't easy. There is very little room for a figure because of the way I designed the loco's upper body to make it removable. The interior takes up a lot of space, too. Consequently the figure had to have its legs cut off above the knees and the top of the hat sanded off to fit in. I donated a new left arm to the figure from the spares box. Other than that he received nothing but my usual average attempt at a paint job.
The rebuilt MK35-figure fitted in the cab. The loco is progressing but I have been temporarily stopped because I used up my supply of appropriate plastic strip.

Friday, 16 October 2015

Figuring it out (1/35)

Perhaps the greatest challenge for me in 1:35 scale is the figures. They are large enough to be models in their own right. Anyone with ten minutes to spare can assure them self of that by visiting a military modelling web site like Missing Lynx. The miniature figure work there is not any good for my modelling ego...

15-10 years ago you had to convert military figures in 1:35 if you wanted more than two or three civilian figures on your layout. Today you have a good supply of civilian figures of excellent quality. Even considering that I prefer figures in static poses I still have a large selection to choose from.
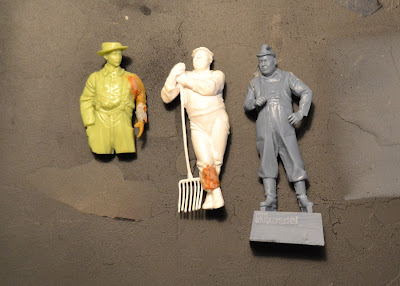
Unpainted figures assembled, but still undergoing modifications. The white Preiser figure photographs a lot worse than the two others. I received the Preiser figure as a part of a set of 5 from a friend. The detailing is not as good as the two other figures, but you get five Preisers for the price of 1½ MK35's.

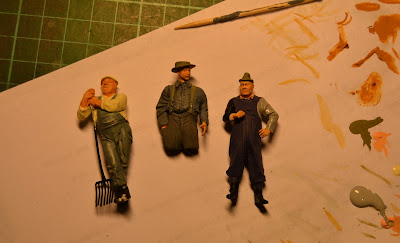
This week I have been relaxing building a few figures. All three of them part of the gravel company work force - one of them slightly amputated to fit my Alpha E 10 loco. The loco driver (from French MK35) had his legs chopped off and his left arm replaced by a spare part. The relaxed worker (from German Preiser) had his leg remodelled with Miliput. The grey figure (from SKP Models) has featured in this blog before and was assembled as per the instructions.
A snap shot of the figures during painting. The white paper acts as a palette for my paints. I used acrylic paints from Vallejo and topped up with some very light washes of oil paint.

Almost done. I still need to paint the rubber boots a green colour. I haven't attempted to paint any facial details. Instead I used different hues of paint to highlight parts of the face and hands combined with a very restrained wash of heavily diluted burned sienna oil paint. I marked the eyes with a tiny line of black oil paint.

The slightly chubby relaxed worker from Preiser beginning to look finished. Shoes still needs paint. As the facial details are not as sharply defined as on the SKP Models-figure it is much harder to paint properly. There are no crevices for the thinned oil paint to flow into. Despite the soft detail nevertheless a charming figure that looks suitably different from most of my figures that have a surprisingly 'fit' look to them.
You have probably seen much better painted model figures (and I'm not sure these two are among my best results) but this blog isn't written to make me look a better modeller than I am. Perhaps my figure painting will have improved with a few more years of practice. I'll then be able to link to this post and show my progress.


Thursday, 13 August 2015

Harvest Time Approaching (1/35)

In the fields around Nystrup the small farmers are busy harvesting their fields. The most progressive ones have equipped themselves with a combine harvester from German manufacturer Claas.

Cloud cover is low and rain will soon put an end to harvesting.

My combine harvester is the Universal Hobbies' Claas 'Europa' in 1:32 scale. It comes pre-assembled directly from the box. I have seen several Gauge 1 railway modellers use the combine right out of the box as a load on flat wagons. I took the time to pick out some details in contrasting colours - particularly on the engine, add a few decals and add some small details. A few spanners are placed at the driver's station and I fitted a home made broom too. The combine was given a light weathering of black oil paint and a little dust all covered with a layer of matt varnish.

Here is my home made broom. Three pieces of plastic, a little glue and some paint.