Showing posts with label skips. Show all posts

Sunday, 17 August 2025

Rare Coal Load on Nystrup Gravel

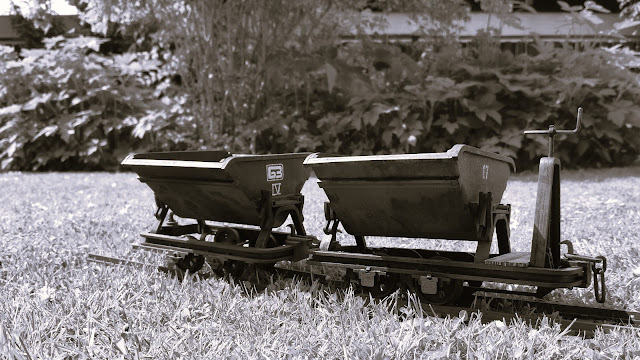
Skips loaded with coal was a comparatively rare occurence on Nystrup Gravel, where the vast majority of trains consisted of skips loaded with gravel. Recently a black and white picture of a coal train in the Nystrup yard surfaced and I wanted to explore the story behind the image.

Nystrup Gravel loco 3 with three skips loaded with coal, including some rather large lumps.

The image is quickly exposed as a simple editing of a digital colour photograph from my small 1/19 scale layout. The coal in the skips is Danish coal from a site I visited on my trip to the Danish island of Bornholm in the Baltic Sea. Bornholm has its rocky underground exposed in contrast to the more westerly located parts of Denmark and a few sites on the island has been worked to extract coal. I visited one of the sites and quickly filled a bag with small lumps of coal. Back home I filled a few skips with Danish coal to resemble the black and white photo. Quite expectedly I succeeded splendidly!

Skips 12, 3 and 54 filled with coal and pulled by Nystrup Gravel's small Lister R. The coal transport is a striking contrast to today's Denmark that used no coal for the last 3 months straight for the first time since the 1830's.

The coal lumps are quite large and some of them may have to be worked with a hammer to fit on the grate in Nystrup Gravel's central power plant.

Despite being quite large, the coal lumps from Bornholm are flaky with thin layers of sand. It will not be hard work breaking them up.

The coal from the Hasle quarry on Bornholm was brown coal (lignite) of a better quality than the brown coal quarried in Jutland at the same time during the German occupation of Denmark (1940-1945). The coal on Bornholm had a burn value amounting to 2/3 of German coal. Up to 40 m of overburden had to be dug away before the coal could be excavated. The overburden was transported by 900 mm skips to the nearby coast and tipped into to water. Surely an endevour only profitable during wartime with a cronic lack of coal from foreign suppliers. Today the site is called 'kultippen' (the coaltip) despite the fact that it was overburden being disposed of. Walking on the tip it's quite easy to pick up pieces of black coal in the sandy dunes that today is left as a kind of desert. There is even a few skips (collected from elsewhere on Bornholm) displayed at the site. Follow this link and see a short movie about the coal extraction on Bornholm.

The sun setting into the Baltic Sea behind the row of skips displayed at 'Kultippen' near the old coal quarry on the Danish island of Bornholm.
900 mm Jung-loco with skips on the tip. The wooden skips are seen being emptied on the site that can be visited today and that supplied the coal for my small 1/19 scale skips.

Bornholm is also known for its many stone quarries and on a visit to one of them, I had to have a supply of granite for another skip. The granite may be on its way to Ericsson's Stone Masonry that sometimes had stone slabs delivered via removable track panels. Perhaps the skip with smaller pieces of granite was delivered this way too? 

Nystrup Gravel skip 2 in almost immaculate condition with small blocks of granite. Probably for the local stone masonry.

'Take care and move slowly, when you get to the masonry's wooden track' chief mechanic Petersen could be telling the driver, before the short train leaves Nystrup.

Wednesday, 11 June 2025

Large Scale Skips Finished

After some very enjoyable work and a long drawn out weathering process the two laser cut 1/10 scale skips from Dutch  Feldbahnfactory are finally finished. They are now ready to be taken into use as conversation items on a cupboard next to my table in the company office where I work.

Summer is here and it's nice to photograp skips on a newly mown lawn.

The two skips were taken on as a challenge to build something  in an even larger scale than 1/19. Being 1/10 scale the skips are massively larger than anything I have ever done in my modelling career. I placed the two skips on my 1/19 scale layout and they simply dwarf my usually rather large skips. 

'Huge skips in my yard!' shop manager Petersen is obviously thinking, wondering where they might have come from.

Comparing with a pair of his own steel skips the size becomes even more apparent. The brake skip is 22 cm in length.

I placed a H0 scale mine skip on the brakeman's platform to illustrate the difference in size between 1/10 and 1/87. The close-up photo also shows up some of my hamfisted assembly of the skip body. I should have spent a little more time sanding...

Primarily the skips have been done as a fun and relaxing project like the Ukrainian futuristic drones and their Niva mothership. Something to revitalize my modelling mood and give me an understanding of different ways of handling kits. 

Last time I mentioned the skips they were almost finshed and lacking only the last weathering, having been held up by the need to replace my air compressor. With the compresser situation fixed both skips were given a very thin overall spray with light earth and sand paints. I'm merely misting the paint on. Several light passes are much better than too heavy a first spray. I added more paint (but still only a light cover) where dust will usually assemble. in advance both skips had been washed with a thinned rust coloured oil paint. I added graphite powder inside the skips bodies to represent the wear from gravel sliding out of the skips. I also used graphite to represent wear on the brake handle and buffers. Some oil spill may get represented with gloss black later, but I'm giving it more consideration. I'm not sure the effect will work in the large scale. 

Ready for service. Or not, as the gauge of the skips are 60 mm compared to Nystrup Gravels gauge of 32 mm.

The 1/10 scale skips have been a really fun and relaxing project. Many thanks to Feldbahnfactory for bringen the kits out. I wish the little company luck with their endeavour. Should I ever wish to explore more modelling in 1/10 scale another skip and a small loco would be tempting.

Two well used skip resting in between construction tasks. Skip IV appears to have the logo of the Borzhava narrow gauge railway in western Ukraine.

With the two skips finished the modelling table needs some cleaning before I continue adding lights and final layer of paint on the 1/19 scale Fowler loco. I'm looking forward to get that finished and continue a long list of projects on my small Nystrup Gravel layout.

Sunday, 9 March 2025

Large Scale Skips - Really Large! (1/10)

I have developed a serious 'multiple scale dispersion syndrome' regularly drifting from 1/19 scale as my mood sees fit. I'm now trying out two kits from the new manufacturer Feldbahnfactory in the Netherlands. Also trading under the name of 'Spoorhout' the small manufacturer is just about to lanuch a production of 1:10 scale 600 mm industrial railway wagons and locomotives in laser cut wood. I couldn't resist the urge to build two classic steel skips in 1:10 scale.

The skips (one braked and one unbraked) comes in flat boxes measuring 36x23 and 41x22 cm. Curiously the braked skip (the kit with the most parts) came in the smallest box.

I have only been opening the boxes and carefully examined the parts. The instruction in A4 landscape format are expertly done and the impression of the kits is very promising. I can say that packaging is solid and the the four frets of parts are wrapped in silk paper. Obviously the maker, Arnoud Bongaards, is talented in digital design and drawing as well as presenting his kits to a very high quality.

Opening the box you are greated by silk paper wrapped frets with laser cut parts for your large scale O&K skips. I had the feeling opening a jewellery box, not a model kit! The kits will have great gift potential for industrial railway enthusiasts.

I received instructions in Dutch language as Arnoud wasn't quite finished doing the English version. Fortunately I'm pretty used to reading Dutch - and lets face it: the drawings says more than a thousands words!

Having carefully removed the silk paper wrapping I examined the parts that seem to be cut nicely and probably needing only very little work to separate from the fret. As with any wooden laser cut kit I'm looking forward to see how the prototype's round shapes are represented in kit form. A few other things I'm looking forward to experience is how the layering of parts will work out and how well the wood will take paint. 

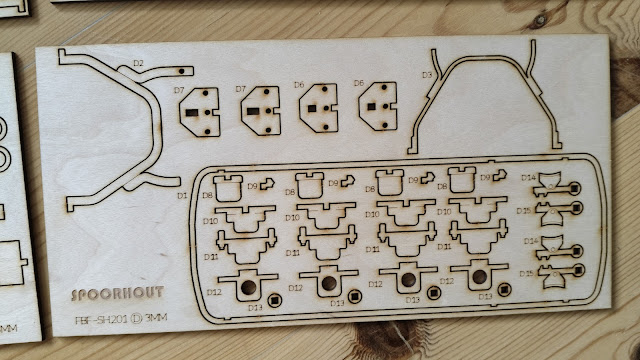
Four frets A, B, C and D - and a small extra one taped to fret A.

Close up of fret D. For any resonably knowledgable skip fan the parts are readily identyfiable.

The well illustrated instructions seem to leave no question unanswered. Time will tell if it really works out that way.

The two skips are not meant to become the beginning of a huge undertaking in 1/10 scale. A fun diversion from my rather serious 1/19 scale modelling is good and I plan to exhibit the finished models on my work office where I have varying displays of railway and construction equipment models. Always a good starter for a talk with colleagues.

Monday, 3 July 2023

Historic Skip Photo

One of my primary sources of inspiration for modelling projects are old photographs of real prototype industrial railways. Recently I got an e-mail containing the image below. A lovely train of skips pulled by an internal combustion engine locomotive in a design obviously inspired by surrealist art. The location is Løsning gravel and stone works owned by Henriksen & Kähler, a large Danish company best known for supplying construction materials as well as owning several ceramics factories. The company wasn't nervous branching out into other business areas as they also had a factory producing gas measuring devices and to end a long list of diverse enterprises: a fishing net factory.

Overgrown track, a characteristic IC loco, loaded skips, a row of telegraph poles and an assortment of metal scrap in the foreground. A well composed photograph and rich source of inspiration for a modeller.

In the photo the wooden framed skips for 785 mm gauge stand out. A simple, square frame of timber bolted together with rough steel brackets and added wheel bearings. The V-tub rests and tips on three cross struts held in place by a combination of brackets and chains. The type was relatively widespread in Denmark, primarily being used by gravel companies and contractors with 785 mm gauge. I have often wondered if the type could be adapted to my prototype gauge of 600 mm.

The locomotive is most likely one from several series produced by Henriksen & Kähler themselves in work shops at their larger gravel operations. 

Monday, 5 June 2023

Loading Three Hudson Skips

Over the course of a few days I have loaded my three U-tub Hudson skips. Using 5-10 minutes at a time it's quite fast to get decent loads in place. I now consider the skips finished.

Three loaded Hudson underground skips finished. Cheap 3D printed models that can be treated to look like something a lot more substantial.

The task of getting loads in the skips began in my shed where I store a supply of styrofoam in different thickness. I cut three rectangular pieces of differing height. Cutting the styrofoam was also done in the shed as small bits of styrofoam will invariably end up everywhere if cut inside the house. 

I glued the styrofoam inside the skips' tubs with white glue. Once dry I shaped the top of the styrofom to look like a load of ash or general waste from the workings of the gravel company. I added finely sieved gravel to the styrofoam shapes and used my usual glue mix of white lue, tap water and washing up liquid. The mix was applied with a syringe and once the gravel was flooded the skips were set away to dry. In one of the tubs I embedded some planks, in another some rags and a used paint tin. Once dry I further detailed the loads with some broken up concrete floor, paint and pastel powder and some branches.

Cutting styrofoam at the worktable in the shed.

Basic shapes of loads glued in the tubs ready for detailing.

One load is glued and painted while the glue still dries in the two skips to the left.

Weight naturally increased a bit with the gravel loads. The lead strip in the bottom of the tub and the light styrofoam filling ensures the skip isn't getting top heavy and unstable on rought track. A method I developed in my 1/35 scale modelling days.


Skips loaded with ash, broken up concrete floor, planks and dirt mixed with rags, branches and paint tins. No sorting of garbage and safe disposal in the 1950's. All Nystrup Gravel garbage was disposed off in emptied gravel pits.

The skips have made a fun, although slightly slower project than expected. The 3D printed kits are well made and with suitable modifications and treatment almost every sign of these being 3D printed models disappear.

I know I couldn't fool anyone, but it's fun experimenting with different techniques to make a photo of my models appear old at first glance. Practice makes perfect - or a little better, at least.


Monday, 15 May 2023

Finished Underground Skips

Another three skips are now finally ready for service on Nystrup Gravel. There is always room for more skips on the gravel line! The recent work on the skips has mainly been painting and weathering. As mentioned earlier on the blog I wanted the Hudson U-tub skips to be heavily weathered. As the finishing of the skips has been rather long drawn out I'm recapitulating it here. Last post with the first preparatory painting and weathering of the skips can be found here.

Afternoon shunting with the three Hudson skips with narrow profile and U-tubs on the layout.

 After the heavy texture weathering was applied with plastic putty the three skips were primed with my favourite primer Games Workshop 'Chaos Black'. Actually I left the primer without a layer of covering black paint, as I have found the primer a good foundation for weathering. For rust I used Humbrol acrylic 113 Matt Rust and Green Stuff 2287 Light Rust as well as the same manufacturer's 2778 Medium Oxide Rust for larger areas. 2778 is basically a prethinned wash and flows easily. Some of the  areas 'wetted' with Green Stuff 2778 were treated with real pulverised rust from a full size skip, giving further texture to the model skips. The cakes of ash were then painted with Vallejo 70.837 Pale Sand that was also applied haphazardly over the skips. The painted skips were then given a wash with heavily diluted rust coloured oil paint and once dry treated with a randomly applied pattern of Vallejo pigments 73.117 Rust. I have mentioned the paint numbers and names, but any rust coloured paints will do. Just make sure the paint isn't applied in regular patterns. Previously I have used beer and loud music to make sure I'm appropriately distracted while painting.

Having confirmed that the coupling system with prototype coupling hooks suspended below the wagons' frames worked fine in 16 mm scale, I found no appropriately sized hooks from manufacturers online. Fortunately it wasn't too difficult to bend up my own from metal wire. The hooks were painted and the skips were ready for the next stage of weathering.

Before final weathering the couplings were tested. Home made (left) and a single spare hook from model car (right) in view. 

After having worked only with a rattle can (the primer) and brushes, the next stage of weathering would use airbrushing. I airbrushed a thin mist of Vallejo 70.837 Pale Sand mixed with matt varnish and a lot of water (I simply use ordinary tap water) to represent a thin layer of whiteish dust covering the upper parts of the wagons. wheels and frame got a few spots with a thin mix of water and Vallejo 71.142 Sinai Sand representing dust from the track.

All ready to go for applying pigments. Pigments are dry and dusty products so I try to keep well hydrated during work!

Once the dust had settled and dried on the skips I finished the weathering with a layer of rust coloured powdered pigment from Vallejo (73.117 Rust). The powder was applied with a cut-down brush with stiff brushes, primaily around the large painted rust areas. I used powdered graphite inside the tubs to represent wear from the loads sliding out of the skips as well as on the wheel treads and buffers.

A train with the Hudson underground skips on their way back from one of the emptied gravel pits that was used for dumping ash and general garbage from the production.

Once back in Nystrup the skips are pushed into the gravel company's complex of buildings.

The top of the insides of the tubs were weathered as well to allow the skips to run empty until I manage to fix a load in them. The load will be ash, floor sweepings and garbage.

Three finished skips numbered 30, 32 and 37 on my little photo plank outside in the garden.

Skip No. 37 with dirt, rust and ash deposits on tub and frames. Not much to reveal that the skips are cheap 3D prints. It remains to be seen if the printed wheels will provide sufficiently good running. Final weight for a skip turned out to be 44 g including a strip of lead in the bottom of the tub. Before adding weight the freshly printed skip weighed only 24 g (including axles and bearings).

I have another three skips in boxes, but I suspect that it will take some time before they turn up on my modelling table. No matter what I now have a nice little train of skips looking a bit more different than my ordinary Hudson 'Ruggas' and DIN-types.


Thursday, 9 February 2023

Underground Skips First Paint

During a few late evenings before bedtime I have been preparing the painting of the first three underground skips. Now one of them is primed with black and having the first splotchy layer of paint applied. These wagons will be heavily weathered with an almost full covering of rust and caked on ash deposits.

Three 3D printed Hudson underground skips in their current status.  

With the first running tests concluded, I began to fit couplings and the necessary weight into each of the underground skips. First the holes in the reinforced buffing plates on the frame was filled with putty and sanded. Then a triangle of plasticcard with a 1 mm hole in one corner was superglued behind the buffer to take a one-link piece of chain holding a leftover plastic hook. I plan to fit the wagons with the characteristic 'below the frame hook and chain coupling' to see if that is a feasible solution in 16 mm scale. I made long links for the couplings and attached a single leftover hook in one end of a skip. Tests are now being done to find out if the hook is prone to fasten in sleepers, turnouts or weeds in the track. If it works I will have to source hooks from a manufacturer.

Frame ready to receive plasticcard coupling brackets. The triangles will be glued on the centreline with the opening against the frame end. Small lead weights are then glued on each side of the brackets.

A cruel close-up of a mobile phone snapshot showing the test coupling between two skips. Time will tell if this works in reality in 16 mm scale.

With couplings and weight added I turned to adding the heaviest texture on the skip with modelling putty. I used a wooden toothpick to apply and work the putty into a thin layer with texture. Once painting and weathering is finished I hope the coarse texture in combination with lighter texture from paint and pastels will help make the wagon look dirty and well used with 'cakes' of ash.

A skip with experimental coupling and testing textured deposits of dirt - both painted and unpainted. Apart from the weights glued under the frame, a large piece of soft lead material is also glued into each of the skip's end brackets carrying the U-tub. 

Sometimes it's a challenge to get plastic putty to adhere properly to 3D printed models. Deluxe Materials 'Perfect plastic putty' works fine. But what else could be expected with a name like that?

Expect further reporting on the three skips once the coupling has been tested and I have completed painting and weathering of the first skip.

Sunday, 15 January 2023

Underground Skip Progress

In my last post on the Hudson U-tub underground skip I had just finished hand pushing one half finished wagon along the Nystrup Gravel track. Since then I added a little weight in the tub (a 12 g pipe fitting) and made some tests with loco pushing the skip along the track through points and curves. Everything seemed to work tolerably well.

The Lister Rail Tractor test pushing 3 skips - so far without any derailments.

Once the testing on one skip had been carried out I prepared parts for two more wagons. I subscribe to the view that 3 examples of an item is seen as 'many'. Probably because the eye easily recognises two as a 'pair', 3 seems to put more strain on the brain. No matter what I now have 3 assembled skips that I will continue to work on. I will gather experience and only then assemble the last 3 skips. 

Prepared parts for two skips laid out on the worktable.

As I mentioned the skips' very light weight is a serious obstacle for reliable running on my uneven track. With a weight of the frame of only 6 g, wheels and axles 7 g and the tub weighing 12 g, I added 10 g of additional 'ballast' gaining a total weight of 34 g. Even with the 3D printed wheels the test wagon worked alright, although more weight wouldn't hurt. It remains to be seen how much weight I can fit in.

Blog reader Nick Curtis commented that Slaters Plastikard's 6 curly spoke 16 mm diameter wheels (ref. 1612DIN) could probably fit on the skips and I'm now considering to replace the plastic wheels. I'm trying out the kit wheels first to give them a chance, though. Surely the advise and hints I'm picking up from the blog's comments is a valuable source for improving my modelling.


The wheels that may find their way to replace the kit's 3D printed wheels.

Once the final rolling tests and weight experiments have been carried out I will take the 3 skips apart again and figure out how to fit coupling chains and hooks. I will also be working on how to add some texture to the skips to represent rust, flaked paint and caked on ash and debris. More about that later.

A U-tub skip being loaded by a Eimco 12B rocker shovel at the Lea Bailey Light Railway. The skip has similar tub details as my Hudson skips, but has a different frame. Image: LBLR. 

Friday, 6 January 2023

Underground Skip on Track

With Christmas and New Year celebrated and having settled stage 1 of the work associated with my daughter's wedding and new apartement, I finally got half an hour at the hobby table. The result was a rolling 3D printed Hudson underground skip, one of six that arrived shortly before Christmas. A lot of work still remain, but as a 'proof of concept' the result was satisfying enough.

U-tub skip for underground use next to a standard Hudson V-skip. 

With a 3D printed construction a small model like the Hudson skip is extremely light - even in a scale as large as 16 mm. With some rather coarsely printed wheels thrown under the construction I expected a model with less than mediocre running qualities. To enhance running replacement metal wheels would be a natural solution, but as I haven't yet found any metal wheels of the correct type I'm going to use the printed ones for a start. That means that I have to cram as much weight into the skip as possible, preferably as low as possible to avoid a high centre of gravity.

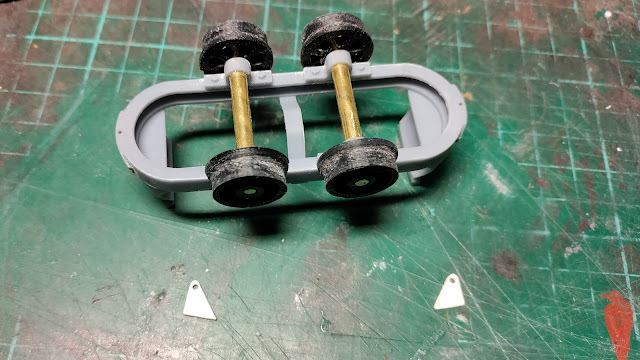
First I had to get the skip running. The wheels are designed for 3 mm axles and I ordered axles as well as brass tube with a 3 mm internal diameter to fabricate bearings. When arriving the brass tube turned out to be 5 mm outer diameter and impossible to fit in the model's axleboxes without wrecking them. It turned out that Albion Alloys had thin-walled brass tube with a 4 mm outer diameter. The tubes were even available from a Danish seller, SMT- modeltog, making a delivery to my door in less than 48 hours possible. To make the postage worth the investment, I added some glues to my order. 


BT4M brass tube with 4 mm outer diameter and inner diameter of 3,1 mm. 

Picking a skip frame, I quickly sanded most of the printing traces from the sides of the frame and opened up the holes in the axleboxes to 4 mm. To make the wagon a few grams heavier, I decided to cut a single, long brass bearing completely enveloping the 3 mm brass axle instead of two bearings fitted into the axleboxes on each side of the skip. With limited view of anything below the skip's tub I think the slightly larger appearance of the axle will hardly be noticed. The axles were cut to length (39 mm even if the instructions said 42 mm). The wheels' axleholes were reamed with a 3 mm drill, the axle fitted in the tube bearings and the wheels pushed on. Before fitting, the wheels were cleaned up a bit and the worst dimples on the running surfaces removed. The wheels are by no way worse than what I have seen on prototype industrial narrow gauge rolling stock in Denmark. In model they may need further treatment, though.

Tube bearings, axles and wheels fitted. The wheel profile isn't the prettiest I've seen!

Skip frame on my Code 100 test track undergoing the first rolling test. 

The first finger pushing tests conducted on a test track and the on the real Nystrup Gravel track, showed that he wagon behaved quite well, even on uneven and curved track. Next up is adding a little weight in the tub and making tests with loco pushing. Once the rolling tests and weight experiments have been carried out I will take the skip apart again and figure out how to fit coupling chains and hooks. Then it will need sanding and add ing of texture, painting and weathering. And then there is five more waiting! I have previously done assembly line work on identical models and I will probably do the same on the underground skips.

All parts for a single skip brought together on my worktable test track panel.


After being hand pushed on the layout with reasonably succes the U-tub skip is now resting, waiting for further tests and improvements.