Showing posts with label underground skips. Show all posts

Sunday, 10 August 2025

Vacation Modelling

As usual I bring a project for some slow vacation modelling in the cottage. This year I chose three 3D printed Hudson underground skips. They are second stage of a six wagon build proces with three skips finished in first stage back in 2023. With experience from building the first three skips there shouldn't be much to worry about! 

Three skips posing assembly line like on the cottage table cloth. One-piece full length 4 mm diameter brass bearings fitted.

One skip fitted with wheels - two still waiting.

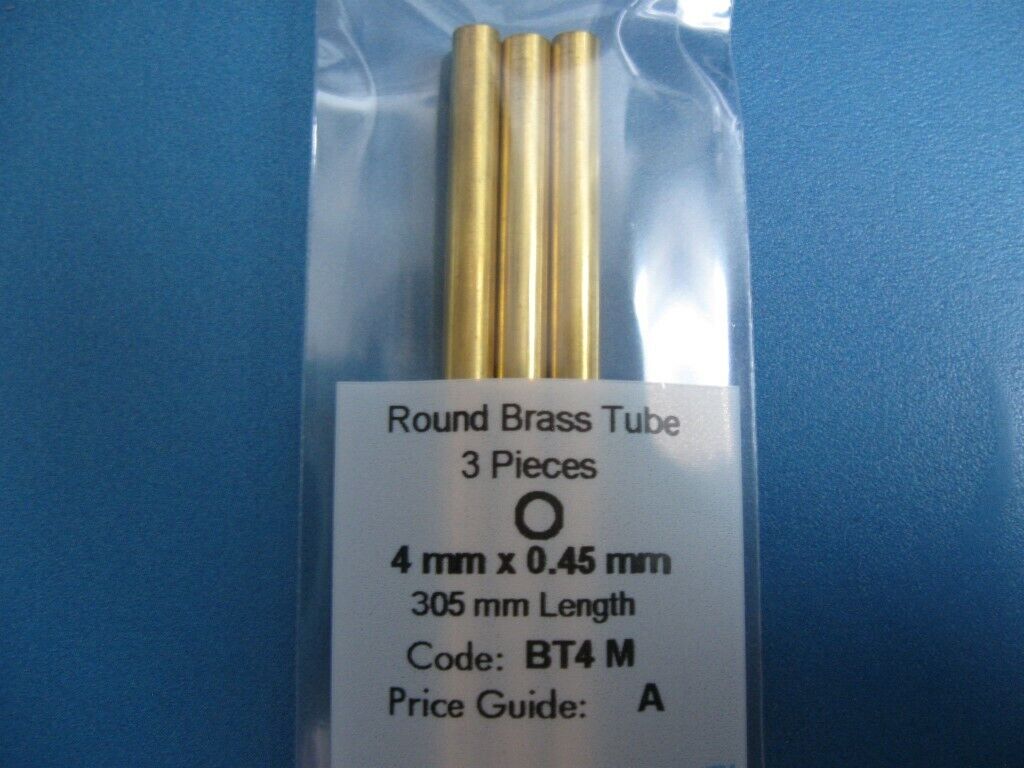
The skips' wheels are designed for 3 mm axles and I used Albion Alloys thin-walled brass tube with a 4 mm outer diameter for bearings. To make the wagon a few grams heavier, I cut a single, long brass bearing completely enveloping the axle instead of two bearings fitted into the axleboxes on each side of the skip. With limited view of anything below the skip's tub the slightly larger appearance of the axle has hardly been noticable on the first three wagons. The axles were then cut to length and the wheels' axleholes were reamed with a 3 mm drill, the axle fitted in the tube bearings and the wheels pushed on. 

Before fitting, the wheels were cleaned up a bit and the worst dimples on the running surfaces removed with a sanding stick. 

Three skips fitted with 'caked on' ash on frames and skip bodies. The modeller enjoying a beer while working.

The putty has dried and now lead sheet is fitted as ballast.

Before the wheels were fitted, I sanded the printing traces from the sides of the frames. That was an easier job than to remove the traces on the sides of the skips' tubs. As the wagons were used to transport ash on Nystrup Gravel I'm applying a heavy weathering that will help to cover the last traces of the printing proces.  From prototype photos the skips were covered with 'cakes' of ash on the sides and to represent that, I added texture to the skips with modelling putty. I applied the putty with a wooden toothpick and worked the semi-dried putty into a thin layer with texture with an old tooth brush. 

With the putty dried I turned my attention to fit the lead ballast that is crucial to achieve accetable running from the skips. The first pieces of lead sheet was super glued into the skip body rests after being bent to a perfect fit.

Now work to bend up couplings are waiting.

Sunday, 19 May 2024

Playing Trains on the Porch

We've had lovely weather in Denmark for the last few weeks. While I like to model outside, I rarely run trains outdoors. Having finished a day's programme in the garden I fancied playing trains on the porch. I got out some Loco Remote straight track panels for a short length of track. The Lister was an obvious choice for propelling a U-tub steel skip back and forth. The birds were twittering and I had a glass of chilled rosé ready.

A small 1/19 scale model train on my porch.

The warm and quiet late afternoon had a good light and I took the chance to make a short film. Besides the sound of birds there isn't much sound on the film. I like the movement of the track panels where they cross some of the unevenness in the porch. It looks exactly how real track panels move in reality.


While I love to model and build stuff it's quite nice now and the to just sit and watch a simple train move back and forth on a length of track.

Monday, 5 June 2023

Loading Three Hudson Skips

Over the course of a few days I have loaded my three U-tub Hudson skips. Using 5-10 minutes at a time it's quite fast to get decent loads in place. I now consider the skips finished.

Three loaded Hudson underground skips finished. Cheap 3D printed models that can be treated to look like something a lot more substantial.

The task of getting loads in the skips began in my shed where I store a supply of styrofoam in different thickness. I cut three rectangular pieces of differing height. Cutting the styrofoam was also done in the shed as small bits of styrofoam will invariably end up everywhere if cut inside the house. 

I glued the styrofoam inside the skips' tubs with white glue. Once dry I shaped the top of the styrofom to look like a load of ash or general waste from the workings of the gravel company. I added finely sieved gravel to the styrofoam shapes and used my usual glue mix of white lue, tap water and washing up liquid. The mix was applied with a syringe and once the gravel was flooded the skips were set away to dry. In one of the tubs I embedded some planks, in another some rags and a used paint tin. Once dry I further detailed the loads with some broken up concrete floor, paint and pastel powder and some branches.

Cutting styrofoam at the worktable in the shed.

Basic shapes of loads glued in the tubs ready for detailing.

One load is glued and painted while the glue still dries in the two skips to the left.

Weight naturally increased a bit with the gravel loads. The lead strip in the bottom of the tub and the light styrofoam filling ensures the skip isn't getting top heavy and unstable on rought track. A method I developed in my 1/35 scale modelling days.


Skips loaded with ash, broken up concrete floor, planks and dirt mixed with rags, branches and paint tins. No sorting of garbage and safe disposal in the 1950's. All Nystrup Gravel garbage was disposed off in emptied gravel pits.

The skips have made a fun, although slightly slower project than expected. The 3D printed kits are well made and with suitable modifications and treatment almost every sign of these being 3D printed models disappear.

I know I couldn't fool anyone, but it's fun experimenting with different techniques to make a photo of my models appear old at first glance. Practice makes perfect - or a little better, at least.


Monday, 15 May 2023

Finished Underground Skips

Another three skips are now finally ready for service on Nystrup Gravel. There is always room for more skips on the gravel line! The recent work on the skips has mainly been painting and weathering. As mentioned earlier on the blog I wanted the Hudson U-tub skips to be heavily weathered. As the finishing of the skips has been rather long drawn out I'm recapitulating it here. Last post with the first preparatory painting and weathering of the skips can be found here.

Afternoon shunting with the three Hudson skips with narrow profile and U-tubs on the layout.

 After the heavy texture weathering was applied with plastic putty the three skips were primed with my favourite primer Games Workshop 'Chaos Black'. Actually I left the primer without a layer of covering black paint, as I have found the primer a good foundation for weathering. For rust I used Humbrol acrylic 113 Matt Rust and Green Stuff 2287 Light Rust as well as the same manufacturer's 2778 Medium Oxide Rust for larger areas. 2778 is basically a prethinned wash and flows easily. Some of the  areas 'wetted' with Green Stuff 2778 were treated with real pulverised rust from a full size skip, giving further texture to the model skips. The cakes of ash were then painted with Vallejo 70.837 Pale Sand that was also applied haphazardly over the skips. The painted skips were then given a wash with heavily diluted rust coloured oil paint and once dry treated with a randomly applied pattern of Vallejo pigments 73.117 Rust. I have mentioned the paint numbers and names, but any rust coloured paints will do. Just make sure the paint isn't applied in regular patterns. Previously I have used beer and loud music to make sure I'm appropriately distracted while painting.

Having confirmed that the coupling system with prototype coupling hooks suspended below the wagons' frames worked fine in 16 mm scale, I found no appropriately sized hooks from manufacturers online. Fortunately it wasn't too difficult to bend up my own from metal wire. The hooks were painted and the skips were ready for the next stage of weathering.

Before final weathering the couplings were tested. Home made (left) and a single spare hook from model car (right) in view. 

After having worked only with a rattle can (the primer) and brushes, the next stage of weathering would use airbrushing. I airbrushed a thin mist of Vallejo 70.837 Pale Sand mixed with matt varnish and a lot of water (I simply use ordinary tap water) to represent a thin layer of whiteish dust covering the upper parts of the wagons. wheels and frame got a few spots with a thin mix of water and Vallejo 71.142 Sinai Sand representing dust from the track.

All ready to go for applying pigments. Pigments are dry and dusty products so I try to keep well hydrated during work!

Once the dust had settled and dried on the skips I finished the weathering with a layer of rust coloured powdered pigment from Vallejo (73.117 Rust). The powder was applied with a cut-down brush with stiff brushes, primaily around the large painted rust areas. I used powdered graphite inside the tubs to represent wear from the loads sliding out of the skips as well as on the wheel treads and buffers.

A train with the Hudson underground skips on their way back from one of the emptied gravel pits that was used for dumping ash and general garbage from the production.

Once back in Nystrup the skips are pushed into the gravel company's complex of buildings.

The top of the insides of the tubs were weathered as well to allow the skips to run empty until I manage to fix a load in them. The load will be ash, floor sweepings and garbage.

Three finished skips numbered 30, 32 and 37 on my little photo plank outside in the garden.

Skip No. 37 with dirt, rust and ash deposits on tub and frames. Not much to reveal that the skips are cheap 3D prints. It remains to be seen if the printed wheels will provide sufficiently good running. Final weight for a skip turned out to be 44 g including a strip of lead in the bottom of the tub. Before adding weight the freshly printed skip weighed only 24 g (including axles and bearings).

I have another three skips in boxes, but I suspect that it will take some time before they turn up on my modelling table. No matter what I now have a nice little train of skips looking a bit more different than my ordinary Hudson 'Ruggas' and DIN-types.


Monday, 20 March 2023

Unwanted Modelling Break

My modelling has come to a pause as I currently have a squashed finger healing. While I have modelled in 16 mm scale with a broken wrist, a right hand middlefinger is something else. And as I was in the process of making coupling hooks for the 3 U-tub skips I need full use of both hands to make them nice and identical.

Current status on the first 3 U-tub skips. They still lack an airbrushed layer of dirt and some weathering powders - and the coupling hooks.

The finger broke as it got caught between two platform segments while I worked at the Hedeland vintage railway (HVB). It's been ages since someone got a scratch during work there - a testament to the care taken and planning of work.

Construction af a new platform on HVB. The concrete 'shoes' are the platform foundations holding the concrete front element in place. We have an old Salta 1602 as a spare excavator when our regular excavator has a problem.

I hope for quick recovery and that I will be modelling again before too long. Until then I have plenty of administrative work to do on the vintage railway.

Sunday, 12 March 2023

Mix of Scales

Currently I'm having projects in 1/87 and 1/19 scales on my worktable. That allows for a perfect illustration of the difference in size between the differently scaled objects.

A mix of scales on my worktable: K-Model excavator and PD-1 draisines in 1/87 and a Hudson U-tub skip in 1/19 scale. The difference in size is substantial!

I have added coupling chains on the two PD-1 draisines and they are now primed and ready for painting. The Soviet excavator has had the track assembly and external drive chains fitted. On the upper structure I'm busy opening up windows in the driver's cabin. That's fiddly work with drills, scalpel and small files. I have glued the excavator's lattice boom together and is now testing out which position to place it in. I'm considering placing it in a horisontal position as if being under repair. No matter what I'm amazed it is possible to print such a delicate structure in a small scale and still have it stand up to my heavy 1/19 scale handling!

In 1/19 scale I'm progressing and will soon have three underground skips ready for service. The last of the three is currently being fitted with lead weight and painted. My quest for appropriately sized coupling hooks wasn't succesful and I'm now working on making my own. Finished skips not too far away now!

Thursday, 9 February 2023

Underground Skips First Paint

During a few late evenings before bedtime I have been preparing the painting of the first three underground skips. Now one of them is primed with black and having the first splotchy layer of paint applied. These wagons will be heavily weathered with an almost full covering of rust and caked on ash deposits.

Three 3D printed Hudson underground skips in their current status.  

With the first running tests concluded, I began to fit couplings and the necessary weight into each of the underground skips. First the holes in the reinforced buffing plates on the frame was filled with putty and sanded. Then a triangle of plasticcard with a 1 mm hole in one corner was superglued behind the buffer to take a one-link piece of chain holding a leftover plastic hook. I plan to fit the wagons with the characteristic 'below the frame hook and chain coupling' to see if that is a feasible solution in 16 mm scale. I made long links for the couplings and attached a single leftover hook in one end of a skip. Tests are now being done to find out if the hook is prone to fasten in sleepers, turnouts or weeds in the track. If it works I will have to source hooks from a manufacturer.

Frame ready to receive plasticcard coupling brackets. The triangles will be glued on the centreline with the opening against the frame end. Small lead weights are then glued on each side of the brackets.

A cruel close-up of a mobile phone snapshot showing the test coupling between two skips. Time will tell if this works in reality in 16 mm scale.

With couplings and weight added I turned to adding the heaviest texture on the skip with modelling putty. I used a wooden toothpick to apply and work the putty into a thin layer with texture. Once painting and weathering is finished I hope the coarse texture in combination with lighter texture from paint and pastels will help make the wagon look dirty and well used with 'cakes' of ash.

A skip with experimental coupling and testing textured deposits of dirt - both painted and unpainted. Apart from the weights glued under the frame, a large piece of soft lead material is also glued into each of the skip's end brackets carrying the U-tub. 

Sometimes it's a challenge to get plastic putty to adhere properly to 3D printed models. Deluxe Materials 'Perfect plastic putty' works fine. But what else could be expected with a name like that?

Expect further reporting on the three skips once the coupling has been tested and I have completed painting and weathering of the first skip.

Sunday, 15 January 2023

Underground Skip Progress

In my last post on the Hudson U-tub underground skip I had just finished hand pushing one half finished wagon along the Nystrup Gravel track. Since then I added a little weight in the tub (a 12 g pipe fitting) and made some tests with loco pushing the skip along the track through points and curves. Everything seemed to work tolerably well.

The Lister Rail Tractor test pushing 3 skips - so far without any derailments.

Once the testing on one skip had been carried out I prepared parts for two more wagons. I subscribe to the view that 3 examples of an item is seen as 'many'. Probably because the eye easily recognises two as a 'pair', 3 seems to put more strain on the brain. No matter what I now have 3 assembled skips that I will continue to work on. I will gather experience and only then assemble the last 3 skips. 

Prepared parts for two skips laid out on the worktable.

As I mentioned the skips' very light weight is a serious obstacle for reliable running on my uneven track. With a weight of the frame of only 6 g, wheels and axles 7 g and the tub weighing 12 g, I added 10 g of additional 'ballast' gaining a total weight of 34 g. Even with the 3D printed wheels the test wagon worked alright, although more weight wouldn't hurt. It remains to be seen how much weight I can fit in.

Blog reader Nick Curtis commented that Slaters Plastikard's 6 curly spoke 16 mm diameter wheels (ref. 1612DIN) could probably fit on the skips and I'm now considering to replace the plastic wheels. I'm trying out the kit wheels first to give them a chance, though. Surely the advise and hints I'm picking up from the blog's comments is a valuable source for improving my modelling.


The wheels that may find their way to replace the kit's 3D printed wheels.

Once the final rolling tests and weight experiments have been carried out I will take the 3 skips apart again and figure out how to fit coupling chains and hooks. I will also be working on how to add some texture to the skips to represent rust, flaked paint and caked on ash and debris. More about that later.

A U-tub skip being loaded by a Eimco 12B rocker shovel at the Lea Bailey Light Railway. The skip has similar tub details as my Hudson skips, but has a different frame. Image: LBLR. 

Friday, 6 January 2023

Underground Skip on Track

With Christmas and New Year celebrated and having settled stage 1 of the work associated with my daughter's wedding and new apartement, I finally got half an hour at the hobby table. The result was a rolling 3D printed Hudson underground skip, one of six that arrived shortly before Christmas. A lot of work still remain, but as a 'proof of concept' the result was satisfying enough.

U-tub skip for underground use next to a standard Hudson V-skip. 

With a 3D printed construction a small model like the Hudson skip is extremely light - even in a scale as large as 16 mm. With some rather coarsely printed wheels thrown under the construction I expected a model with less than mediocre running qualities. To enhance running replacement metal wheels would be a natural solution, but as I haven't yet found any metal wheels of the correct type I'm going to use the printed ones for a start. That means that I have to cram as much weight into the skip as possible, preferably as low as possible to avoid a high centre of gravity.

First I had to get the skip running. The wheels are designed for 3 mm axles and I ordered axles as well as brass tube with a 3 mm internal diameter to fabricate bearings. When arriving the brass tube turned out to be 5 mm outer diameter and impossible to fit in the model's axleboxes without wrecking them. It turned out that Albion Alloys had thin-walled brass tube with a 4 mm outer diameter. The tubes were even available from a Danish seller, SMT- modeltog, making a delivery to my door in less than 48 hours possible. To make the postage worth the investment, I added some glues to my order. 


BT4M brass tube with 4 mm outer diameter and inner diameter of 3,1 mm. 

Picking a skip frame, I quickly sanded most of the printing traces from the sides of the frame and opened up the holes in the axleboxes to 4 mm. To make the wagon a few grams heavier, I decided to cut a single, long brass bearing completely enveloping the 3 mm brass axle instead of two bearings fitted into the axleboxes on each side of the skip. With limited view of anything below the skip's tub I think the slightly larger appearance of the axle will hardly be noticed. The axles were cut to length (39 mm even if the instructions said 42 mm). The wheels' axleholes were reamed with a 3 mm drill, the axle fitted in the tube bearings and the wheels pushed on. Before fitting, the wheels were cleaned up a bit and the worst dimples on the running surfaces removed. The wheels are by no way worse than what I have seen on prototype industrial narrow gauge rolling stock in Denmark. In model they may need further treatment, though.

Tube bearings, axles and wheels fitted. The wheel profile isn't the prettiest I've seen!

Skip frame on my Code 100 test track undergoing the first rolling test. 

The first finger pushing tests conducted on a test track and the on the real Nystrup Gravel track, showed that he wagon behaved quite well, even on uneven and curved track. Next up is adding a little weight in the tub and making tests with loco pushing. Once the rolling tests and weight experiments have been carried out I will take the skip apart again and figure out how to fit coupling chains and hooks. Then it will need sanding and add ing of texture, painting and weathering. And then there is five more waiting! I have previously done assembly line work on identical models and I will probably do the same on the underground skips.

All parts for a single skip brought together on my worktable test track panel.


After being hand pushed on the layout with reasonably succes the U-tub skip is now resting, waiting for further tests and improvements.

Thursday, 22 December 2022

Underground Skips

Being a hard working ordinary gravel line Nystrup Gravel's primary type of rolling stock is of course the side-tipping skip. From an old list we know that the company owned a mixed range of standard steel skips of German-inspired DIN-type as well as a few British Hudson-skips. Recent research in the company archives has now revealed that the company also had a number of Hudson underground skips with U-tubs and narrow profile. 

Workshop manager Petersen inspecting a newly arrived 3D printed underground skip. 

With documentation for underground skips on the prototype Nystrup Gravel my model of the gravel line obviously had to have some as well. I found some rather credible looking 3D printed U-tub skips resembling a well known British type built (or at least marketed) by Hudson. Recently I have had rather positive experiences with 3D printed products including loco parts, porcelain isolators and figures. My first 3D model was a Schöma locomotive back in 2013 when I was modelling in 1/35 scale.

Four standard skips set aside for the weekend. On my 1/19 scale model of the Nystrup Gravel I have a mix of DIN- and Hudson-type skips just as the real gravel company had. A single Hudson can be seen far left. Now a new type of skip will soon join them.

Nystrup Gravel wasn't home to any underground activity (except for some resistance activities against the German occupation 1940-1945) and the reason for having underground skips were most likely some limited clearances inside one of the buildings in the Nystrup Gravel complex. The few images I have so far seen of the wagons shows them dumping ash and general waste in the emptied part of a gravel pit. Observations that could point to their use for transporting waste from within the production facilities.

A page from a Hudson catalogue showing various U-shape skips for underground use. Here sourced from the website of The Yorkshire Group of 16mm N.G. Modellers Ltd.

The 3D printed kits are sold as 'SM32 16mm Scale Hudson Skip Kit' on ebay. It is mentioned that the parts are printed in polyethylene terephthalate glycol. The kit consists of two large parts (frame and tub) as well as four smaller parts (wheels). I had 6 skips shipped as I like to have a number of the same type of wagon. On Danish industrial railways a single wagon of a type wasn't the norm, as most industries bought rolling stock in batches. I continue that shopping habit.

One of the U-tub skips taken directly from its zip-lock bag. More awaits unpacking in the background.

Newly unpacked skip seen from a slightly different angle.

Skip and tub separated with wheels in the foreground.

Close-up of the 15 mm diamater wheels which are of questionable quality, at first glance at least.

The parts are rather finely printed with no large marks from the printing proces. On some surfaces there is a very fine layering pattern visible. The bottom of the U-tub isn't genuinely half-round but 'stepped'. Both effects are known disadvantages from the printing proces and the design/drawing phase. The layering effects have diminished in the recent years due to advances in printing technology, but ruined most small scale 3D printed models some years back. Usually the effects are less serious in large scales where it is also a little easier to remove or cover them with surface texture and paint.

A view of the underside of the skip frame.

As customary on late Hudson products the open end of the U-profile is on the inner side of the frame. 

The prints are very light weight and I suspect that will be a challange if not taken care of. Even if I find appropriate metal wheels I will probably have to add weight to make the wagons run well on my prototypically bad industrial railway track.

A look into the tub. There is no detail on the tub's inner surfaces. I will decide if I fill the tubs with a load or fit detail to at least the upper inner surfaces.

A tub seen from below. The rivets are nicely done.

From this view the tub's riveted construction is clearly visible.

I have ordered brass piping with an inner diameter of 3 mm to be used as bearings and 3 mm axles. That should enable me to test the printed wheels on my track and find out if metal wheels are a must. 

Have you similar wagons in service on your 16 mm railway or any advice on where to find 15 mm diameter curly spoked wheels that will match the skips? Please leave a comment or e-mail me at nystrupgravel@gmail.com