Showing posts with label Fowler. Show all posts

Monday, 23 June 2025

Fowler Progress: Paint and Decals

I'm not the fastest of railway modellers. 3 years after I took delivery of a Fowler in 1/19 scale for Nystrup Gravel I'm still working on my personal interpretation of an early 1930's Fowler in Danish service on 600 mm gauge. But now the loco is finally approaching a finished stage. This week I had basic painting and decal application done. 

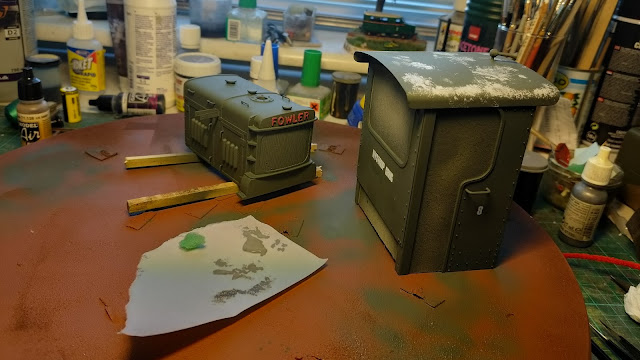
Snapshot of the freshly repainted Fowler on my worktable.

With large openings in the cab the Fowler presented me with quite a task masking these before painting could commence. Rather than using only masking tape, I cut some scrap cardboard to a tight fit for door and rear cab wall openings. The cardboard was fitted to the cab with Tamiya masking tape. Front windows received only masking tape. One advantage (except saving masking tape) is that the cardboard allows touch points for careful handling of the cab during painting, something that masking tape wouldn't provide.

I airbrushed cab, bonnet and gearbox cover with thinned Vallejo 70.897 'Bronze Green' and highlighted the Fowler lettering with brush painted 70.946 'Dark Red'. My loco was originally delivered from Essel Engineering with a black roof. With the Nystrup locomotive originally meant for service in the tropics I guessed the roof would have been painted a light colour to reflect sunlight. I painted the roof bronze green like the rest of the upper body (because that would have been an easy option for the workers at Nystrup Gravel). I then added a peeling effect to the roof by first dabbing light grey paint randomly over the roof area with a torn up piece of a kitchen scouring pad. When dry I applied natural metal paint with a new little piece of scouring pad, this time concentrating on places where I had applied grey paint. The effect is meant to look like green paint flaking away from a grey layer of paint, itself peeling away from a zinc paint.

Cab and bonnet painted green on the Ikea 'Snubba' turntable I use for conveniently turning models during painting. 

My new Harder & Steenbeck airbrush is easy to use and produces a very steady flow of paint easy to control. Cab openings are covered with cardboard fixed in place with masking tape. 

First stage weathering of the roof in progress.

For the painting of the gearbox cover I used cling film to protect motor and electronics. More gentle and far easier than using only masking tape.

Decals are leftovers from my 1/35 version of Nystrup Gravel. They were custom made for a Menck excavator and as I always order spare decals I could now add numbers and lettering from my stash of unused decals. Before the decals were applied I gave the areas where they would be placed a cover of gloss varnish. This helps the decals to sit well without the dreaded 'silvering effect' - much better than had I applied them on a matt surface. I used decal solutions to make the decals adhere as best as possible to the cab sides. First Mr. Mark Softer (makes the decal go soft and flexible) and when the decal sits right, Mr. Mark Setter, that helps the decal stick to the model. Once dry I gave cab, bonnet and gearbox cover a layer of matt varnish. That helps preserve decals and paintwork and covers the gloss varnished areas. 

Next up is final installation of headlights and sandboxes as well as detail painting and final weathering.

Friday, 25 April 2025

Easter and Fowler

Since lights were succesfully tested in operation on Nystrup Gravel's Fowler F 30 work has progressed at minimum speed. Brackets for lamps have been fitted and holes for wires drilled in cab front and rear. A new air brush has arrived, which will come in handy as the old one was beginning to cause trouble. 

Cab rear wall with lamp bracket and hole for wires drilled.

Plasticard glazing for the cab front. I'm always labelling parts like these as they look very similar, but are actually made to fit their particular window openening.

Glazing for the front windows are ready but awaits repainting of the upper body before being glued in place. As usual the glazing is simply transparent plasticard cut a little over size.

Shortly after coming home from Budapest the Easter holidays saw me spending time in the family cottage. Bringing the Fowler wasn't an option and to have a little something to build during evenings I brought the 1/10 scale braked skip. Assembly progressed swiftly and I'm about to fit wheels and axle boxes.

The weather in Denmark during Easter wasn't good for outdoor modelling. Here frame and skip body rests are assembled.

Hopefully my testing of the new airbrush will have given me enough confidence to take on the challenge of laying down a new matt green topcoat on the Fowler upper body. Then I can finally install the LEDs in the lamps and fix them to the cab to allow for fitting of the final details and weathering.
Monday, 10 March 2025

Lights On the Fowler

I have been keeping away from work on the lamps and lighting on the Fowler as long as possible. I have always been reluctant to take on varying electrical jobs (like fitting lights in locos and in buildings) on my model railway. Not because I don't like a layout with lights in a dimly lit layout room, but because I find it difficult work. So in pure defiance I set out to connect some wires and see if I could turn on the lights on my Fowler model.

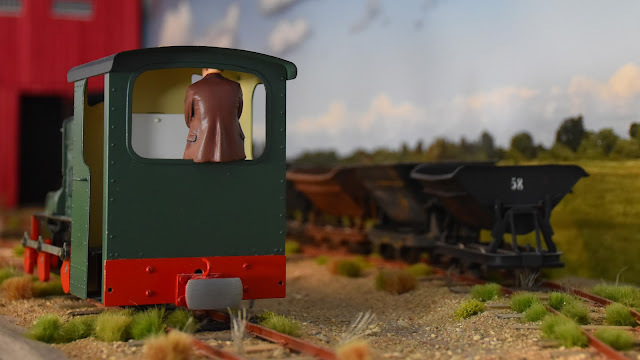
Sometimes the fear of the task is the greatest obstacle. 15 minutes of work and I could turn on the lights!

I had been collecting some useful stuff for the lighting project and had two sizes of typical lorry headlights to choose from: 9.5 and 12.5 mm in diameter. I decided to use the 9.5 mm headlights in whitemetal that I suspect originates from Imperial Modellbau from Germany. They were packed in an unmarked plastic bag, so I'm unable to confirm it.

Two sizes of headlights and LEDs. I will be using the small 9.5 mm whitemetal headlights with separate resin glass inserts. The larger headlights are from an old diecast Ford A lorry.

The LEDs are insanely small as they are leftovers from another project. They seem to give a resonably sharp light in a good hue, so I'm intially testing them out in the lamps. Their size is close to a prototypical light bulb!

With the LEDs functioning all that remains is to figure out how to lead the wires to the lamps and still have the loco disassemble comparatively easy - and of course to fit the LEDs in the headlights. The Fowler is approaching the finish line!

Just to prove that the rear facing LED works as well!


Friday, 21 February 2025

Fowler Painting Begun

After enjoying building parts for the cab interior, I have now set out to paint the loco. Not something many will notice afterwards as the loco obviously is already painted. Handling and working on the loco has created scratches, and the many added exterior details, although given a first treatment of paint back in August, could use a proper repaint. Now the loco is dismantled for fitting the cab details and repainting.  

Cleaned up work area with parts for the cab interior. After vacuuming the workbench, painting of the Fowler can now begin.

One of the first things I changed on the Fowler was lowering the buffer height to fit Nystrup Gravel's skips. With the buffers lowered the old mounting hole became visible. I thought the partly visible hole would be a good illustration of narrow gauge industrial locomotives' flexibility. I drilled two holes for the mounting bolts in each buffer plate and painted the area, where the buffers would have been located when mounted higher with a mix of red/brown colours to illustrate the original primer. The area was masked off with Tamiya masking tape. Then buffer plates and buffers were air brushed Vallejo Air 'Ferrari Red'. Removing the masking tape revealed the primer colour as if the buffers had been lowered without anyone taking the trouble to overpaint the area with red.

Painting in progress. Rear buffer beam screwed off for ease of drilling and painting. Coupling rods have received the first layer of red paint.


Buffers are fitted after painting, frames painted 'Black Grey' and rods and counterweights painted red. The cab floor has had its first layers of paints, the brake coloumn is fitted - and I found the hand tools I've been looking for!

Gear lever subassembly and instrument panel glued in place and cab interior having its first layer of weathering applied. The traces of the buffer's higher mounting for the loco's original customer can be seen.

My trusty German Gabbert airbrush from the late 1990's has developed some bad manners that I will have to look into before I can paint the upper body. Until then I can't fit window glazing and get the final things in the cab glued in place. While getting the airbrush in shape again, I'm placing the Fowler on the shelf. Hopefully not for long!

Friday, 7 February 2025

Fowler Cab - End In Sight

Work on the cab interior on my Essel Engineering  Fowler F30 has progressed pretty well. All major parts have now been built and primed with some even painted and installed in the cab. The only item on my list of interior items that I haven't finish is the hand tools. I can't remember where I put the white metal handtools that I wanted to place on the cab floor. On the other hand additional details have been added and window glazing for the front windows have been prepared. 

Painting the interior and fitting the details in progress.

The interior is built in segments and planned to be glued in place inside the cab as painting and assembly order of different exterior fittings dictates.

The instrument panel was in an early stage in the last post on the cab interior. After drilling holes for the instruments it received a little putty and some sanding. Then I added some small push buttons from sliced round plastic stock. The panel was primed and given a cover of medium grey on the frontside and silver on the inside of the holes for the dials. The transfers are fitted to thin clear plasticard and covered with a thin layer of gloss varnish. The dials are then cut out and fitted on the inside of the panel with Humbrol 'ClearFix'. Once dry a drop of 'ClearFix' is also onto the dial from the front. The idea is that a light source mounted in the instrument panel will allow a little light to shine through the clear plasticard and thin transfer to show illuminated gauges. Fingers crossed!

Instrument panel in plasticard and 1/35 scale transfers for the instruments.

The first dial fitted to the 16 x 25 mm instrument panel. Only the green lamp will light up on my loco. The red lamp has been blocked by layers of black paint on the rear side of the panel.

Once the design of the gear levers and associated stuff was finally decided, the box for the levers and clutch pedal was quickly built. The two levers and pedal were cut from plasticard. One gear lever is for directional change - positioned firmly glued in 'forward'. The other lever is for 'low' or 'high' and permanently positioned in low gear.

Instrument panel finished, levers and sanding pipes fitted to the sandboxes and gear installation in progress.

Gear levers and clutch pedal test fitted in the cab. 

The speed controller is not patterned from a real Fowler loco, but from a preserved Danish narrow gauge locomotive. I guessed the simple design would be one that a mechanic at the Nystrup workshop could have made without any fuss: a length of angle iron and a handle with a wire connection to the engine. 

Speed controller glued to the front wall in the cab. Pencil lines marking floor level to help adjust cab interior.

A small triangular plate fitted in the rear cab corners. A convenient place to place the note book used to keep track of the number of skips propelled back and forth each day.

Some interior details are fitted by now, while others have to wait until repainting of the loco exterior is finished. 

Back on the layout for a snapshot. The loco is looking so much better without the original huge battery box in the cab. Next up is little work on the buffers and a repaint.


Tuesday, 28 January 2025

Things You May Find In a Narrow Gauge Industrial Railway Locomotive Cab

As I researched for stuff to put in the Fowler cab I stumbled over some images of things I found in the cab of a preserved Danish 785 mm gauge locomotive. A testemony that these locomotives were living places where men worked and noted down loads and trains as the working day progressed. 

Loco D 5 once used to transport concrete blocks for costal protection. Now it is preserved at the Hedeland vintage railway in Denmark.

During shunting some years back I noticed a few things on the shelf behind the driver's seat in the cab. Apart from a wooden box numbered '6' or '9', a measuring stick and a cab heater, two notebooks caught my attention.

After drying I could carefully open the notebook and the notes in one of them looks very much like a report over transported loads. The notes in the book are dated between 1968 and 1978 with one of the last entries being made 28. to 30. March 1978 - see image below. 

The shelf behind the driver's seat with general clutter and notebooks.


This entry from 28 - 30 March 1978 is one of the last in the book and it is most likely an account of the number of concrete blocks carried. Possibly of two weight classes: 1.5 t and 4 t. It seems reasonable to assume that each train had a capacity of 26-30 1.5 t blocks or 15-16 4 t blocks. I interpret the notes to show 5 trains per working day.

Apart from wooden blocks used to rerail the locomotive and oil cans I will now have to make a small notebook for the cab interior and a place for it to go. Reality always challenges modelling!

Tuesday, 21 January 2025

Fowler Cab Interior Detailing

With the detailing of the model's exterior mostly done I have now turned my attention to the cab interior. Previously I had fitted a new cab floor and added a plate separating the cab from the engine compartement. As with the exterior most of the detailing is planned to be made with plastic card and profiles with nickle silver wire added where needed. During my Christmas vacation I rebuilt and painted a driver figure for the loco. Now the rest of the cab interior is under construction. 

Testing placement of the left sand box in the Fowler cab. The plate separating cab and engine compartment shows up in white plasticard.

I chose to model the cab interior as it looked post-war after a substantial rebuild of instrumentation and levers. Nothing in the Nystrup Gravel company archives indicates that the rebuild included a new engine, but rather that the idea was to allow the driver to control gears, brake, sanding and speed from the right side of the cab. On most Fowlers the driver had to switch from left to right in the cab to manipulate every lever. 

My plan is to add the following items: 

  • Brake column
  • Wooden blocks
  • Driver figure
  • Sand boxes with levers and pipes
  • Gear lever
  • Speed control
  • Instrument panel
  • Oil cans
  • Hand tools

Brake column finished and painted. Sand boxes begun. Cardboard test pieces and off-cuts seen right.

Sand boxes being sanded. First parts cut for instrument panel. This is enjoyable, old school, basic modelling. Next stage involves fitting details: openings for filling, levers and pipes to wheels. Endless fun! 

The sand boxes and instrument panel are basic plasticard constructions with added detail from metal wire and pipe. The instrument panel is designed for lighting with full top and bottom and black painted interior to prevent 'shine through' from the probably very dim light source I'll build into the panel. I'm still searching for usefull decals or prints for the gauges. Consequently I have not yet made any holes in the panel's front plate.

Major elements in differing stages of finishing. Oil can needs only weathering, while the instrument panel is only just started. Sand boxes are sanded and all visible corners rounded. Openings for sand refilling are added from plastic pipe.

The coming week I hope to finish the sand boxes and work out their final mounting in the cab. The last remaining item to design and prepare in the cab is the gear lever and that is still mystery to me. 

Friday, 27 December 2024

Fowler Driver Finished

Relaxed modelling over the Christmas holidays has produced a finished figure of the driver in the Fowler locomotive. As usual it is a Modelu figure adapted to its role and position on my Nystrup Gravel layout.

You only see the back of the driver. But he is there and he will stay in the cab, even during a derailment.

In the previous post I had begun adding material to the back side of the figure. I converted the figure to fit on the edge of the lower part of the rear wall in the cab. I added enough 'Green Putty' to create an overhang of the figure's jacket and a narrow 'channel' to fit over the cab's edge. This allows me to carefully remove the figure while it will still be held in place during most operating situations. Once the general shape was obtained I added putty to even out the surface and sanded everything smooth. It takes several stages of sanding and putty and a decent amount of patience. 

Rear view of driver test fitted in the cab. The green is added material from 'Green Putty' to the original Modelu figure.

After priming with 'Chaos Black' painting is now in progress.

When I was satisfied with the figure it was washed with hot water and a soft brush. After drying overnight it was primed with my favourite primer 'Chaos Black' from Citadel. For the layers of covering paint I used Vallejo acrylics.  The jacket was painted first in 70940 'Saddle Brown' then the shirt was painted white (70951) the sweater 70837 'Pale Sand'. I then painted the skin areas and shadows in the clothings' folds were accentuated with a darker tones of the colour as appropriate. Once the upper parts of the figure were painted I painted the trousers 900 'French Blue' and the shoes a dark grey. I didn't spent a lot of time on detail painting and facial detail as the figure isn't particularly visible in the cab. Once finished I air brushed a layer of matt varnish over the figure to protect the paint and give the clothing a flat look. Skin areas were given a thin wash of oil paint. 

The finished figure in the cab. Notice the tight fit on the rear wall and wooden blocks for use in case of derailments.

Here the driver is out of the cab for a brief moment to show off in all his glory.

The brake coloumn was finished alongside the figure and I also got it primed and painted. The testing of different shapes of wood for the wooden blocks to be used in case of derailment was worth the trouble. I decided on quite different shapes and sizes than I had originally planned. The blocks were sanded and dyed with light grey wood dye.

The driver is partly visible through the front cab windows. At least as long as there is no glazing.

After the driver figure next up is more interior details like sand boxes, panel with gauges and switches as well as the necessary levers. 

Saturday, 21 December 2024

Fowler Driver Figure and Brake Column

With the Christmas holidays just started after the last tasks were done on the job, I jumped directly to the worktable, cleared away the worst mess and began working on the driver figure for the Fowler and continuing work on the brake column. Christmas will be the time for cab interior on the Fowler!

Brake column needing only final sanding and cleaning before it can be primed and painted. The wooden blocks are test pieces to check what sizes and numbers of jack blocks can be fitted under the cab floor.

The brake column is a simple thing glued together from plastic tubes of different diameters set onto an (almost) eliptical mounting plate and fitted with bolt head imitations of sliced hexagonal plastic profiles. Not entirely prototypically, but good enough for its future hard to see location in the cab. 

Quite fast I decided that the driver on the Fowler locomotive had to be the standing figure in Modelu loco driver pack 11219.  The figure arrived in May among a batch of stuff from Modelu. The figure is almost a perfect fit leaning against the low rear wall in the cab. Initially I have adjusted the figure's height by trimming shoes and cap with knife and sanding sticks. Not much work but the pose improved and taking a milimeter or two of the figure's height also makes it easier to get it in or out the cab once its filled with levers etc.

First stage of 'building up a butt' on the driver figure. The in-progress brake column is just visible in the cab.

The most time consuming work on the figure was adding material to the back side of the figure. As the figure is designed to sit on a flat surface and I'm having my example sit on an edge I was in for some plastic surgery of adding 'tissue'. I used 'Green Putty' from Green Stuff World building it up in layers. I'm working on a good fit between figure and loco, to make the figure removable and yet being able to keep its position while traversing bad track (as all track is at Nystrup Gravel). Currently I'm adding the last layers of 'Green Putty' and smoothing out the surface before sanding begins.

When the figure arrived in May he was photographed leaning against the Fowler loco. After being 'tailored' to fit in the cab he will probably seldom be seen outside. Too bad actually, as it is a lovely scale figure.

With a good start on the holidays modelling wise, I look forward to some time at modelling table. It needs a more thorough cleaning. After working with vegetation and ground cover it is covered in fibres and gravel. Having started on the figure and cab interior I've an urge to finish as much as possible during all the other Christmas activities. 

A few printouts from the article kept safe in plastic chartecues in my 1/19 modelling binder. Easy to see I'm a modeller from the previous millennium!

Besides prototype photos the article by Bill Strickland in the November 1980 issue of 'Merioneth Mercury' is a good guideline for my work on the locomotive. I think it shows how good quality magazine articles are a lasting ressource in modelling. Don't throw away that kind of treasures!

Friday, 30 August 2024

Ballasting and Reality

The cab detailing on the Fowler has been hit by the reality of my work life. Not much progress on the small plastic parts to be hidden away in the cab. I have had more succes with adding some vegetation and ballast. Somehow I find it much easier to spend five minutes pouring out a little ballast one evening and then adding glue a few days later.

It's friday and the last train of the day has arrived in the Nystrup Gravel Yard. The Fowler locomotive is shunted by the little Lister. Probably for an evening check of a mechanical issue before the first train saturday.

The locos having departed through the building complex a few skips are now checked for oil in the bearings. Even though vegetation and ballast are now in place there is still detailing and weathering to add.

So despite a busy work schedule there's progress on the little Nystrup Gravel layout. I have begun to think it's realistic to have the entire layout fitted with ground cover before year's end. That is an accomplishment as my modelling speed can best be called moderate. I continue having high hopes of greater speeds, but I have to be realistic, as 1/19 scale Nystrup Gravel is only one of my railway endeavours. 

The different railway activities may sometimes limit each other, but mostly they actually add value to one another. And while some readers may wonder if there is a serious fault in the time continuum in Denmark the image below shows that Nystrup Gravel director Erik Holm is actually attending the world's largest railway exhibition Innotrans in Berlin later in september. I'm attending as well, and I have a few questions to ask if I bump into Mr. Holm.

Trade visitor pass to Innotrans for Nystrup managing director Holm.

Saturday, 10 August 2024

Easy Living - Vacation

After a week in Germany my vacation has now settled into the slow rythm of doing very little in a slow pace. Giving my house a little paint, interrupted by watching the olympics and generally enjoying life with wife and family. A little train running and a start on the cab interior on the Fowler diesel has been added to the few things accomplished. 

Running the Fowler back and forth on a short temporary garden line in front of my garden shed. Very relaxing!

With the help of images and drawings from an article by Bill Strickland in the November 1980 issue of 'Merioneth Mercury' I've begun making interior details for the Fowler cab. I'm just getting started on the brake installation and sand boxes. It's fiddly work and I hope it will be worth the effort. Work on the driver firgure is also under way with intial adjustment to feet and head to fit the cab.

Covering the added exterior details with paint has helped to make the model a little more finished although there is still a lot of work left. I used Vallejo 'Black' to cover bolt heads and profile additions on the frames and an ancient (most likely early 2000's) tin of Humbrol enamel 195 'Dark Green Satin' on the body details fitted. Where I had fitted metal parts I was carefull to prime with enamel paint before the acrylic colour was applied. My experience is that enamel has a stronger 'grip' on bare metal than my favourite acrylic paints.

What a difference a few brush strokes makes! All the exterior detail additions have been painted. The loco will continue to develop in the coming months.

One of my vacation projects actually got finished: the Modelu fox and it even got some publicity on the Modelu Facebook page. The guys at Modelu said nice things about my modelling and provided their audience with a link to this blog. Things like that boost my modelling confidence. Hopefully it will also help the producer to boost sales something we all will benefit from. Notice that I'm no influencer type receiving gifts in return for mentioning producers. My blog is way too obscure and I'm a proud full price paying customer when I shop for my hobby.

My first Modelu animal lifted from the Modelu Facebook page.

Friday, 31 May 2024

More Modelu Figures

In early May I received new Modelu figures to test as drivers in Nystrup Gravel's Fowler diesel. A lot more was in the package and I also mentioned the figures being sorrounded by supporting web of thin posts. They help the figure to remain firmly supported during printing and initial curing. Here is a closer look of how Modelu figures are looking before the supports are removed.

The two additional figures from the Modelu double figure sets 11208 and 11219 figures and a fox from set 31101. The maze of support sprues are evident. Unfortunately the right figure's right thumb seems to have suffered a fracture not even the supports could avoid.

The supports are easy to remove and shouldn't keep anyone away from investiong in one or several of Modelu's excellent large scale figures. I would count the Modelu figures as one of the most influential additions to 1/19 scale railway modelling. Modelu's figures are light years better than the usual caricature garden railway figures. They may be good enough in the garden, but on a small indoor layout like mine... never!

Apart from the loco crew I had the following sets added to the package:

0134 'Man with spade'

0148 'Man Kneeling'

31101 'Foxes'

'Man with spade' will be a good representation of track worker having been at work tamping a few sleepers with the spade. 'Man kneeling' could be representing a mechanic tending to a problem on a loco with a few tools laid on a piece of old cloth beside him.

Apart from the selected loco driver and a single fox the rest of the figures go back in a cardboard box for storage. I have plenty of other projects.

Friday, 10 May 2024

New Figures

Risk of overstaffing at Nystrup Gravel? It could be the case with the latest delivery from the busy 3D printing maternity clinic in Bristol, also known as Modelu. 6 new employees were included in the package. The figures were accompanied by two foxes to add a little life to the area behind the loading ramp. 

One of the new figures resting againgst the footplate of the Fowler (with added detail parts yet unpainted). Small remnants of the 3D printings supports can still be seen here and there on the figure.

As with earlier purchases from Modelu I've not planned getting all figures ready for service at once. The most pressing need is to get a driver figure for the Fowler locomotive. The idea is to select one or two figures from the two crew packs to be converted to a Fowler driver. I'll probably have to do minor surgery and a little sculpting as I did a lot when I modelled in 1:35 scale.

Modelu crew pack 11208 for the small England engine. Photo: Modelu

Modelu crew pack 11219 for quarry Hunslet engine. Photo: Modelu.

After a switft production time of one week and a one week postal and customs trip to Denmark I couldn't wait to open the package. Safely wrapped in several layers of bubble wrap inside a solid cardboard box the figures waited for me to examine them and test fit them in the Fowler cab. I had a surprise waiting for me. My earlier deliveries from Modelu have been of figures with the 3D printing supports removed. Now the figures are supplied with the complete support structure of a web of thin posts. They help the figure to remain firmly supported during printing and initial curing. The removal of the support posts isn't a difficult task. Only a sharp knife, a side cutter and some time is needed. What surprised me the most is the new level of detail. My 1/19 scale figures from Modelu has been adequate in detail, but I have often been disappointed by weak facial detail, soft and missing detail in clothing and bad demarcation from eg. trousers to shoes. Most of those objections are now gone. I'll be going into detail when I start working on one of the new figures. And by the way: the price has gone down as well!

The right figure from pack 11219 resting his back side on the low rear wall in the Fowler cab. To call him a perfect fit isn't quite true, but it's a close call.

Here the figure is seen from the side.

The left figure from pack 11208 was my second bet on a possible driver figure for the Fowler. He looks good too, but needs something the rest his right arm on. 

Peeking out from the cab. 

I'm quite confident that I now have a decent driver for the Fowler. Adding a little material to the back side of the figure from pack 11219 and adjusting the height (trimming shoes and cap) will obtain a near perfect fit in the cab. And the figure will even be removable and at the same being able to keep its position while traversing bad track (as all track is at Nystrup Gravel).

As for the rest of the figures pictures will have to wait. It's Spring and I'm too busy with the 1:1 scale vintage railway, maintenance of two wooden houses and real work. But one of the Modelu foxes sneaked out and was photographed near the lorry loading ramp.

A Modelu fox in 3D print has crossed the meadow covered by static grass from the photographic rendition of a wood where it usually lives.