I'm not the fastest of railway modellers. 3 years after I took delivery of a Fowler in 1/19 scale for Nystrup Gravel I'm still working on my personal interpretation of an early 1930's Fowler in Danish service on 600 mm gauge. But now the loco is finally approaching a finished stage. This week I had basic painting and decal application done.
 |
| Snapshot of the freshly repainted Fowler on my worktable. |
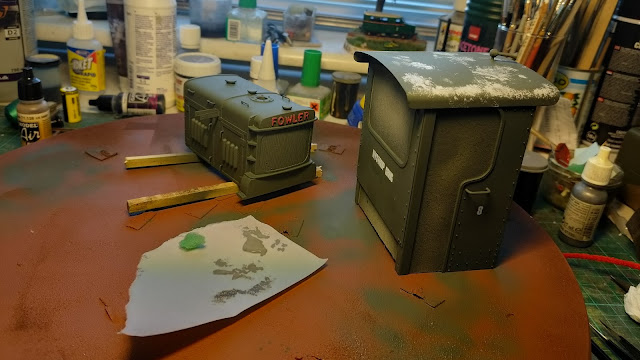
With large openings in the cab the Fowler presented me with quite a task masking these before painting could commence. Rather than using only masking tape, I cut some scrap cardboard to a tight fit for door and rear cab wall openings. The cardboard was fitted to the cab with Tamiya masking tape. Front windows received only masking tape. One advantage (except saving masking tape) is that the cardboard allows touch points for careful handling of the cab during painting, something that masking tape wouldn't provide.
I airbrushed cab, bonnet and gearbox cover with thinned Vallejo 70.897 'Bronze Green' and highlighted the Fowler lettering with brush painted 70.946 'Dark Red'. My loco was originally delivered from Essel Engineering with a black roof. With the Nystrup locomotive originally meant for service in the tropics I guessed the roof would have been painted a light colour to reflect sunlight. I painted the roof bronze green like the rest of the upper body (because that would have been an easy option for the workers at Nystrup Gravel). I then added a peeling effect to the roof by first dabbing light grey paint randomly over the roof area with a torn up piece of a kitchen scouring pad. When dry I applied natural metal paint with a new little piece of scouring pad, this time concentrating on places where I had applied grey paint. The effect is meant to look like green paint flaking away from a grey layer of paint, itself peeling away from a zinc paint.
 |
| Cab and bonnet painted green on the Ikea 'Snubba' turntable I use for conveniently turning models during painting. |
 |
| My new Harder & Steenbeck airbrush is easy to use and produces a very steady flow of paint easy to control. Cab openings are covered with cardboard fixed in place with masking tape. |
 |
| First stage weathering of the roof in progress. |
 |
| For the painting of the gearbox cover I used cling film to protect motor and electronics. More gentle and far easier than using only masking tape. |
Decals are leftovers from my 1/35 version of Nystrup Gravel. They were custom made for a Menck excavator and as I always order spare decals I could now add numbers and lettering from my stash of unused decals. Before the decals were applied I gave the areas where they would be placed a cover of gloss varnish. This helps the decals to sit well without the dreaded 'silvering effect' - much better than had I applied them on a matt surface. I used decal solutions to make the decals adhere as best as possible to the cab sides. First Mr. Mark Softer (makes the decal go soft and flexible) and when the decal sits right, Mr. Mark Setter, that helps the decal stick to the model. Once dry I gave cab, bonnet and gearbox cover a layer of matt varnish. That helps preserve decals and paintwork and covers the gloss varnished areas.
Next up is final installation of headlights and sandboxes as well as detail painting and final weathering.

No comments:
Post a Comment