Showing posts with label vegetation. Show all posts

Monday, 28 October 2024

Little Progress

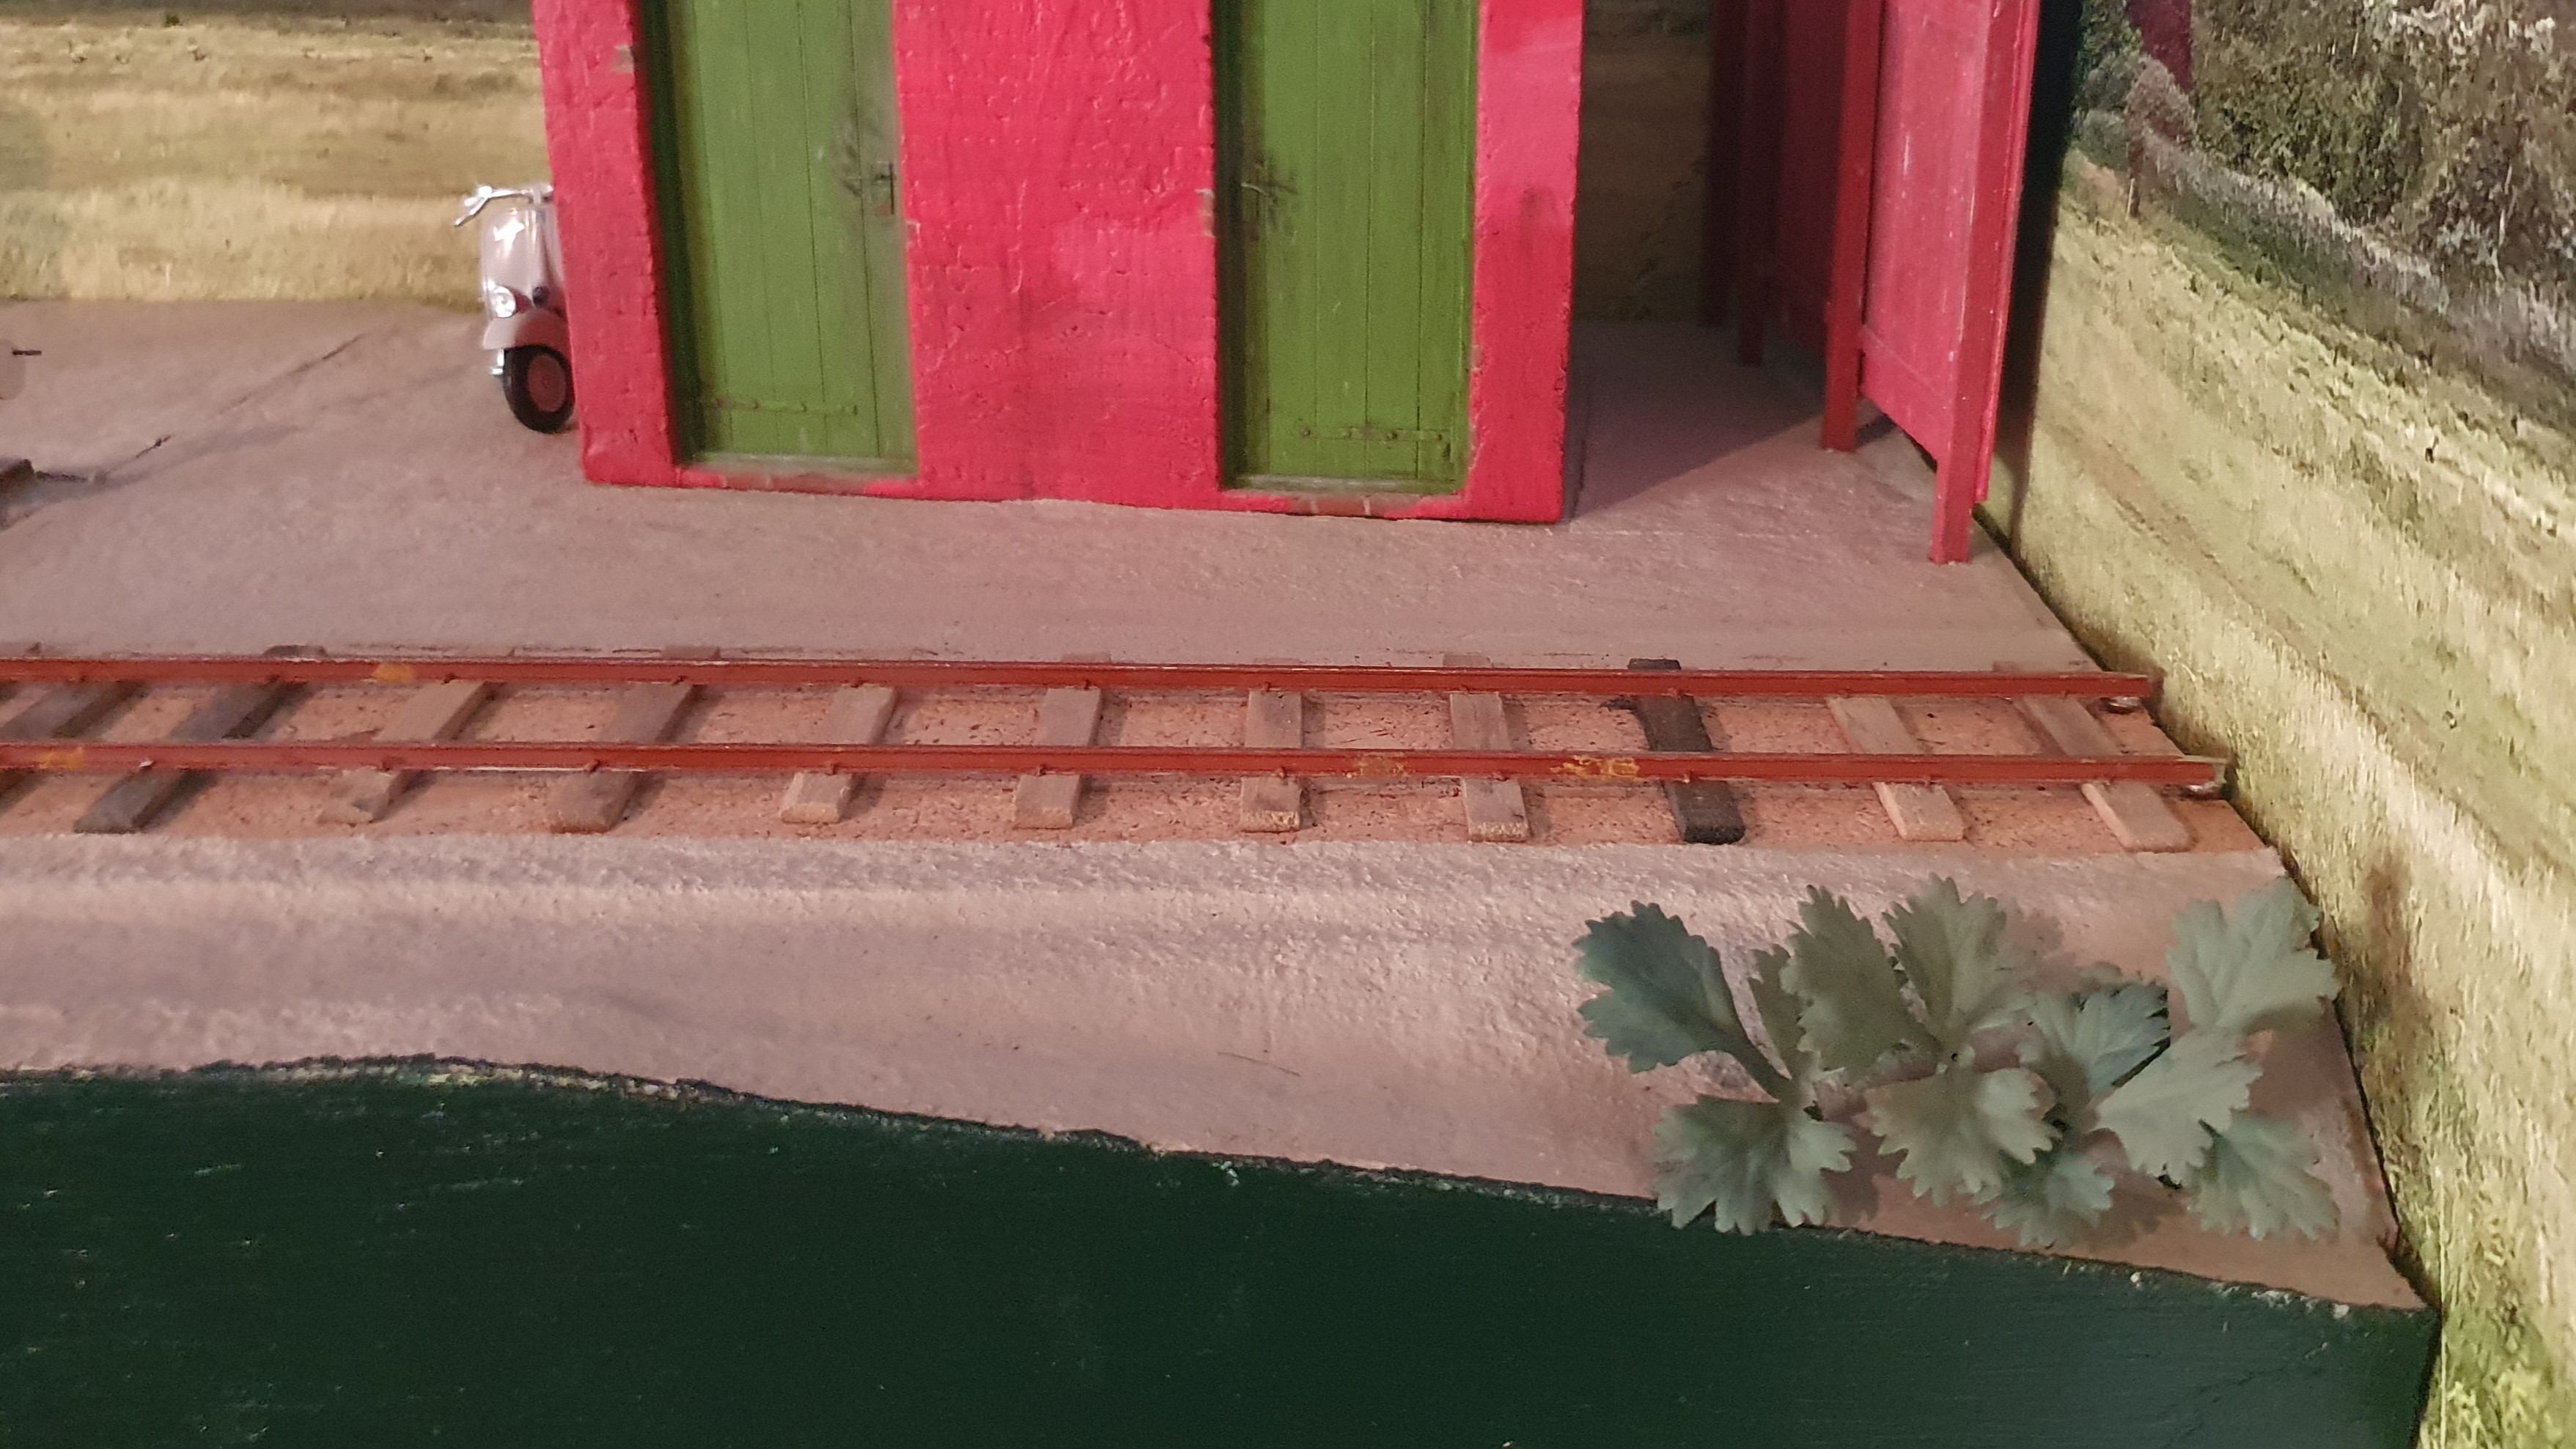
There has been little progress on Nystrup Gravel during the last month. Obligations in other directions have been taking up my available time. Fortunately things are now getting better as we move into the traditional modelling season. As a small appetizer I added a few additional broad leafed plants to the layout's right end front.

The front slope is beginning to look finished. Now the remaining surface needs some attention.

The right end of my small layout will be further developed in the coming weeks with the prospect of melting together with the rest of the landscaped part. Other projects on the list are cab interior in the Fowler diesel, and painting of a few small scale models that I didn't get to finish during summer. The major reasons for not being able to show more progress is two other railway events in my life.

As usual I attended the huge railway exhibition InnoTrans in Berlin during september. I knew the managing director of Nystrup Gravel was also going, but I didn't meet him (among 170.000 attendees it would have been no small wonder). As usual I was part of my company's staff manning our exhibition stand, but I managed some tours round the exhibition and even got to see some narrow gauge equipment. The exhibiting companies continue to use models to illustrate their products and is to a large extent using 3D printed models. 

The most detailed models were seen at the stand of Полтавський Тепловозоремонтний завод (Poltava Locomotive Repair Plant) from Ukraine. In addition to the 1/87 scale TjME3 above a model of a M62-locomotive was also exhibited.

The use of 3D printed models is becoming very widespread. Here the technology is used to show maintenance equipment complete with scale figure.

Shortly after a week spent in Berlin for Innotrans the major annual event for vintage narrow gauge industrial railway enthusiasts in continental Europe, the 'Feldbahntreffen' was hosted by the Hedeland vintage railway (HVB), where I spend a good deal of my spare time. Volunteers had planned and prepared the event for several months, but most of the work took place in the week before the meeting and during the four day it lasted. Four Dutch vehicles visited HVB, the first time the railway has hosted locomotives from abroad. Naturally I spent a lot of time planning, working and enjoying the meeting.

Visiting Dutch locomotive nr. 6 'Ijsseloord' from Smalspoor Katwijk Leiden.

One Dutch engine and two Danish resting after a day's work on the 5 km HVB.

110 European enthusiasts from Germany, Switzerland, the Netherlands, France, Great Britain, Sweden, Finland, Romania, Ukraine and Poland joined more than 40 volunteers from HVB for four days of networking, presentations, train rides and visits to usually off limits workshops and storage buildings.  

Wooden box with 'Nystrup Gravel' painted on top in use as illustrative load in a wagon during the 32. Internationales Feldbahntreffen at the Hedeland vintage railway 10.-13.October.

I now hope to be able to devote a few more evenings for modelling and hopefully breathe some life into this blog again!

Monday, 16 September 2024

New Plants

Last week I experimented with some soft plastic broad leaved plants and I decided to carry on with the work. The soft plastic took paint reasonably well and I liked the contrast to the overwhelmingly grassy growth on the layout. My layout is too small for 1/19 scale trees so variety in low growing vegetation is important.

Butterbur plants with an assortment of grass tufts, stones and ground cover on the small slope next to the fuel and lubrication shed.

Before fixing the plastic plants, I glued some grass tufts in place and also fixed a piece of scrap wood and some rusty scrap metal to the slope. Then I scattered some finely sieved brownish sand to the slope fixing it with thinned white glue. The holes for the plants were kept open with tooth picks that kep away sand and glue. Further holes for plants were made after the glue had dried. I simply punch holes through the top of the layout with a screwdriver.

Before the glue dried completely I added the first butterbur plants. While I was working a sign saw the staff somewhat baffled. 

With the plants in place I'm now wondering if I should fit some more in the same area and perhaps also add a little 'colony' of the plants near the lorry loading ramp. The most important development is however, that I've now begun to add ground cover and vegetation to the layout's right hand end. I hope to have the whole layout covered by Christmas.

A zoomed out view of the fuel shed (a resin kit from Kippo Models) showing the right hand end of the layout with the fence creating a minimum of a scenic break. I built the shed back in 2019.

Wednesday, 4 September 2024

Experimenting With Vegetation

In February I acquired some artificial grass from IKEA for an experiment with high vegetation looking a bit like the rushes growing in poorly drained areas. Although intially very promising, I ditched the solution after having installed a few tufts of cut down IKEA grass. It was too obviously plastic grass from IKEA and no amount of matt varnish or detail painting could hide that - particularly as they were placed at the layout's front edge. Now a new experiment is unfolding at the same location: planting butterbur.

At the right end of the small layout new, experimental plants have started growing

I don't know where I bought the plastic plants with large leaves, but they were probably cheap. I found 3 wraps of them in a bag while cleaning out a cupboard and they look like a type of plastic plants used by by people keeping fish in aquariums. They are from the time when I modelled in 1/35 scale and I probably decided they were too large for 1/35. Now I wanted to try them out in 1/19 scale.

A handful of plants were wiped with a wet cloth and when dry given a spray with black primer. The root end were cut off and the leaves painted green. Once dry they were stuck into holes on the small slope at the layout's right end.

3 stages of butterbur for Nystrup Gravel (from top down): unpainted plant, primed and painted. The fourth plant is as bought with stem and roots still attached.

First impression of the plastic plants isn't too bad. With some groundcover and a little colour variety these plants stand a greater chance of survival in the Nystrup biosphere than the IKEA grass.

My greatest concern is if the paint will hold on to the soft plastic over time. I have tried to rub the primer off the leaves without succes so perhaps I'm worrying too much. No one will be touching the plants regularly and they can be spot painted if needed.

The roots and stems have been put into storage. They may come in useful later.

Friday, 30 August 2024

Ballasting and Reality

The cab detailing on the Fowler has been hit by the reality of my work life. Not much progress on the small plastic parts to be hidden away in the cab. I have had more succes with adding some vegetation and ballast. Somehow I find it much easier to spend five minutes pouring out a little ballast one evening and then adding glue a few days later.

It's friday and the last train of the day has arrived in the Nystrup Gravel Yard. The Fowler locomotive is shunted by the little Lister. Probably for an evening check of a mechanical issue before the first train saturday.

The locos having departed through the building complex a few skips are now checked for oil in the bearings. Even though vegetation and ballast are now in place there is still detailing and weathering to add.

So despite a busy work schedule there's progress on the little Nystrup Gravel layout. I have begun to think it's realistic to have the entire layout fitted with ground cover before year's end. That is an accomplishment as my modelling speed can best be called moderate. I continue having high hopes of greater speeds, but I have to be realistic, as 1/19 scale Nystrup Gravel is only one of my railway endeavours. 

The different railway activities may sometimes limit each other, but mostly they actually add value to one another. And while some readers may wonder if there is a serious fault in the time continuum in Denmark the image below shows that Nystrup Gravel director Erik Holm is actually attending the world's largest railway exhibition Innotrans in Berlin later in september. I'm attending as well, and I have a few questions to ask if I bump into Mr. Holm.

Trade visitor pass to Innotrans for Nystrup managing director Holm.

Friday, 12 July 2024

Landscaping Near Building

Long time followers of this blog will know that I like to model outside. Sometimes out in the open while the barbeque heats up or when weather and type of modelling project makes sense. During the last few weeks one of the two segments making up my Nystrup Gravel layout has been sitting on a pair of trestles under the roof of my double carport. A convenient place for many things (We usually only park the car there during winter). I haven't spent long evenings modelling, but 10 minutes here and there adds up.

Outdoor modelling in the carport a warm summer evening. I'm adding grass tufts in the point to the left as preparation for ballasting.

I have primarily been adding grass to the rear of the layout and around the relief building, building a wooden floor to the entrance area of the large wooden building and ballasting a point. I added static grass with my RTS Greenkeeper. Besides getting a tolerable cover of light green grass on the layout up against the backscene, I experimented with adding another layer of static grass on top of the first. I want part of the layout covered in tall thin grass and having the 12 mm static grass fibres stand 'on top' of each other creates visibly higher grass cover. Not 24 mm but recognizably higher than 12 mm. Detailed study of the results once the glue has fully dried will determine if the method works for me.

Adding static grass near the relief building and flooring at the entrance. The still wet glue is visible in the upper left corner.

Since the large wooden relief building was placed on the layout in 2022, I have wanted to add a wooden floor in the large entrance door. Not that much is visible when the layout sits in its usual place in my workshop/library, but I like that type of detail for close up viewing or photography. The floor was built from scraps of wood and some coffee stirring sticks coloured with dark grey stain dissolved in tap water. The scraps were used as a foundation to build up the floor area and correct length stirring sticks then glued down as visible flooring. A little gravel to make a smooth transition between floor and ballast as well as some light weathering finished off the work..

The complete flooring placed in the door opening of the large wooden building. Just some weathering before it's finished. The slight gap in the building's backplate over the floor can't be seen when the layout is installed in the workshop/library room.

Wood stain was applied carefully to keep the colour on the light and faded side. 

With the layout segment set up easily accessible from all sides in the carport I finally got round to ballast the first turnout on the layout. My last session with ground covering work had reached the turnout, where quite a lot of work had to be done. When I laid the track on the layout in 2021 I rebuilt the standard Peco points with wooden sleepers. For a minimum of risk I decided to keep the plastic sleepers in the frog section. To achieve some kind of uniformity between wooden and plastic sleepers the black Peco sleepers recieved a layer of acrylic medium grey paint and a thin wash of raw umber oil paint before any other work started. My layout is built from light materials and due to the plastic sleepers' height a lot of ballast would be necessary potentially challenging my idea of a light layout. As a weight saving measure I added strips of left over 2.5 mm foamboard between the sleepers. This allows me to use a much thinner layer of sieved gravel to achieve a realistic ballast profile - and keep the layout comparatively light. Before ballasting I added a number of grass tufts in the track. I ballast my track in the old fashioned way of adding gravel dry, adjusting it with a soft brush and then flooding the ballast with a thin mix of water, PVA glue and washing up liquid.

Close-up of a Peco turnout partly rebuilt with wooden sleepers. For a minimum of risk I kept the plastic sleepers in the frog section. The sleepers are painted medium grey with a thin wash of raw umber oil paint. 

As a weight saving measure I'm inserting scrap pieces of foamboard between the sleepers. The Peco plastic sleepers are higher than the wooden sleepers in the hand built track, requiring more ballast. Ballast weighs a lot in 1/19 scale and the light foamboard acts as a filler saving weight.

Ballasting in progress. The ballast to the right has just been flooded with a mix of tap water and white glue. The dry ballast center has been roughly levelled with a brush and will now be dressed with a mix of small stones before being glued.

With the layout back in its usual place I could enjoy a layout with two thirds of the surface covered with a kind of realistic cover rather than the painted kitchen rags that have making up the surface for far too long. Maybe the layout will be completely covered (not finished!) by year's end?

The left end of the layout is soon looking like more like a semi-finished model railway than the naked landscape of painted kitchen rags. Still a lot to do adding more vegetation and small details.

In this view from the newly ballasted turnout the wooden building towers over the small train. Just as it is supposed to!

My vacation is fast approaching and I will probably be taking a small modelling project or two with me in our summer cottage. If I will make any progress remains to be seen.

Monday, 12 February 2024

IKEA Vegetation on Nystrup Gravel?

I have used natural materials and commercially available moddeling products for ground cover and vegetation. Now I have begun to consider using some of the artificial plant products made for interior decoration. For the time being I'm experimenting with a product from IKEA.

New vegetation has conquered a corner of the Nystrup layout. But only for a short time. If accepted the vegetation will move elsewere.

The challenge of finding grass and rush-like vegetation large enough for 16 mm scale has recently made me study the artificial plants' section in IKEA more closely than ever before. I have brought home a simple product of long grassy looking plastic fibres mounted in a rectangular piece of dark plastic fitted into a white plastic open-topped box. 

The plastic grass leaves are far too high for 1/19 scale and vill have to be cut down before they are mounted in the layout's surface. For experimental purposes I have fitted the plastic grass near the layout's edge to find out if the result is credible enough to continue working on. 

IKEA photo of the FEJKA artificial grass.

Have you had any experience with artificial plants on your 16 mm scale layout? Please leave a comment in the comments' section below or write an e-mail to the company mail nystrupgravel@gmail.com

Tuesday, 12 September 2023

Plank Road at Lorry Ramp

With the recent adding of grass near the loading ramp the only 'naked' areas remaining on the segment was the road area below the ramp as well as a short piece of track lacking ballast. The plank road under the ramp's chute needed lengthening and the rest of the road area covering with a suitable mix of sieved gravel. That work has now been finished (as if a model railway is ever finished!).

Current status at the lorry loading ramp at Nystrup Gravel. Ground work is finished as far as plank road and gravel surface concerns. I still haven't got a lorry to display and the Ferguson acts as replacement vehicle.

With a mix of differently sized grey stained planks produced, they were glued to the layout's surface. Some withered grass tufts were placed up against the plank retaining wall under the chute. A few green tufts were placed at the end of the loading area to illustrate a more humid ground. A few black spots were painted on the layout surface. They are the beginning of some small waterfilled potholes I plan to install. If they don't come out as expected they can easily be filled in.

The stained planks have been glued in place under the loading ramp's chute. The planks helped avoid lorries getting stuck in rainy weather and wet conditions. The plank road is known from several Danish industrial railway locations and Nystrup Gravel naturally used the method too.

A first layer of gravel and sand in differing tones was spread over the loading area with a plastic spoon. I decided to keep the gravel quite level without the ruts many modellers would have created in a similar area. I have gone with a quite subtle level of uneveness. More can always be added if I decide to. A few dead leaves were scattered where they would assemble due to wind and traffic. As usual the gravel was glued with diluted white glue.

The first layer of gravel and sand in differing tones is being glued down. I use a syringe loaded with a mix of PVA glue, water and washing up liquid. It's Friday afternoon and I enjoy a glass of homemade grape juice with vodka and sparkling water - always add a level area the size of a glass on each layout segment!

The next task at the loading area will be working with the colours of the gravel layer and work on the puddles.

Despite the amounts of gravel loaded into lorries the loading ramp at Nystrup Gravel was a cramped location. Lorries had to reverse under the chute with not much room for manoeuvering.


Friday, 25 August 2023

22 mm Grass Tufts - Blog Post #500

As I worked my way through my supply of grass tufts (mentioned in a previous post) I made sure to order additional ones to avoid the work coming to a halt. As I did that I noticed that the supplyer Green Stuff World now had grass tufts 22 mm in height in several colours. Consequently three packs of high tufts were ordered in addition to the 12 mm versions.

A view of three heights of grass tufts seen on the layout looking towards the fuel and lubrication shed.

I had ordered three colour variants of the 22 mm grass tufts and having arrived the colours 'Light green' and 'Dry green' seemed to fit perfectly fine with the colours I have previously used on the layout. The grass tufts with the colour 'Burnt' on the contrary, will probably remain in the box. The colour is much to dark and red for my taste. I have measured four tufts and they matched the stated 22 mm pretty well with some being slightly higher.

The grass tufts come in boxes measuring 15 x 9 cm.

While info on the box mentions the product's use in multiple scales, it doesn't mention 1/19 scale.

Three sizes of grass tufts from Green Stuff World.: from left 12 mm, 6 mm and the new 22 mm tuft.

As the title says this is the 500th post on this little modelling blog. When I started blogging more than 10 years ago, I hadn't thought it would develop into such a lasting activity. Now it has become an integral part of my modelling. Sometimes an inspiration and sometimes a reward allowing me to share the joy of a well executed project. I don't know if I will ever take the blog to celebrate the 1000th post. But so far I intend to keep up the blogging.

Thursday, 9 June 2022

Vegetation From New Source

I have used both natural and artificial products for vegetation during 20 years of large scale railway modelling. I have had good experience with German products from Heki, but as I began modelling in 1/19 scale almost all the regular landscaping materials from the traditional railway modelling manufacturers seemed far too small. I have now tried a new supplier and look forward to properly test the products. One of them could easily be tested. See below.

The greenery contained in my package from Spain. I also had some tools, weathering powders and paints sent up north to test.  

Spanish Green Stuff World supplies a wide range of materials primarily targeted to Warhammer-modellers. Apart from some bizarre colours and weird names for some of the products, I got the impression that several items could perform well in 16 mm scale. I was particularly glad that I could have tufts with a grass height of 12 mm. More height than is usually found in tufts from other companies.

Two 12 mm tufts and one 6 mm tuft installed near the track. Properly bedded in, they will no doubt look good.

After having fitted a few tufts in 12 and 6 mm versions, I must conclude that the height written on the packs may be just a tiny bit exaggerated as not all 12 mm tufts could be measured to 12 mm height over terrain. The 6 mm tufts measured out quite close to 6 mm in height. Aside from the variation in height (to the low side, unfortunately) the tufts are well worth their price. For longer tufts I may have to experiment with homemade ones.

Some tufts will be installed around the loading ramp and other products from Green Stuff World will also be used near the ramp. I'm looking forward to develop the area further soon.