Showing posts with label grass. Show all posts

Tuesday, 5 March 2024

Ramp Track Photo

Currently I'm in the process of choosing where to place the wooden poles with lamps around the lorry loading ramp. I'm in no hurry to decide where to put them. Actually the lorry loading ramp looks so in balance with the surrounding nature that I have had some doubts if it's a good idea to erect them. 

I can almost hear the birds sing and smell the sleepers.

But Nystrup Gravel isn't a nature reserve for flora and fauna, but an industrial location brutally exploiting the planet's ressources. Some wooden power poles with lamps is a minimum to convey an atmosphere of some human growth oriented activity.

One drawback with poles around the ramp is the awkward shadows they will cast on the backscene. This image is a cruel preview of what to expect unless I find a cunning way to place the poles.
 

Besides playing with wooden poles around the loading ramp, I'be been adding a little extra ballast here and there in the track and added water to the puddles in the area under the ramp's chute. They've ended up looking more like tar holes and I wonder if if they're worth redoing or if I'm simply going to fill them in.

Monday, 12 February 2024

IKEA Vegetation on Nystrup Gravel?

I have used natural materials and commercially available moddeling products for ground cover and vegetation. Now I have begun to consider using some of the artificial plant products made for interior decoration. For the time being I'm experimenting with a product from IKEA.

New vegetation has conquered a corner of the Nystrup layout. But only for a short time. If accepted the vegetation will move elsewere.

The challenge of finding grass and rush-like vegetation large enough for 16 mm scale has recently made me study the artificial plants' section in IKEA more closely than ever before. I have brought home a simple product of long grassy looking plastic fibres mounted in a rectangular piece of dark plastic fitted into a white plastic open-topped box. 

The plastic grass leaves are far too high for 1/19 scale and vill have to be cut down before they are mounted in the layout's surface. For experimental purposes I have fitted the plastic grass near the layout's edge to find out if the result is credible enough to continue working on. 

IKEA photo of the FEJKA artificial grass.

Have you had any experience with artificial plants on your 16 mm scale layout? Please leave a comment in the comments' section below or write an e-mail to the company mail nystrupgravel@gmail.com

Wednesday, 6 December 2023

Sisal Coarse Grass

During a few evenings I have untwined, glued and dyed a handful of sisal rope for some coarse grass. A very simple task and one of the many unstressful railway modelling activities. I used two different dyes - a dark green and a light grey. The light grey sisal strings have worked fine as dry or dead grass in track areas before. Now I want to try them in bigger tufts mixed with dark green ones.

A cruel snapshot with bad lighting to show how the sisal grass looks when newly planted. Small pieces of the foam underground are still lying around on the layout's surface. Once fully dry I adjust height of the tufts and fit more if needed.

I simply cut lengts of 5-7 cm of a string of sisal rope. The pieces of rope are then glued with PVA glue to keep the fibres together. When the glue is dry, the lengths are roughly untwined, dyed and left to dry. They are then further worked to spread out the fibres and cut down to fit the area and position. The tufts are then planted with PVA glue in holes cut in the layout's landscape. Once dry the height of the tufts can be further adjusted and teased out to form clumps of high grass.

Green sisal grass can be seen left of the Lister - to the right a small tuft of grey sisal can just be recognized.

The sisal coarse grass isn't a new method for me. I used it as an experiment on the gradient to the lorry loading ramp in larger lumps for the first time. I think it makes a good contrast to the thin static grass I use for the majority of grassed areas on the layout. I'm still looking to find out how to fit a representation of spikes to the coarse grass. 

Lengths of sisal rope being glued with PVA glue. After drying the individual sisal strings are being untwined to resemble plant strands.

Sisal fibres with light grey dye drying.

Two colours of sisal coarse grass ready to be planted on the layout. 


Monday, 28 August 2023

Grass on the Loading Ramp Segment

After preparation of the basic ground covering with used ground coffee and sieved gravel and dirt as well as small stones and twigs, I finally pulled myself together and fired up the static grass applicator. The loading ramp segment now has a basic cover of grass in varying tones. 

After a few days in my covered car parking the loading ramp segment is fully grassed.

Before I added the static grass I placed grass tufts where I thought it was appropriate. To fasten the static grass I used glue from RTS in two variants. The best for the large areas was the 'Gras-Flock Kleber – cremig' smeared on the ground surface with a flat brush. I varied the thickness and covering of the glue hoping to create different levels of grass covering. In places I didn't add glue allowing the ground to show through.

Nystrup loco no. 3 rolling down the lorry ramp with an empty skip. The static grass in the foreground is a mix of RTS grass colours 'Early summer' and 'Straw'.

The rear side of the segment is fitted with a predominantly dry and pale growth of grass. The front side is more green and lush. Although the grass towards the rear isn't too obvious when viewed from the front, the idea is that the lighter grass will blend better in with the photographic backdrop. 

Once the glue was applied, I started with a thin layer of 4 mm high grass with the name 'Summer' from RTS. Then I added 12 mm grass in the RTS grass colours 'Early summer' and 'Straw'. Where I wanted the grass to be green and fresh, living of good quaility soil I used most of the 'Early summer' variety and where I wanted the grass to look pale and struggeling with less fertile soil I used 'Straw'. 

The front side of the segment with the lorry loading area to the left. The homemade coarse grass from sidal rope isn't disqualifying itself totally, so I will probably be exploring that method further in the future.

With a basic covering of grass the layout segment begins to show some of the views I had planned. There is still much to do, though. As I worked outdoor the photos were made in my garden.

There is a lot more to do regarding grass and shrubbery on the loading ramp segment, but first I will work on the road area below the ramp. More plank road still needs to be made as well as covering the rest of the area with a suitable mix of sieved gravel - perhaps with some waterfilled potholes for variety. 

Friday, 25 August 2023

22 mm Grass Tufts - Blog Post #500

As I worked my way through my supply of grass tufts (mentioned in a previous post) I made sure to order additional ones to avoid the work coming to a halt. As I did that I noticed that the supplyer Green Stuff World now had grass tufts 22 mm in height in several colours. Consequently three packs of high tufts were ordered in addition to the 12 mm versions.

A view of three heights of grass tufts seen on the layout looking towards the fuel and lubrication shed.

I had ordered three colour variants of the 22 mm grass tufts and having arrived the colours 'Light green' and 'Dry green' seemed to fit perfectly fine with the colours I have previously used on the layout. The grass tufts with the colour 'Burnt' on the contrary, will probably remain in the box. The colour is much to dark and red for my taste. I have measured four tufts and they matched the stated 22 mm pretty well with some being slightly higher.

The grass tufts come in boxes measuring 15 x 9 cm.

While info on the box mentions the product's use in multiple scales, it doesn't mention 1/19 scale.

Three sizes of grass tufts from Green Stuff World.: from left 12 mm, 6 mm and the new 22 mm tuft.

As the title says this is the 500th post on this little modelling blog. When I started blogging more than 10 years ago, I hadn't thought it would develop into such a lasting activity. Now it has become an integral part of my modelling. Sometimes an inspiration and sometimes a reward allowing me to share the joy of a well executed project. I don't know if I will ever take the blog to celebrate the 1000th post. But so far I intend to keep up the blogging.

Thursday, 9 June 2022

Vegetation From New Source

I have used both natural and artificial products for vegetation during 20 years of large scale railway modelling. I have had good experience with German products from Heki, but as I began modelling in 1/19 scale almost all the regular landscaping materials from the traditional railway modelling manufacturers seemed far too small. I have now tried a new supplier and look forward to properly test the products. One of them could easily be tested. See below.

The greenery contained in my package from Spain. I also had some tools, weathering powders and paints sent up north to test.  

Spanish Green Stuff World supplies a wide range of materials primarily targeted to Warhammer-modellers. Apart from some bizarre colours and weird names for some of the products, I got the impression that several items could perform well in 16 mm scale. I was particularly glad that I could have tufts with a grass height of 12 mm. More height than is usually found in tufts from other companies.

Two 12 mm tufts and one 6 mm tuft installed near the track. Properly bedded in, they will no doubt look good.

After having fitted a few tufts in 12 and 6 mm versions, I must conclude that the height written on the packs may be just a tiny bit exaggerated as not all 12 mm tufts could be measured to 12 mm height over terrain. The 6 mm tufts measured out quite close to 6 mm in height. Aside from the variation in height (to the low side, unfortunately) the tufts are well worth their price. For longer tufts I may have to experiment with homemade ones.

Some tufts will be installed around the loading ramp and other products from Green Stuff World will also be used near the ramp. I'm looking forward to develop the area further soon.

Friday, 29 April 2022

First Static Grass on Nystrup Gravel

Finally I managed to get on with landscaping and the process of covering the little Nystrup Gravel layout with surface features and static grass. It's the same old story - too busy with work, family and the vintage railway. Fortunately the short modelling sessions of 10-15 minutes do add up over time.

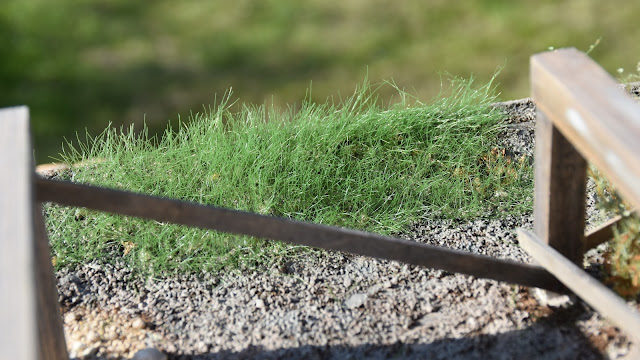
It's spring. The first grass is appearing on Nystrup Gravel.

Back in January I began adding ground cover in the form of (relatively) finely sieved gravel and used ground coffee. As the coffee was much too dark in colour, I flowed a diluted mix of lighter earth colours over the coffee areas to lighten up the colour but still making it darker than the gravel areas. I finished with some air brushed colour (Vallejo 71.142 IDF Sinai Grey) before I added more branches, old grass and leaves where they would be most likely to end up. Probably way too much effort for an area to be covered with grass... 

Before the first grass could be applied I added the last stabilizing planks to the loading ramp. With a little spot painting here and there and adding a little weathering the ramp allowed the grassing to proceed.

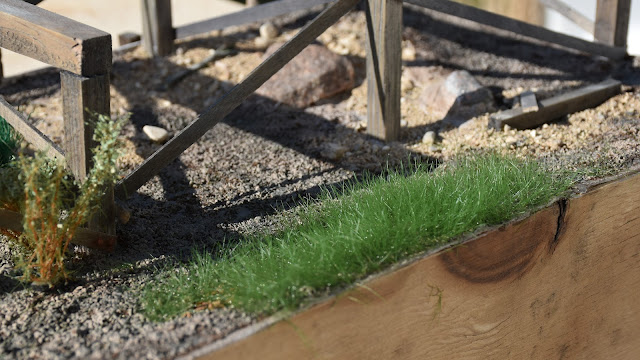
Zooming out a bit the different materials used for the ground cover are visible.

I unpacked the black suitcase with my static grass applicator and filled two of the small containers with 4 mm RTS-flock 70204 and 12 mm RTS 70212-2 of the same green colour called 'Summer'.

A small test area behind the loading ramp was covered with glue from the same RTS-brand as the applicator. With the glue applied I began the grass application by covering the area with a thin covering of the 4 mm grass and then going over the area with the long grass until I had a sufficient covering. The slow drying glue allows plenty of time to add more grass fibres if needed.

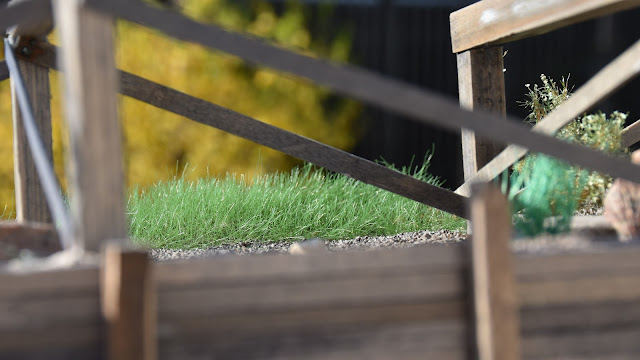
A small shrubbery has found a place to grow under the loading ramp. A patch of green grass has begun to grow here as well.

One layer of 12 mm static grass in a single colour behind the loading ramp. Under the ramp the grass will be thinner and less green due to shadows, less rain and harsher ground conditions.

I'm very satisfied with the result of my little experiment and will now carry on with getting grass planted under the ramp to allow the last track on the layout to be built. I will add different lengths and colours of grass according to how ground, sun light, lost gravel from unloading skips and other factors influence growth. 

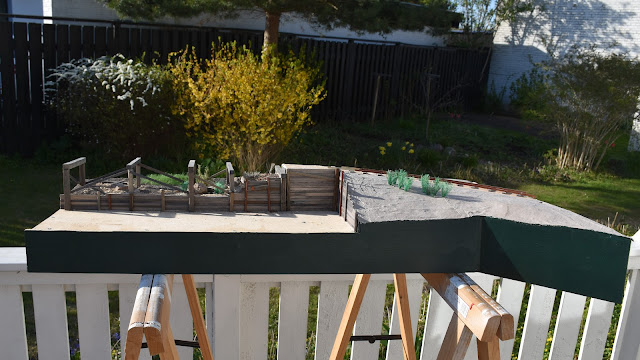
The outdoor modelling season is back. Nice and sunny spring weather combines well with modelling. 


Monday, 25 October 2021

Long time since last posting

Time flies. It's been ages since my last posting, and it actually reflects the progress made on my small layout pretty well. Not much has happened due to work, illness and a heap of other activities. Now I'm slowly gearing myself up to modelling again and what more entertaining activity than rail painting should be able to inspire me?

The 2.3 m long module 1 is down on a pair of trestles to have the other side of the rails painted.

It's probably no secret that I ventured into railway modelling on the basis of an almost lifelong interest in real narrow gauge industrial railways and that I'm volunteering on a 700 mm gauge vintage railway. With two operational steam locos each turning 100 years old, we couldn't avoid celebrating with an event involving the railway's friends, partners, the local community and the volunteers making it all possible. During an august weekend we hosted a formal reception with invited VIPs as well as special trains for enthusiasts and a full day of all steam trains for our passengers. More images from the event on my Flickr-site.

From left to right; No. 3 (O&K 7459/1921) and Da 7 (Henschel 18449/1921) posing together on Hedehusgaard station. Celebrating the loco's 100th birthdays in lovely sunshine.

After a long day of service the two locos have returned to the loco shed and service area, to be cleaned and readied for the next day's service.

Unfortunately all the sunshine and happy everyday life dissappeared when I managed to catch a bad stomach infection. For a full 3 weeks I was completely and utter out of service. Fortunately I enjoyed the luxury of a loving family and the benefit of living in a society providing free medical treatment and salary during sick leave. With both strength and weight loss it took some weeks to regain my usual stamina levels - but then I'm not 51 anymore! 
 
My very first tufts of rough green grass from unwound sisal rope. I'll keep on experimenting to make it look better. If nothing else it's really cheap.

With other matters having priority of attention, only minor progress can be reported on the loading ramp. My experiments with white glue and sisal rope have also continued. This week, though, I lifted module 1 from it's usual position on top of the book shelves and placed it on a pair of trestles to facilitate painting of the rails on the side facing away from the front of the layout. I'm almost done with the first layer of paint and will continue with spot painting and a wash with diluted oil paints before the module returns to it's usual position. Hope to return with news a bit more exiting during the coming months.