Long time followers of this blog will know that I like to model outside. Sometimes out in the open while the barbeque heats up or when weather and type of modelling project makes sense. During the last few weeks one of the two segments making up my Nystrup Gravel layout has been sitting on a pair of trestles under the roof of my double carport. A convenient place for many things (We usually only park the car there during winter). I haven't spent long evenings modelling, but 10 minutes here and there adds up.
 |
| Outdoor modelling in the carport a warm summer evening. I'm adding grass tufts in the point to the left as preparation for ballasting. |
I have primarily been adding grass to the rear of the layout and around the relief building, building a wooden floor to the entrance area of the large wooden building and ballasting a point. I added static grass with my RTS Greenkeeper. Besides getting a tolerable cover of light green grass on the layout up against the backscene, I experimented with adding another layer of static grass on top of the first. I want part of the layout covered in tall thin grass and having the 12 mm static grass fibres stand 'on top' of each other creates visibly higher grass cover. Not 24 mm but recognizably higher than 12 mm. Detailed study of the results once the glue has fully dried will determine if the method works for me.
 |
| Adding static grass near the relief building and flooring at the entrance. The still wet glue is visible in the upper left corner. |
Since the large wooden relief building was placed on the layout in 2022, I have wanted to add a wooden floor in the large entrance door. Not that much is visible when the layout sits in its usual place in my workshop/library, but I like that type of detail for close up viewing or photography. The floor was built from scraps of wood and some coffee stirring sticks coloured with dark grey stain dissolved in tap water. The scraps were used as a foundation to build up the floor area and correct length stirring sticks then glued down as visible flooring. A little gravel to make a smooth transition between floor and ballast as well as some light weathering finished off the work..
 |
| The complete flooring placed in the door opening of the large wooden building. Just some weathering before it's finished. The slight gap in the building's backplate over the floor can't be seen when the layout is installed in the workshop/library room. |
 |
| Wood stain was applied carefully to keep the colour on the light and faded side. |
With the layout segment set up easily accessible from all sides in the carport I finally got round to ballast the first turnout on the layout. My last session with ground covering work had reached the turnout, where quite a lot of work had to be done. When I laid the track on the layout in 2021 I rebuilt the standard Peco points with wooden sleepers. For a minimum of risk I decided to keep the plastic sleepers in the frog section. To achieve some kind of uniformity between wooden and plastic sleepers the black Peco sleepers recieved a layer of acrylic medium grey paint and a thin wash of raw umber oil paint before any other work started. My layout is built from light materials and due to the plastic sleepers' height a lot of ballast would be necessary potentially challenging my idea of a light layout. As a weight saving measure I added strips of left over 2.5 mm foamboard between the sleepers. This allows me to use a much thinner layer of sieved gravel to achieve a realistic ballast profile - and keep the layout comparatively light. Before ballasting I added a number of grass tufts in the track. I ballast my track in the old fashioned way of adding gravel dry, adjusting it with a soft brush and then flooding the ballast with a thin mix of water, PVA glue and washing up liquid.
 |
| Close-up of a Peco turnout partly rebuilt with wooden sleepers. For a minimum of risk I kept the plastic sleepers in the frog section. The sleepers are painted medium grey with a thin wash of raw umber oil paint. |
 |
| As a weight saving measure I'm inserting scrap pieces of foamboard between the sleepers. The Peco plastic sleepers are higher than the wooden sleepers in the hand built track, requiring more ballast. Ballast weighs a lot in 1/19 scale and the light foamboard acts as a filler saving weight. |
 |
| Ballasting in progress. The ballast to the right has just been flooded with a mix of tap water and white glue. The dry ballast center has been roughly levelled with a brush and will now be dressed with a mix of small stones before being glued. |
With the layout back in its usual place I could enjoy a layout with two thirds of the surface covered with a kind of realistic cover rather than the painted kitchen rags that have making up the surface for far too long. Maybe the layout will be completely covered (not finished!) by year's end?
 |
| The left end of the layout is soon looking like more like a semi-finished model railway than the naked landscape of painted kitchen rags. Still a lot to do adding more vegetation and small details. |
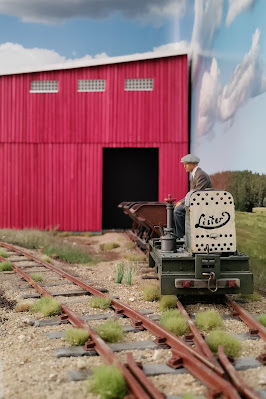 |
| In this view from the newly ballasted turnout the wooden building towers over the small train. Just as it is supposed to! |
My vacation is fast approaching and I will probably be taking a small modelling project or two with me in our summer cottage. If I will make any progress remains to be seen.


No comments:
Post a Comment