Last year
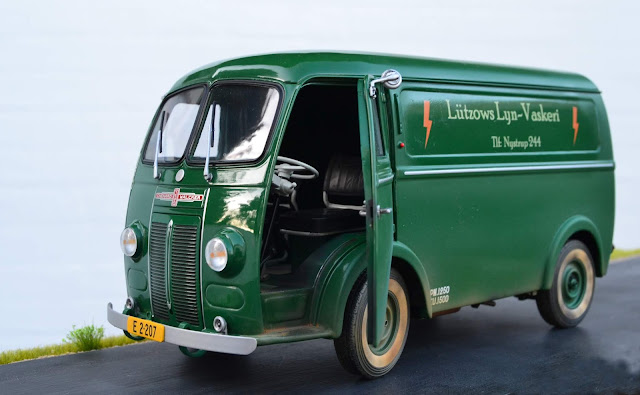
I purchased a lovely French Chenard & Walcker van. The van is a charming vehicle in a nice green colour. Unfortunately it was adorned with French markings. Besides the French license plates it was also fitted with what I suspect to be regional markins from the Seine region. On its sides the car producer's name was written with large letters. To be turned into a believable Danish van the markings had to go and new decals fitted.
 |
| Straight from the box onto a small garden table for photography. |
 |
| After adding new markings, license plates and weathering. |
Removing unwanted markings without ruining underlying paint is a challenge. In this case there just wasn't any alternative. I chose to test the effect of acetone on an area of paint on the car's underside. It took several applications of acetone and a good deal of rubbing with a swab before I managed to get just a tiny amount of green paint showing on the swab. So far so good: the green paint held up to the effects of acetone pretty well. My hope was that the markings had been printed with a different kind of paint easy to remove without affecting the main colour.
It turned out that the markings dissolved quite readily when treated with acetone. I started with the blue and white 'Seine' markings, progressed to the painted on rear lights and rear license plate. With those markings off, I had developed enough confidence to remove the large 'Chenard & Walcker' lettering on the van's sides. Rather than using swabs I used a piece of soft cloth dipped in acetone. Using swabs to remove the lettering would have taken ages and I was afraid that too many passes with acetone could eventually damage the green paint.
 |
| 'Seine' in blue and white is destined for removal. The French license plate will be covered by a new Danish one. |
 |
| The marking is slowly dissolved and wiped away with acetone and swab. |
 |
| The marking is gone with no damage to the green paint. |
I fitted the van with yellow license plates according to the regulations for commercial vehicles. I have previously had the complete license plate made as a decal, but I always had troubles matching the size of decal and homemade plastic card license plate. Now my decals have only letters and numbers. I paint the correct colour (black or yellow) directly on the plastic card license plate and then apply the decal. Having removed the painted on rear lights I fitted a new rear light over the rear license plate. Except from light and license plates no further parts were added.
The large decals for the van's sides slided easily off the backing paper after 30 seconds in water. With the van's gloss sides the decals were also easy to position correctly. After treatment with Mr. Hobby decal fluids I covered the decals with gloss varnish to protect them and blend them into the van's surface. I may need more practice working on large scale glossy vehicles as I'm not quite satisfied with the result...
 |
| Snapshot from the worktable. Decals fitted and blended in with gloss varnish. The lower parts of the van air brushd with matt varnish and road dirt colours. |
The car's lower parts were air brushed with matt varnish and a thin application of road dirt colours. Small details were picked out and I continued the weathering into cab and cargo hold to enable some realistic scenes to be set up with open doors.
 |
| Weathering of cab floor in progress. |
Although not completly happy with the varnishing of the large decals on the van's sides, I like the van. It's convincingly Danish looking, fitting the Nystrup Gravel period and theme and isn't overwhelmingly large. Below are som outdoor shots of the van.
 |
| The road dirt is primarily done with air brushed matt acrylics with a few spots made with a thin brush. A few oily spots added with oil paint. |
 |
| The van belongs to 'Lützows Lyn-vaskeri' which in English is something like 'Lützow's lightning fast washing'. A company with a reference to one of my railway friends - always keen on having clean work clothes. |
 |
| Rear view with license plate and rear light. |
 |
| Both rear doors open. The inside floor is weathered as well. |
 |
| Driver's door open. The cab floor got its share of weathering. Apart frm using paints I also used ground up pastel chalk and graphite powder to weather the van. |


Delightful model, nicely converted!
ReplyDeleteBriliant work!
ReplyDeleteSom sædvanligt propert håndværk og på billeder svært at skelne fra virkeligheden. Husker de "forbandede" døre, der blev benævnt "selvmordsdøre" da de lukkede op "forkert". Altså virkede døren som et sejl selv i lav fart før holdt og holdt man fast røg man ud. Også FIAT "elskede" disse døre i deres små biler som FIAT 500 m. fl.
ReplyDeleteFlot scale, men beholder nu min Spor 1, den har jeg (heller) ikke plads til, så 1:19, uha, går SLET ikke:-)