Showing posts with label Bankes Bakelit. Show all posts

Wednesday, 27 November 2019

Three Wheeler from Banke's Bakelite

The small company Banke's Bakelite is known from previous posts on this blog. I have built part of the company's factory and one of their lorries in 1:35 scale. Now it's time for a 16 mm version of a lorry from Banke's Bakelite. The factory itself was located right next to Nystrup Gravel's track in Nystrup, but used lorries for transport of both raw materials and finished goods. Only on a few occasions due to flooding of roads did the bakelite factory use the 600 mm railway.

... und noch weiter! German advertisement for the Tempo Hanseat showing a Hanseat with a hefty tire pattern on its front tire.
The Tempo Hanseat in service at Banke's Bakelite is fitted with much a more relaxed tire pattern. The driver has left the cab and is obviously examining the little lorry. A mechanial problem, perhaps?

I decided to keep the vehicle in the colour as supplied by its manufacturer Minichamps. I only air brushed the rear end with yellow paint. This would enhance visibility and traffic safety of the little, slow lorry in the dark months of the long Danish autumn and winter. I had decals custom made using the same artwork as my previous decals in 1:35 scale. The decals were applied on surfaces prepared with gloss varnish. Mr. Hobby decal solutions helped get the large decals integrate well with the surface of the model.
I used a combination of Tamiya masking tape and a plastic bag to make sure I only got yellow paint where I wanted.

Decals being fitted on the lorry. Company name and telephone number. Rear license plate removed awaiting fitting of a new plate in line with my modelling period.
The plastic injected tarpaulin was also gloss varnished in preparation for the decals. After decal application the tarpaulin was air brushed with flat varnish. The tarpaulin was then treated with detail painting and diluted oil paints in very much the same fashion as when I paint clothing on figures. The model's original black license plates were exchanged with new ones made from plastic card, painted yellow and fitted with decals.
Decals are on and the tarpaulin is getting details painted and some general weathering added. The new license plates are glued in place. Next task is to paint details and add weathering to the rest of the little lorry.
I picked out a few details on the lorry with acrylic paint. Windshield wipers were painted with chrome and the head lights also got a shiny chrome ring to keep the lens in place. The exhaust was painted with a thick layer of acrylic paint stippled with a stiff brush while drying. That creates a nice 'ripple' effect on the exhaust looking like a layer of rust. The exhaust's texture was enhanced with a wash of rust coloured diluted oil paint. Several other parts of the engine was treated to somelight wrathering as well. The underside of the opening bonnet wase air brushed lightly with dark grey.

The doors were given an unfair number of dents and scratches to represent a victim of rather careless drivers. The load area was also distressed with both acrylic and oil paints using several sizes of brushes. I gave the car a few light passes with two tones of sand coloured paint to represent dust thrown up from the road surface. I will probably add a bit more later.
The Hanseat was primarily used to ferry finished bakelite products to the standard gauge railway station in Skovby. As most products were shipped out in cardboard boxes the tarpaulin protected them from the wetness of the Danish climate.

A splash of yellow helps to protect the slow Hanseat with dim lights being hit by faster cars on the dark roads around Nystrup.
The driver now seems to have given up all hope getting the Hanseat started again. He will now have to walk to the nearest telephone to phone for a mechanic to help him take his load of bakelite products to their destination.

The Tempo Hanseat is my fourth road vehicle finished as Danish cars matching the Nystrup Gravel universe. Now it's back to finish the brick shed and finishing the build sketches and design planning for my Pedershaab locomotive. And soon it's December with all the associated activities. After more than 15 years of modelling Nystrup Gravel, the company has not once sent out a Christmas Card. Perhaps it's about time?

Friday, 28 July 2017

Module Finished (1/35)

The bakelite factory module is now finished (well as finished as a model railway ever gets). This afternoon I took advantage of one of the last days of my vacation to install wires and switches for the lights in the buildings. The switches and 12 V socket were arranged on the front of the module.

While the module gradually evolved towards finishing last summer, a few 'bald' spots still remained. These were taken care of this nice summer evening while I enjoyed the working lights in the buildings.
As the sun sets there is apparently still activity inside the buildings.

One guy went home after turning out the lights.

Finally the last guy at Banke's Bakelite closed up as well.

A driver and his Bedford O having a little break in front of one Nystrup's small industries.The little 600 mm. gravel line running between factory and parking area is almost invisible.

In the yard of Pedersen's Machine Shop a lot of work must have gone into a thorough clean up. No trace of all the metal parts usually strewn everywhere. Shortly after this photo was made, stuff began to build up again.
Being a slow modeller I seem to take forever to get the smallest of tasks done. I'm glad I only build a small module at the time. A whole layout would probably feel quite overwhelming.

Sunday, 28 August 2016

Main Building at Banke's Bakelite Finished (1/35)

After a long construction period the contractor (me) has finally finished work on the main building at the 1:35 scale bakelite factory in Nystrup. Not because it's been difficult or boring, but because I work on several models simultanously.
The main building at Banke's Bakelite is now finished. My next task is to glue it solidly to the module and blend it into the surrounding ground work.
While waiting for decals for my Opel Blitz bus, I took the opportunity to work on the factory. The main parts of the model are laser cut from MDF and card board by a friend of mine. Interior and roof was cut from foam board in 4 and 6 mm. thickness. Some of the work has been the subject of an earlier blog post.

Previously I had fitted light to the ground floor rooms and I did the same to the single first floor room. I then painted the interior walls on the first floor light grey and made a removable floor. That allows me access to the ground floor lights if they should need any attention in the future.
Installing light above the first floor in the factory building.
Testing if everything works. The difference in light levels is caused by the temporary lack of a rear wall on the upper floor. I'm glad to see that there are no 'light leaks' in the building (not counting the missing rear wall, of course).

I built the roof from two sandwiched layers of foam board covered with self adhesive surgical tape. The tape is my preferred method of modelling tar paper. The tape is slightly 'furry' and when painted retains a nicely textured surface.
Foam board roof with wooden edging fitted to the building.

Surgical tape covering the roof. Pencil marks helped me to position the strips of tape with a minimum of regularity.

After having painted the building I cut a rear wall to enable the model to be closed up and hold the removable interior in place. The rear wall is only kept in place by its tight fit and is easily removed to allow the interior to slide out of the building. Wires from the lights are run under the module surface inside the building. The wires are arranged to allow the lights to be switched on and off in all three rooms independently.
A view across Nystrup Gravel's track towards Banke's Bakelite. Now work on getting the building fit into the surrounding ground work can begin
A full view of the factory module. Despite the work involved in the factory building it is only a back ground feature. Although with a module width of only 40 cm. the term 'back ground' is open to debate.
Building the model has taught me that buildings in 1:35 scale are quite large. I have only built a small segment of the prototype building and even then the model has tested my work area's size. Any future building just a little larger will have to built on the work bench in the shed, where I usually work on lawn mower, bikes and other 1:1 scale real world items.

Wednesday, 1 June 2016

Building interior and adding ground cover (1/35)

In a slow and steady pace I manage to finish stage after stage on the road to a finished bakelite factory module. Even in the current unfinished state some nice views can be had.
Early evening in June in front of Banke's Bakelite in Nystrup. The Cushman scooter from the local oil depot seems strangely deserted. Where's the driver?


Recently the ground floor interior in the bakelite factory has reached a level where I can call it finished. More detail can definitely be added, but I question the benefit. The view across the module and through the windows allows only little to be seen.
With the building lifted off, the ground floor interior can be seen. Cooker and chair from Plus Models, bucket from Tamiya, bench from left over parts from a laser cut Daniel Caso coach kit, two coke bags from Wespe Models and a home made table. A Paulo Modellbau stove is positioned out of sight in the corner of the right room. All very basic, as not much can be seen through the windows.

Across the tracks from the bakelite factory a little 'truck stop' is developing. Not a fancy thing serving meals or coffee, but a simple gravelled area where lorry drivers can stretch their legs while waiting to take their lorries down the road to Nystrup Gravel's loading site.
The parking area during construction. The large stones make sure no lorry accidentally reverses out on the railway line. I picked up the stones in my drive way and had them glued down in less than two minutes. Oh, and the factory building has had its laser cut windows installed. Now a roof is urgently needed!
To avoid too much littering the city council has deployed two garbage bins for the lorry drivers. One seems to have suffered terminally from a close encounter with a lorry. Both bins are in resin from Plus Models.
I now plan to let the module work rest while I finish the Commer tractor. First I have to clear the work table, though. Does it sound familiar?

Sunday, 10 April 2016

Draining of the Factory Yard (1/35)

In smaller scales it is usually only very few modellers who take the trouble of fitting gully grates in streets and yards. In 1:35 it is a thing I think is important to remember. As model railways are still seen mostly from above, details on the ground are easily seen - or missed. Particularly in a large scale as 1:35.

In the factory yard of Banke's Bakelite I have fitted a single gully grate to help drain the area.. The grate is from a set in etched metal produced by Epokemodeller in 1:32 scale. I raised the ground around the grate slightly to achieve a little depth under the grate and a slight gradient of the yard towards the grate. Few will ever notice the space under the grate but I like to have the three dimensional effect. The hole under the grate was painted black and the grate itself dark grey after it had been blackened.
The Epokemodeller etch. The supply will probably be more than adequate for even the most unlikely expansion of my 1:35 model of Nystrup Gravel.

Ground being built up from scraps of plastic card and plaster. 
Most of the yard itself is covered with a layer of fine, dark grey sand picked up from a sandy trail near my in-laws' cottage.

The factory yard covered with gravel. Soon the brick wall can be glued in place.
I still have to add a little gravel around the grate and weather the grate itself. 
The yard of the bakelite factory. The wall is fitted and I have placed the power pole to test its position. 

Saturday, 2 April 2016

The Wall (1/35)

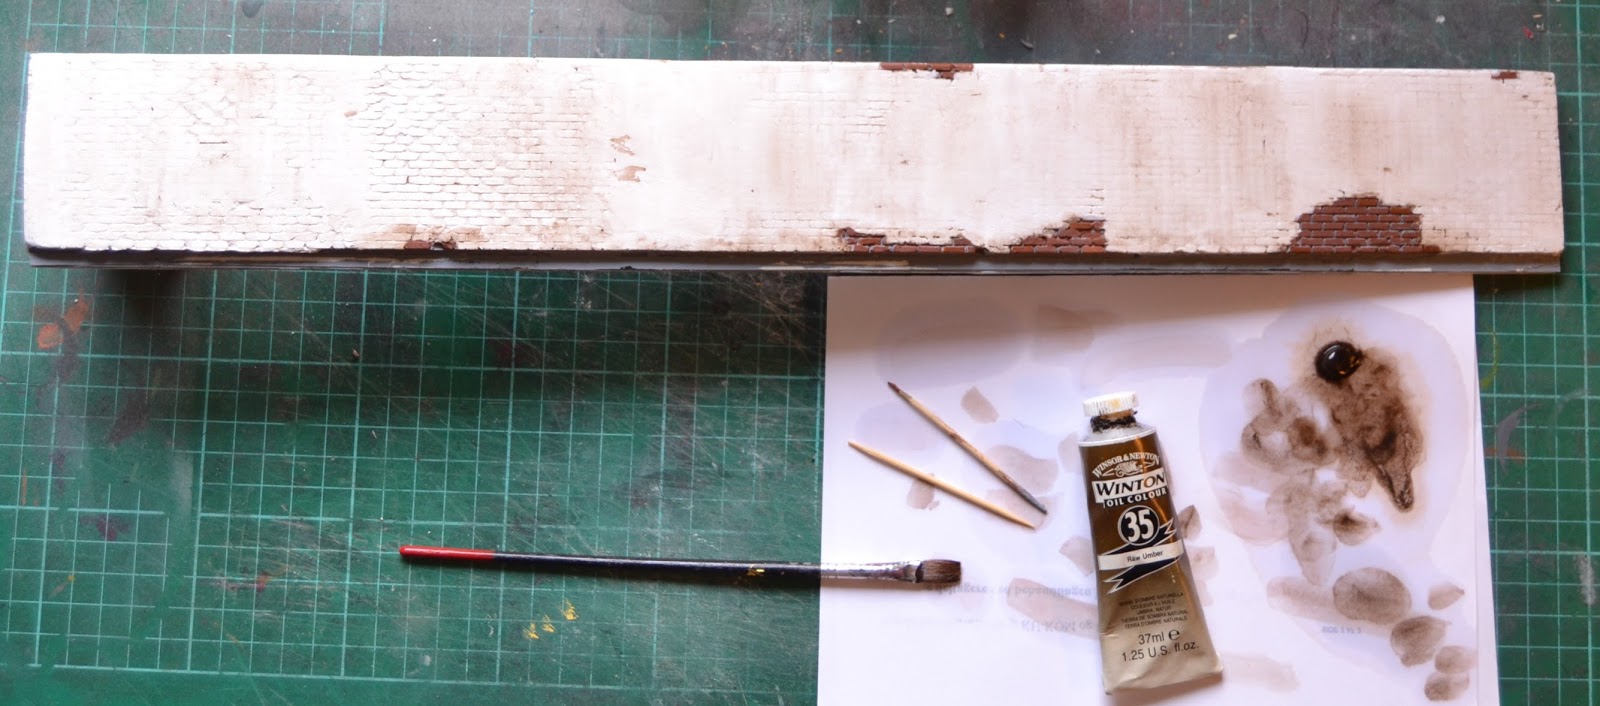
The long brick wall separating the bakelite factory yard and Nystrup Gravel's 600 mm. track is a an important back ground feature on the factory module. I was inspired to build the wall from the white painted brick wall in my back garden. The brick wall at Banke's Bakelit was probably erected in 1942 after one of the company's lorries toppled the old wooden fence.

I built the brick wall from elements cast in plaster using a mould from Diorama Debris. The elements were glued to a piece of foam board. I filled the transitions with plaster and a thin mix of plaster was also used to cover most of the wall to represent a plastered wall. A few spots were left without plastering to show the bricks. On the rear side of the wall I glued Tamiya brick paper as the wall will not be viewed by many from that side.

The plaster castings that makes up the main parts of the wall.
The wall assembled, plastered and painted.
I painted both sides of the wall with thinned white acrylic paint. After the paint had dried I covered the wall with matt acrylic varnish from a spray can. I sprayed the wall with varnish twice to make sure I got a good covering. The varnish provided a safe foundation for the final treatment with oil paint. A thin mix of turpentine and raw umber was washed over the wall. I made sure to get the treatment heaviest near the bottom of the wall. A little green paint was used to represent algea growth near the ground.

Applying oil paint to the wall.
Ground up chalk pastel was brushed on the bottom of the wall with a short and stiff brush. Although the pastels need a protective cover of flat varnish, the wall is now basically ready to be fitted to the module.

The wall seen from the bakelite factory yard. This is the side that will not be seen by many, as it is facing away from the module's front.
The wall's front side. Although inspired by my own garden wall, this one is much dirtier.

Monday, 14 March 2016

Rebuilding Bankes Bakelit (1/35)

I'm currently rebuilding the factory building at Bankes Bakelit. Quite an accomplishment as I never managed to finish the first version of the building. The upgrade from card board mock up to foam board building was planned. Now the building has (due to the unforeseen intervention from good friends of Nystrup Gravel) progressed to laser cut 4 mm. MDF. In fact several friends came up with ideas for improving the building. I really like getting suggestions and advise. I consider it the main benefit of this little blog. Thanks a lot.

Per Møller Nielsen, the owner of Epokemodeller, a small Danish producer of all sorts of useful accessories in scales from H0 to Gauge 1, offered to laser cut both walls and windows. Sketches with the main measurements were mailed and the finished parts delivered only a week later. I paid Per a small sum for the service, but surely the result merits the investment.
The building from Larsen's Toy Factory I'm using as inspiration for my bakelite factory. Workers beside a pile of the wooden toys they were making inside for more than 60 years. Too bad I can only build one end and a single row of windows. I can see that H0-modellers have one advantage over my 1:35 scale...
I assembled the three main parts (front and sides) with white glue. The parts came chamfered and they fitted perfectly together. I added a small rear reinforcement of foam board. The major rear foam board wall of the building will be integrated with the internal structure and interior.

I filed the lower window edge to allow for the mounting of a window sill. On the prototype the sills are quite prominent and I didn't want to leave them out. The sills were fabricated from plastic card and painted a rusty red to match the window frames, although you from the old photo above can see that they originally were white.

The outer walls of the building were covered with a layer of white glue that was worked with a short and stiff haired brush while drying. This gives the wall a three dimensional structure which I think is necessary in 1:35 scale. After two layers of white paint I fitted decals with the company name. I had those made years ago by my usual supplier of decals 'Skilteskoven' in Odense.
Ready for paint. The covering of dried white glue is vaguely visible.
White paint added and decals fitted. Gloss varnish provided a smooth surface for the decals but it still took a considerable amount of decal solution to make the decals conform to the irregular surface.
Foam board interior during construction. Grain of wheat bulbs test fitted - one in the front room right and two in the office left.
Lights on in the front room. I plan to fit the lighting so I can turn on the light in each room individually.
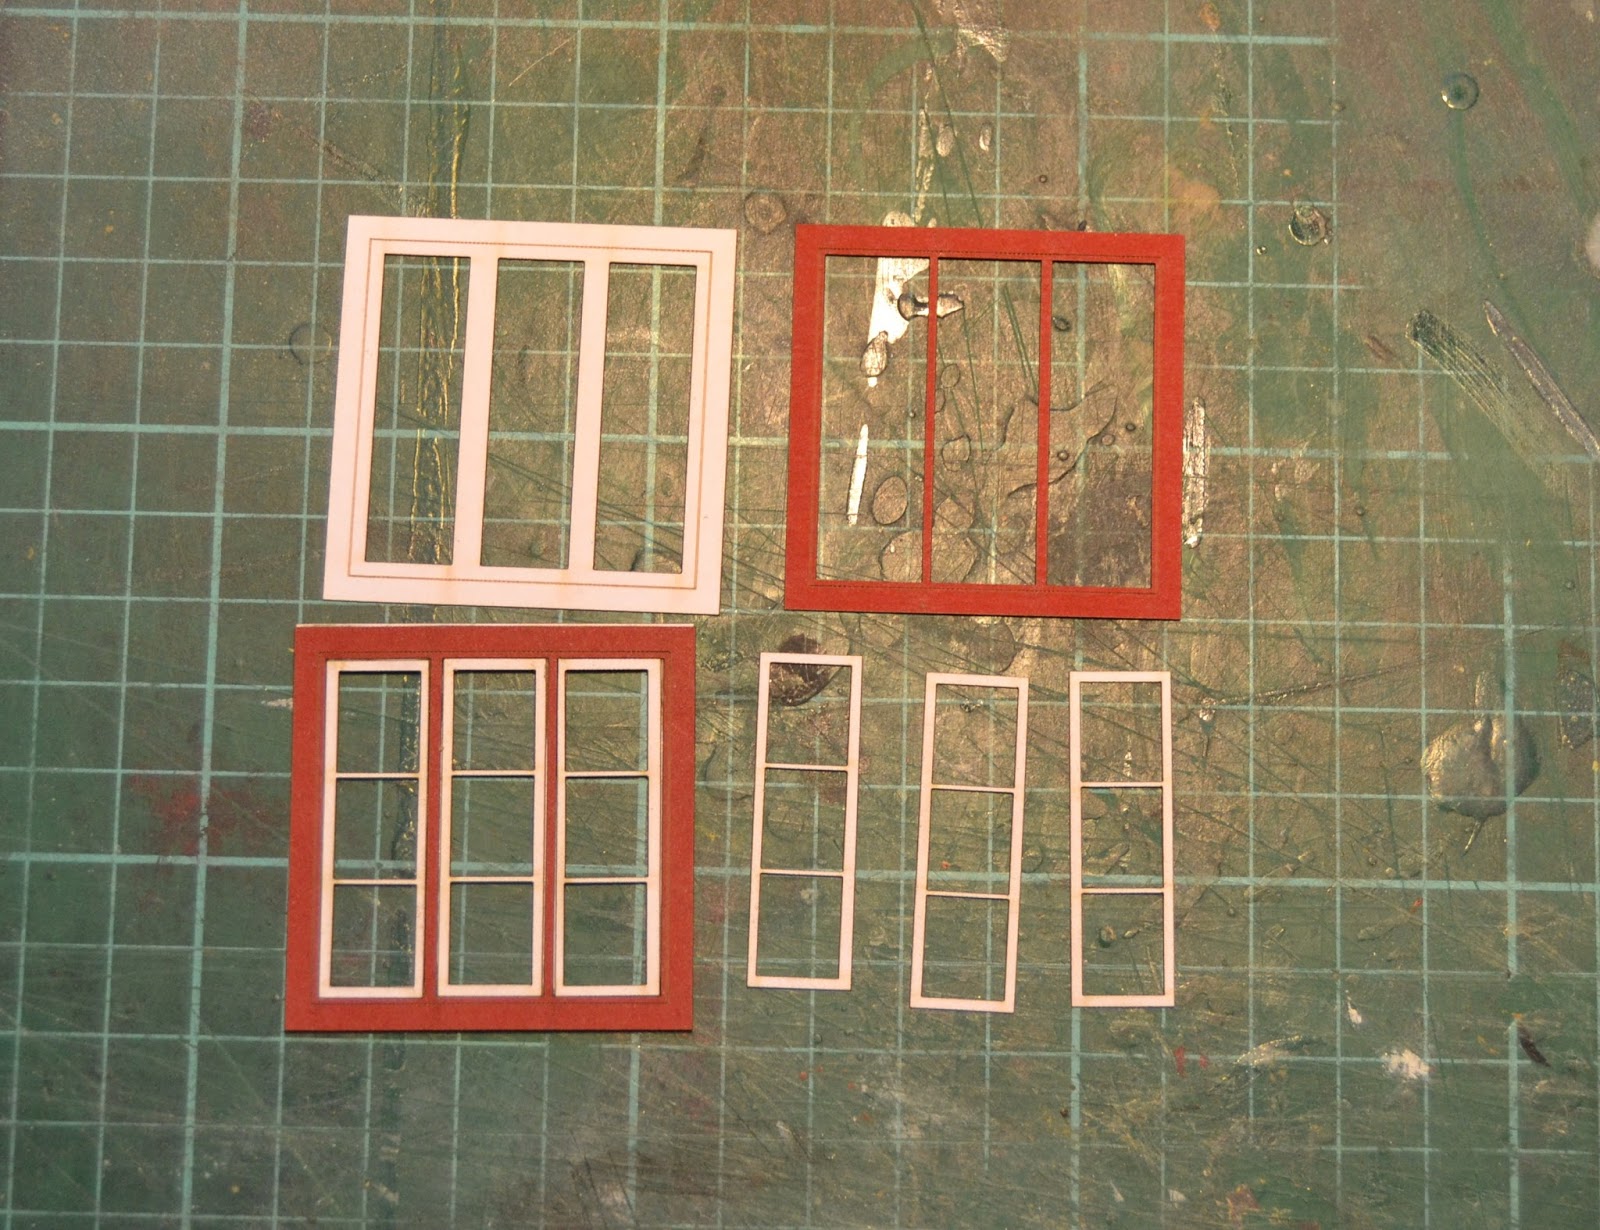
The windows were also laser cut by Per in thin card board. I carefully assembled the windows with thinned white glue. After the glue had dried, I gave the windows a cover of Vallejo matt varnish on both sides to protect the surface and provide a little extra stiffness.
Each window is made up from five parts. Here they are in company with an assembled window. Clear plastic card will be glued on the frames' rear as glass.
The interior is currently being glued up from foam board in the form of a 'drawer' that can be pulled out of the building. Two rooms on the ground floor (office and front room with stove) and a single room with tanks and piping on the first floor.

Friday, 5 February 2016

Building Bankes Bakelit (1/35)

Last March I started planning Bankes Bakelit, the small bakelite factory just north of Nystrup Gravel's 600 mm. track. The factory has now progressed from a card board mock up to a proper structure of foam board. I adjusted the size of the building slightly as there was room for a little larger foot print on the module. As I wasn't aiming for a scale model of the factory building, I just enlarged the building as much as space allowed while keeping the proportions. The building now makes a more prominent presence. I didn't want trains to dwarf the building - rather the opposite.
Test assembly held together with pins from my latest shirt purchase.
The building is made from a double layer of 6 mm. foam board. Window openings in the inner foam board layer are a little larger than in the outer layer. In that way I hope to fit windows in a realistic depth in the wall. I still haven't found any suitable window frames to fit in the holes and I suspect I will not. I will probably have to build the window frames from plastic profiles.
Windows cut out, double walls fitted and all parts glued.
Floor fitted - still unglued.
Interior floor and dividers have been built to allow for lighting and a little interior detailing. With floors the building don't need bracing.

Saturday, 15 August 2015

Drums and Power Pole (1/35)

While I had the air brush out to paint the interior of a lorry cab, I took the opportunity to also get some drums painted. They had been primed in Games Workshop 'Chaos Black' in advance. I gave the drums a quick blast of colour, not being particularly concerned if the paint covered equally well everywhere. I added a bit of rust on some of them.
Freshly painted drums. They will be used at Bankes Bakelit for transport and storage of the chemicals used to make bakelite. Below is a concrete pole that will carry power lines to the bakellite factory. I dug it out of my spares box. Research showed it to be made by the French company Ironside. How it came into my possession is a mystery - I have never bought an Ironside kit.

After drying I gave the drums a wash of heavily diluted burnt umber oil paint. I mounted them on some wood profiles. In that way they are easy to place at different locations and vehicles.

Drums washed with a thin mix of oil paint and turpentine. To ease handling the barrels are mounted with double sided tape on a wooden stick. New Year's morning sticks from fire works rockets are strewn across the streets in Denmark and while I take a walk to clear my head I can easily pick up a year's supply of sticks - for free.
Five of the drums fitted to a few boards (so as not to scratch the lorry's load bed).

Ready to depart to the bakelite factory with a full load of chemicals.
While the oil paint dried on the drums I sanded down the prominent mould lines on the pole. The pole is 20 cm. long, meaning it would be 7 m. when enlarged 35 times. After sanding and a little Humbrol putty in the worst sink holes, I applied a rough surface to the pole. I covered a small area (half a length on one side) at a time with plastic glue. I left the glue to soften the plastic for about a minute and then worked the area with an old tooth brush. It left a slightly rough surface without it looking out of scale. After priming and painting the result looks as below.


I drilled holes in the top of the pole and mounted three nice Part insulators. After painting and a little weathering I consider the pole ready to mount next to the bakelite factory building (must finish the construction of the building first, though).
Pole fitted with turned brass insulators and weathered.

A close up of the insulators. Now I just need an insulator enthusiast to tell me I have used a type of insulator not used in Denmark!