Monday, 26 May 2025

Skip With Brake 1/10 Scale

The second laser cut kit from the Feldbahnfactory-delivery is approaching a finished stage. Although time for modelling has been quite limited, the skip has slowly inched its way towards a finished stage. Now only final weathering is left before the braked skip and its cousin, the unbraked skip can be called completely finished.

Current status on the braked skip number 67. Looking quite worn and weathered even before I have begun the final stages of weathering. It will get worse!

Assembly presented no problems and with the experience gathered on the first, unbraked skip everything seemed like smooth sailing in well chartered waters. Even with the added parts of brake shoes and rodding no problems arose. The attentive viewer will notice, that the axle boxes on the braked skip are of a different type than those on the standard skip. I find it great that Feldbahnfactory have built in a little variety in the design with different pattern axle boxes. 

I also did some assembly on the kit in the summer cottage, and I managed to finish the basic frame and wheel assembly in two calm modelling evenings.

I painted the skip in the same as the standard skip, with rattle can spray paint: black primer from Games Workshop and Beltoni texture rust. I added dark grey and black from Vallejo with brush and added the number 67 on both ends of the skip body with etched stencils and semi-dry light sand paint stippled on. The wooden boards on the brake platform were scribed as being made from two planks and then heavily distressed with knife and coarse sanding sticks. The platform boards were then painted with a mix of heavily dileted oil paints and acrylic for the bolt heads. Both wagons are now ready for final weathering.

A single skip will make an impressive object for exhibition in your living room with careful lighting applied. No one will have doubts about your hobby!


Friday, 23 May 2025

Rhubarb on Rails

Spring is well advanced in Denmark and modelling time has been awfully limited. Work and other tasks have taken up too much time. But the first harvest from the garden's rhubarb plants is traditionally carried out with assistance from a 1/19 scale industrial railway on transportable tracks. This year wasn't any different.

This year's rhubarb train was made up from the light and versatile Lister R, two timber bolster bogies and Peco SM32 track panels.

In comparison to the rhubarb train of 2022, this year's train had progressed considerably. Proper wagons for the transport of rhubarb stalks had been finished in 2024. Mostly used for the transport of timber, the timber bogies are 3D printed items from Rail Print detailed and painted. As a further improvement to earlier rhubarb seasons, this year I had managed to paint the track panels a nice rusty colour to blend in better with the surrounding nature. Wet weather and slippery rail heads limited the train length, though. As a consequence only timber bogie 72 and 79 was in use during the rhubarb campaign. 

Friday, 25 April 2025

Easter and Fowler

Since lights were succesfully tested in operation on Nystrup Gravel's Fowler F 30 work has progressed at minimum speed. Brackets for lamps have been fitted and holes for wires drilled in cab front and rear. A new air brush has arrived, which will come in handy as the old one was beginning to cause trouble. 

Cab rear wall with lamp bracket and hole for wires drilled.

Plasticard glazing for the cab front. I'm always labelling parts like these as they look very similar, but are actually made to fit their particular window openening.

Glazing for the front windows are ready but awaits repainting of the upper body before being glued in place. As usual the glazing is simply transparent plasticard cut a little over size.

Shortly after coming home from Budapest the Easter holidays saw me spending time in the family cottage. Bringing the Fowler wasn't an option and to have a little something to build during evenings I brought the 1/10 scale braked skip. Assembly progressed swiftly and I'm about to fit wheels and axle boxes.

The weather in Denmark during Easter wasn't good for outdoor modelling. Here frame and skip body rests are assembled.

Hopefully my testing of the new airbrush will have given me enough confidence to take on the challenge of laying down a new matt green topcoat on the Fowler upper body. Then I can finally install the LEDs in the lamps and fix them to the cab to allow for fitting of the final details and weathering.

Sunday, 20 April 2025

Narrow Gauge In Budapest

When I visit cities abroad I usually try to get a railway attraction on the programme. Recently I was in Hungary's capital Budapest that has a very varied selection of railway features: plain normal standard gauge, trams, Europe's oldest metro, funicular, rack and pinnion line, railway museum and a narrow gauge 'childrens' railway'.

Mk-45-2002 arriving with train at Széchenyihegy station on the Budapets childrens' railway. The loco was built in Romania by the 23. August Works as 1569/1972.

I was fortunate to get a taste of several of the dishes at the Budapest railway buffet, but the 760 mm gauge childrens' railway took first place as it is a lovely scenic train journey through the hills of eastern Budapest that also has great value for non-railway enthusiasts (at least my travel partner said so). I visited the railway back in 2009 and not much had changed since my first visit. The railway was built in 1947 as a pioneer railway, an institution many countries under communist rule was blessed with. Here the young pioneers (besides getting a (un)healthy dose of political teachings) could learn working together running a railway with adults only taking care of the most demanding tasks. That's basically also what is happining on the railway today just without the communist indoctrination.  

The large mosaic above the ticket counter at Széchenyihegy station reminds of the time when the Hungarian flag had to be accompanied by the red banner on a depiction of the young pioneers. The uniforms have changed slightly, but the children are still saluting every passing train with (what to me looks very much) the communist pioneers' salute.

 
Despite visiting in early April two trains were operating on the almost 12 km long railway. Here trains meet on Szépjuhászné station. The train from Hűvösvölgy is pulled by Hungarian built Mk 48.2024.

The railway is a (for a Dane) steep climb from Hűvösvölgy to Széchenyihegy covering 235 meters in height including a horse shoe curve with a tunnel. Absolutely worth a visit.

If you visit the railway museum in the northern part of Budapest to see narrow gauge items you'll be disappointed: I saw only one small 760 mm draisine representing Hungarian narrow gauge railways at the museum. There is a lot of interesting standard gauge things to see (of particularly interest to me was the track maintenance machines and rail cranes). 

The single narrow gauge item exhibited at the Hungarian railway museum in Budapest. Draisine GV 179. 

Budapest is a nice city to visit, rail transport is extremely cheap, has good regularity and while very few foreigners understand Hungarian, Hungarians understands English just fine.

Sunday, 6 April 2025

Huge Skip Progressing

During some busy weeks I have none the less managed to work on the unbreaked 1/10 scale steel skip from Feldbahnfactory. Basic assembly was accomplished during a weekend in the cottage and priming, painting and weathering is almost done by now. I plan to add final touches once I have assembled the braked skip. That will make it easier to get both skips finished with the same look and faster, too. 

Almost finished DIN standard steel skip in 1/10 scale photographed in the spring sunshine in the garden.

I have never built a kit in such a large scale in laser cut wood. I didn't experience any problems during assembly and the instructions are top quality and easy to follow. I didn't make any alterations in the assembly sequence which I usually do. Probably not too many ways to assemble a skip, I suppose?

I assembled the kit while in the cottage with just basic modelling tools and standard white PVA glue. I was a little sceptical with the kit's prolific use of layering parts to achieve mass in e.g. frame, wheels and the skip rests. In reality, once finished, the layering is only noticable in a few places. I'm sure that with basic filler and sanding the problem could be avoided, but I wanted to build the kit in the most simple fashion. 

Frames and wheel sets united. A nice detail is that the bracket for a round wooden beam for braking is included in the kit. A detail not present in many model skips.

Almost assenbled skip put together as a test with the cottage surroundings in the background. If assembled very carefully the kit will not look bad unpainted.

I had no trouble removing most of the parts from the frets. Only on one fret (the one with the skip body parts) it seemed like the cutting could have been done better. Nothing that hampered the build, but slightly annoying in an otherwise perfectly produced kit. The few and quite small attachment points on the parts are easily sanded away. On some parts I sanded the edges a little to avoid a square look. I did that e.g. to the edges of the skip's frame and the coupling chains. This is an area where a full laser cut kit will always come out a bit inferior to a kit that mix materials to achieve more prototype shapes. 

The rivets on the skip are represented with very shallow cuts marking out the rivet. In this large scale a real raised rivet would be much better, but it's one of the features laser cutting can't produce. Adding rivets can't be too difficult in 1/10 scale and if I aimed for a more detailed look of my two 1/10 skips I would probably take that approach. On the other hand the Feldbahnfactory kit is super simple to put together. In my view it has a good level of detail for its simplicity of assembly.

End view of the painted skip on the short track panel included with the kit. I have numbered the skip with roman numerals, on this end with a white pencil, a method I have also used in 1/19 scale.

Here is one of the places where the layering of kit parts are visible. Not too obvious and I will disguise it with some lost gravel and dust from the loading proces. This end of the skip has a fancy logo from a Ukrainian 750 mm narrow gauge railway in the western part of the country around Borzhava, Боршавська вузькоколійна залізниця.

The wood grain isn't particularly noticably on most parts. In this close-up you can see traces of layering on the skip body rests and some wood grain marks on the safety handle.

How the wooden parts would look once painted had me worried intially. Sometimes wood behave crazy when painted and no amount of sanding will make it look like anything but crazy wood. The wood used in this kit works well with standard rattle can spray can paint. I used a mix of my usual black primer from Games Workshop and the Beltoni texture rust paint, that I have used previously on my 1/19 scale bogie timber bolsters. The texture in the rust paint help create as slightly uneven surface on the skip, an effect I further enhanced with sprinkled on genuine rust dust from a prototype skip. Using ground up real rust is part of my 'Famous for nothing weathering method'. Further spot painting was done with an air brush and different dark greys. Initial weathering consists of an overall wash with heavily diluted rust coloured oil paint. I will be adding more weathering when I finish the braked skip. Weathering them together will help make them look like coming from the same industry.

Coupling chains during painting. Heavy work with files produced quite nice rounded chain links.

As a conclusion I feel that most of my reservations with the kit was put to shame. Where I suspected the kit to let me down (wood texture, round parts, layering etc.) it was either insignificant or easily avoidable with a little work. If you are looking for some impressively large skip models to display the Feldbahnfactory models are easily assempled and will look good on your shelf, mantlepiece or as a nerdy office display. My braked skip kit is on the Easter holiday modelling programme as it is a large kit that lends itself to outdoor modelling in the cottage. 

The Feldbahnfactory skip is great little (large) kit of the widespread steel DIN skip. It provides a resonably cheap and easy way of getting that impressive skip train on a shelf or in a museum's display case.

Sunday, 30 March 2025

Danish Model Railway Union Exhibition 2025

The Danish Model Railway Union's annual model railway exhibition had again booked the large sporting centre no more than 1000 m from my doorstep. I'm not overly excited by model railway exhibitions, but when one is held this close to my home it's no big investment in time. I actually visited the exhibition last time it was held in my hometown.

An integral part of the DMJU exhibition is a diorama contest, where the audience is invited to vote for  the best diorama. This time there were 3 contestants and I didn't need much consideration before I voted for this diorama in 1/87 scale.

The DMJU is a society organising most Danish model railway societies. As their main public event the DMJU hosts an annual model railway exhibition. Some traders are invited, but the exhibition is centered around layouts and modelling rather than trading. 16 mm gauge is not a widespread scale in Denmark and as expected no layouts or models attended. Narrow gauge was pretty thin with only one layout having a decent amount of it in 1:120 scale.

Most layouts were H0 and drew pretty large crowds, but layouts like this isn't fueling my railway modelling passion. No offence meant to its builders.


The DMJU exhibition is primarily a show to give a broad overview of what's happening on the Danish railway modelling scene. Not least to younger people looking for a hobby. The exhibition is thus mostly focused on layouts, but some traders are present. I visited my usual business partners that also help me with custom made parts when I need that. No traders get rich from my model railway shopping at the exhibition, but I found a few goodies at the sales stand of Epokemodeller. One of the items was so well made I came to great doubts of my railway modelling future!

Large laser cut factory windows and drain covers for a future Eastern European diorama in H0. And a small narrow gauge locomotive in the same scale. 

Picking up the tiny Deutz OME117F loco I was astonished to notice that I could actually read the number on the builder's plate. 10835 corresponding to a Deutz loco delivered to the Netherlands.

All levers are present at the driver's position as is a fully detailed seat. I really struggle to understand how someting so finely detailed and well made can be sold for just 20 Euros. Sounds too good to be true, but it's not. Check out the loco on Artitec's homepage.


Doubting the reason continuing my modelling when such masterpieces can be picked up for 20 Euros from Dutch manufacturer Artitec, I placed the loco on my small 1/87 diorama together with some mine tubs and it looked even better. Photographed with some of the stuff I have made myself I realised that my own modelling wasn't so inferior as to be given up totally. So I will carry on doing fun industrial narrow gauge modelling. And now the Deutz is being built into the history of my yet geographically undecided Eastern European mining area as a 'trophy locomotive' brought back as reparations from Germany after World War 2.

Out of use Deutz with mine tubs in front of the concrete fence around the mining facility.

Moving closer the detail on the little locomotive shows up even clearer. The loco is a static model, but at the small price H0 modellers could easily place a few of them on an open standard gauge wagon and have an unusual load.


So despite my reservations I had a good 1½ hours at the exhibition and brought some nice things with me home for a very reasonable price. Surely not the worst activity on an otherwise quiet Sunday.

Friday, 14 March 2025

MD-54-2 in 1/87 Scale

The mailman rang the doorbell and delivered a package from Ukraine with yet another 750 mm gauge Soviet locomotive model in 1/87 scale. The company K-Model from Kyiv has a large range of H0 scale model cars and vehicles. Added to that is a small number of 750 mm narrow gauge models in the same scale. I have shopped in Kyiv before and am in the proces of  building (now and then, at least) their TU-4 loco.

Two 1/87 scale MD54-2 locos right out of the parcel from Ukraine.

MD54-2 locomotives were built by the Istinsk Machine Building Plant (200 km southeast of Moscow) between 1953-1962. The type was designed as a replacement for older small narrow gauge locos for 600 and 750 mm gauge of Soviet manufacture and a wide array of locos acquired as war booty and reparations. A riveted frame with two axles on elliptical springs carried what was basically the upper body and mechanical parts from the DT54 tracked tractor. A total of 1817 MD54-2 locomotives were built (a small number by Soviet standards). A very similar loco was the MKD-35 built primarily for the smallest industrial railways with 600 mm gauge where regauging to 750 mm wasn't economically viable. 


A lot can be said about the MD54-2 but it's not first in line for a design award!


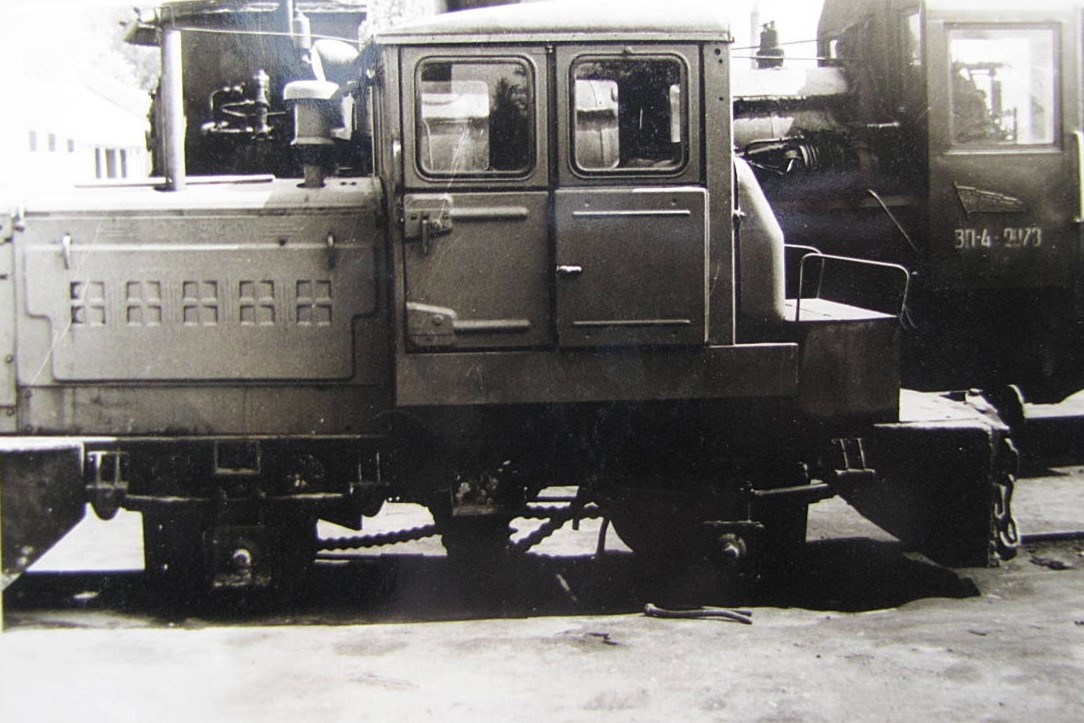
An 750 mm MD54-2 at the Pershotravenka porcelain isolator plant, Zhytomyr Oblast, Ukraine. In the background the company's VP-4-2073. Photo: L.N. Yanchuk.

The model is delivered assembled, painted and fitted with glazing in the windows. The model is tiny, measuring only 5.3 cm in length and 2 cm in width. Each loco is accompanied by a skip model that looks somewhat proportionally challenged. I bought two locos and the two skips are going straight to my box of spareparts.

The model is 3D printed, is unmotorized and fitted with metal wheelsets. Despite being resonably well protected by bubble wrap and a sturdy cardboard box some headlights and an exhaust pipe had broken off during transit. I could retrieve the broken off parts from the wrapping and they will be kept safe until I begin working on the models.

Image from Ebay showing the MD54-2 model with the accompanying skip. At least I can source two central buffers for a future project.

The K-Models' MD54-2 on a slice of birch in a landscape setting. A tiny model that will be a nice addition to my Soviet narrow gauge collection.  

MD54-2 1027 preserved at the Pereslav railway museum in the small town Talitsy in Yaroslavl Oblast, Russia. The colours could indicate that this is the actual prototype for the K-Models model.

The MD54-2 models are now packed safely away in a small cardboard box as they are not high on my list of modelling tasks. I have 1/19 projects that are far more important and I have begun assembling the new 1/10 scale skips as well. The most important thing is that I now have two MD54-2 locos in my collection. You never know how long small manufacturers survive in a niche market.