Showing posts with label Ukraine. Show all posts

Sunday, 6 April 2025

Huge Skip Progressing

During some busy weeks I have none the less managed to work on the unbreaked 1/10 scale steel skip from Feldbahnfactory. Basic assembly was accomplished during a weekend in the cottage and priming, painting and weathering is almost done by now. I plan to add final touches once I have assembled the braked skip. That will make it easier to get both skips finished with the same look and faster, too. 

Almost finished DIN standard steel skip in 1/10 scale photographed in the spring sunshine in the garden.

I have never built a kit in such a large scale in laser cut wood. I didn't experience any problems during assembly and the instructions are top quality and easy to follow. I didn't make any alterations in the assembly sequence which I usually do. Probably not too many ways to assemble a skip, I suppose?

I assembled the kit while in the cottage with just basic modelling tools and standard white PVA glue. I was a little sceptical with the kit's prolific use of layering parts to achieve mass in e.g. frame, wheels and the skip rests. In reality, once finished, the layering is only noticable in a few places. I'm sure that with basic filler and sanding the problem could be avoided, but I wanted to build the kit in the most simple fashion. 

Frames and wheel sets united. A nice detail is that the bracket for a round wooden beam for braking is included in the kit. A detail not present in many model skips.

Almost assenbled skip put together as a test with the cottage surroundings in the background. If assembled very carefully the kit will not look bad unpainted.

I had no trouble removing most of the parts from the frets. Only on one fret (the one with the skip body parts) it seemed like the cutting could have been done better. Nothing that hampered the build, but slightly annoying in an otherwise perfectly produced kit. The few and quite small attachment points on the parts are easily sanded away. On some parts I sanded the edges a little to avoid a square look. I did that e.g. to the edges of the skip's frame and the coupling chains. This is an area where a full laser cut kit will always come out a bit inferior to a kit that mix materials to achieve more prototype shapes. 

The rivets on the skip are represented with very shallow cuts marking out the rivet. In this large scale a real raised rivet would be much better, but it's one of the features laser cutting can't produce. Adding rivets can't be too difficult in 1/10 scale and if I aimed for a more detailed look of my two 1/10 skips I would probably take that approach. On the other hand the Feldbahnfactory kit is super simple to put together. In my view it has a good level of detail for its simplicity of assembly.

End view of the painted skip on the short track panel included with the kit. I have numbered the skip with roman numerals, on this end with a white pencil, a method I have also used in 1/19 scale.

Here is one of the places where the layering of kit parts are visible. Not too obvious and I will disguise it with some lost gravel and dust from the loading proces. This end of the skip has a fancy logo from a Ukrainian 750 mm narrow gauge railway in the western part of the country around Borzhava, Боршавська вузькоколійна залізниця.

The wood grain isn't particularly noticably on most parts. In this close-up you can see traces of layering on the skip body rests and some wood grain marks on the safety handle.

How the wooden parts would look once painted had me worried intially. Sometimes wood behave crazy when painted and no amount of sanding will make it look like anything but crazy wood. The wood used in this kit works well with standard rattle can spray can paint. I used a mix of my usual black primer from Games Workshop and the Beltoni texture rust paint, that I have used previously on my 1/19 scale bogie timber bolsters. The texture in the rust paint help create as slightly uneven surface on the skip, an effect I further enhanced with sprinkled on genuine rust dust from a prototype skip. Using ground up real rust is part of my 'Famous for nothing weathering method'. Further spot painting was done with an air brush and different dark greys. Initial weathering consists of an overall wash with heavily diluted rust coloured oil paint. I will be adding more weathering when I finish the braked skip. Weathering them together will help make them look like coming from the same industry.

Coupling chains during painting. Heavy work with files produced quite nice rounded chain links.

As a conclusion I feel that most of my reservations with the kit was put to shame. Where I suspected the kit to let me down (wood texture, round parts, layering etc.) it was either insignificant or easily avoidable with a little work. If you are looking for some impressively large skip models to display the Feldbahnfactory models are easily assempled and will look good on your shelf, mantlepiece or as a nerdy office display. My braked skip kit is on the Easter holiday modelling programme as it is a large kit that lends itself to outdoor modelling in the cottage. 

The Feldbahnfactory skip is great little (large) kit of the widespread steel DIN skip. It provides a resonably cheap and easy way of getting that impressive skip train on a shelf or in a museum's display case.

Friday, 14 March 2025

MD-54-2 in 1/87 Scale

The mailman rang the doorbell and delivered a package from Ukraine with yet another 750 mm gauge Soviet locomotive model in 1/87 scale. The company K-Model from Kyiv has a large range of H0 scale model cars and vehicles. Added to that is a small number of 750 mm narrow gauge models in the same scale. I have shopped in Kyiv before and am in the proces of  building (now and then, at least) their TU-4 loco.

Two 1/87 scale MD54-2 locos right out of the parcel from Ukraine.

MD54-2 locomotives were built by the Istinsk Machine Building Plant (200 km southeast of Moscow) between 1953-1962. The type was designed as a replacement for older small narrow gauge locos for 600 and 750 mm gauge of Soviet manufacture and a wide array of locos acquired as war booty and reparations. A riveted frame with two axles on elliptical springs carried what was basically the upper body and mechanical parts from the DT54 tracked tractor. A total of 1817 MD54-2 locomotives were built (a small number by Soviet standards). A very similar loco was the MKD-35 built primarily for the smallest industrial railways with 600 mm gauge where regauging to 750 mm wasn't economically viable. 


A lot can be said about the MD54-2 but it's not first in line for a design award!


An 750 mm MD54-2 at the Pershotravenka porcelain isolator plant, Zhytomyr Oblast, Ukraine. In the background the company's VP-4-2073. Photo: L.N. Yanchuk.

The model is delivered assembled, painted and fitted with glazing in the windows. The model is tiny, measuring only 5.3 cm in length and 2 cm in width. Each loco is accompanied by a skip model that looks somewhat proportionally challenged. I bought two locos and the two skips are going straight to my box of spareparts.

The model is 3D printed, is unmotorized and fitted with metal wheelsets. Despite being resonably well protected by bubble wrap and a sturdy cardboard box some headlights and an exhaust pipe had broken off during transit. I could retrieve the broken off parts from the wrapping and they will be kept safe until I begin working on the models.

Image from Ebay showing the MD54-2 model with the accompanying skip. At least I can source two central buffers for a future project.

The K-Models' MD54-2 on a slice of birch in a landscape setting. A tiny model that will be a nice addition to my Soviet narrow gauge collection.  

MD54-2 1027 preserved at the Pereslav railway museum in the small town Talitsy in Yaroslavl Oblast, Russia. The colours could indicate that this is the actual prototype for the K-Models model.

The MD54-2 models are now packed safely away in a small cardboard box as they are not high on my list of modelling tasks. I have 1/19 projects that are far more important and I have begun assembling the new 1/10 scale skips as well. The most important thing is that I now have two MD54-2 locos in my collection. You never know how long small manufacturers survive in a niche market. 

Tuesday, 23 July 2024

Summer Modelling TU4

Dedicated followers of this blog will probably recognise the checkered table cloth. A sure sign that I'm vacationing in the cottage and holiday modelling. And that's just what I am! For a change I have brought a 1/87 scale kit to assemble to the best of my abilities. The small size is perfect for bringing away from the house, but the tiny parts are quite challenging. Nevertheless I press on and hope to have the kit more or less finished once my vacation is over.

Assembly of the K-Model's TU4 in resin with etched metal details. I forgot my travel size cutting mat, but in the cottage we're never short of a scrap of wood to use as a substitute. 

The TU4-kit comes without instructions for assembly. Not the biggest of problems as the number of parts is pretty small. It is probably the placing of the tiny etched metal parts where the missing instructions will annoy me the most. The kit supplies parts for a static loco only and I'm keeping the model that way. No experiments with tiny H0e mechanisms this time!

TU4 bogies with wheels and gauge adjusting shims fitted. A small casting fault on one flange probably won't be noticed once the model is fitted on a small diorama. 

I began by sanding away flash on the parts from the frame and bogies. I then AC-glued the front skirts to the frame part and test fitted a pair of wheels on the stub axles on a bogie casting. The gauge didn't quite match 9 mm so I drilled and cut four shims to add on the axle subs. As I was away from my stash of all sorts of plasticcard pieces I couldn't find a piece thin enough to add on both sides of the bogie. The obtain a decent fit in the track, the shims were placed crosswise on each bogie. Once the bogie sides were superglued on bogie assembly incl. wheels I drilled chassis and bogies for M2 bolts for safe and flexible mounting. This will allow for realistically posing the loco on both curved and straight H0e track.

Two models from K-Model next to each other. The TU4 is still mostly unglued and only assembled to test how the major parts fit. The TU4 is 88 mm over the frame ends, while the PD-1 is 75 mm over the buffers. My 1/19 Baguley-Drewry is wider than the TU4 is long. Must get a photo of them together!

After removing flash from the upper body I closed the openings from cab to the two bonnets and installed very a rudimentary instrument panel. It's built from plasticcard and I'm not claiming any accuracy as it's all built from pictures showing only part of the construction. Not much will be seen through the windows anyway. The cab interior was primed and then brush painted a medium grey.

As I had the black primer out, I primed the bogies as well and brush painted them dark grey with wheels being given a layer of rust colour.

It's beginning to look like a TU4. It looks like I will have to build a gear box protruding down between the air tanks.

I have been working out the remaining assembly and painting process and next is some major work on the body. The upper body will be glued to the frames. A range of small parts must be attached, mostly photo etched parts of a frightening small size. Very interesting work coming up!

Sunday, 30 June 2024

TU7 and Closed Goods Wagons in 1/87 Scale

The packages from Ukraine keeps arriving, bringing my supplies for a little diorama of a mining location in Eastern Europe to new levels. This time I shopped at Retro Trains Models in Kryvyi Rih in the Donetsk region. The order took no more than a week and a half to travel from Eastern Ukraine to Denmark. Parcels from the UK often have longer shipping time.

Two goods wagons, a TU7 and a Tomytec drive unit have arrived on my work table.

RTM produce high quality resin kits of 1520 mm standard gauge Ukrainian locomotives (that would be broad gauge to us) as well as an expanding series of narrow gauge loco and rolling stock. The level of detail is quite high and the TU7 kit has more parts than my 1/19 Lister (even when counting all the parts I added myself). I think that illustrates the level of detail possible in the RTM kits. If I will manage to apply all those very tiny parts neatly remains to be seen!

Data sheet of a TU7A. Despite being in Russian, most railway enthusiasts should be able to interpret the info and see that this is not a tiny narrow gauge locomotive. 

The TU7 type was developed in 1971/72 at the Kambarka Engineering Works to replace the company's older 750 mm gauge locomotive types TU4 and TU2. The type is still in production at Kambarka, although in an updated version (TU7A) introduced in 1986. The production of TU7 reached well over 3000 units and several hundred were exported to e.g. Cuba and Vietnam. The TU7 was designed for use on on gauges ranging from 750 mm to 1435 mm and standard gauge. Cuba received standard gauge TU7s while the Vietnamese ones were 1000 mm. Like the TU4s at Western European heritage lines, a TU7 has also found its way west, as the 603 mm gauged Brecon Mountain Railway in Wales acquired TU7-1698 from Latvia in 2010. The TU7 is a versatile construction fitting in on railways with gauges varying from 600 to 1435 mm gauge! 

TU7 at Tver Construction Material, 180 km northeast of Moscow. As usual the gauge is 750 mm. Photo: Ilja Semonof.

The RTM TU7 is a resin kit with a high level of detail and designed to fit on the Tomytec TM-21. While the recently bought TU4 will be a static model the Tomytec drive unit will enable me to build a functional locomotive. 

A simple design with single end cab. Fault free casting with no flash at all. Test assembly of a few major parts shows a perfect fit. 

Well packed kit with an impressive decal sheet.

To accompany the TU4 and TU7 a few wagons was in order and I selected two closed goods wagons built by Demikhovo Engineering Works (Демиховский Машиностроительный Завод, ДМЗ) in Demikhov near Moscow. The plant was founded in the Soviet Union in the 1930's building machines for the peat industri including bogie hoppers by the thousands. Today the company is Russia's main producer of EMU's. The prototype goods wagons seems to be a type built from 1965 and into the 1980's with a load capacity of 20 t. From photographs and a single drawing the RTM kit looks very close to prototype. As the TU7 kit the wagons have lots of fiddly parts and a high level of detail.  

The RTM kit's upper body test fitted on the combined frame and floor part. A rather long 750 mm gauge goods wagon, but still a quite small model (compared to what I usually build).

The sudden investment i H0e models of Soviet prototypes is not a sign of a change of scale, but merely meant to be an enjoyable side show allowing me to model another field of interest in a much smaller scale. The Nystrup Gravel project moves on in its usual slow pace hampered by the usual time limiting factors of life (not that I'm complaining). This week I have been working (10 minutes or something) on track detailing before adding vegetation and ballast. 

Close-up of a Peco point partly rebuilt with wooden sleepers. As I rebuilt the two points, the frog sections kept their plastic sleepers. On one of the points the sleepers have now received a layer of medium grey paint. The upper right part has also had a thin wash of raw umber oil paint. Further weathering will hopefully help the plastic sleepers to blend into the rest of the hand built track on the layout.

Monday, 10 June 2024

TU4 Diesel Locomotive in 1/87 Scale

My little adventure exploring Soviet narrow gauge in 1/87 scale continues to haunt me. I have aquired Peco H0e track and points for a small diorama, mining equipment in H0f and now a resin kit of the classic Soviet narrow gauge diesel locomotive TU4 has arrived from Ukraine.

TU4-2620 at the Peregruzochnaya 'Station' on the Pishchalskoye peat line in Kirov Oblast, 2018. Photo: Igor Kaisin.

As the PD-1 draisines the TU4 is a kit from K-Model in Kyiv via eBay. 'Haven't Ukrainians more urgent things to do than making resin kits of narrow gauge locomotives these days?' many may ask. Yes, there is a war going on, but Ukraine is a huge country and the economy is still working despite difficulties like temporary power shortages and more than a million men and women in the military. Pubs were open in Britain during the 'Blitz' so obviously miniature models can be produced in Ukraine during wartime, too. 

The TU4 kit is unmotorised and cast in good quality resin. There are small amounts of flash to be cleaned away, but nothing a semi-experienced modeller can't handle. I have found no warping or air bubbles in the castings. Most of the parts are quite small as can be expected in 1/87 scale. I'm quite sure it is possible to motorise the model using a N-scale diesel mechanism. My plans for the kit have yet to be formulated, but most likely the kit will end up a static model on a siding on a small mining diorama.

The kit's cardboard box. Although sold by K-Model it says SK Trains on the box lid.

The box contains three zip-lock bags with parts.

The major parts laid out on the cutting mat. The loco is shorter than a logging bogie in 1/19 scale!

Loco body and frame. Nice clean castings with very thing flash to be removed.

The first TU4 was built in 1962 (first prototype built 1958) at the Kambarka Engineering Works (КМЗ, Камбарский машиностроительный завод) in the Soviet Union. 3210 TU4 locomotives were produced until 1974, most of them in the Soviet standard narrow gauge 750 mm. The locomotives were (and are still) used on many narrow-gauge railways serving industries like logging, peat extraction and minerals. Regular narrow gauge lines in Ukraine had TU4 locos in service into the beginning of the 21. century.

TY4-1417 in a configuration looking very much like the K-Model resin kit. Image from USSR, 1970's.

With a production that size a number of changes occured to the design and 4 major subtypes of TU4 locos has been identified. It's mostly subtle external differences, like window shape, placement of headlights etc. and due to rebuilds and swapping parts at repairs there are often many individual differencies. The K-Model kit seems to be of a mid-production TU4 differring clearly from the first 200 produced and the last 1000, some of which had a TU5 cab.

TU4 production was distributed all over the Soviet Union and lately examples have been exported to vintage railways in e.g. Finland and Sweden. Here is Östra Södermanlands Järnväg's no 21 imported from the Haivoron line in Ukraine and rebuilt/regauged to 600 mm. Here shunting at Mariefred Station in 2023.

The kit parts go back in the box as I currently haven't time for yet another project. But I like to know the kit is safely in my stash for the future. One never knows with small kit companies, particularly those located in countries attacked by Russia.

Thursday, 14 September 2023

Progress in Small Scale

In March I bought some 1/87 scale models of Soviet designed vehicles from a Ukrainian manufacturer. I started work on them, but got sidetracked by my main modelling effort, the 1/19 scale Nystrup Gravel. I have now dug out the models from their cardboard box and begun a small test diorama. Work is progressing again.  

Circular diorama ready for a 1/87 draisine.

It was my plan to build a small circular diorama for one of the PD-1 draisines. I used a slice of birch tree trunk with a diameter of ca. 10 cm. I picked birch because it was easy to source and because it is a signature tree for many of the northern parts of the draisines' typical habitat: Belarus, Russia and Ukraine. Track bed and landscape contours were made from foam board and a length of homemade 9 mm gauge track soldered up from copper clad sleepers and Code 100 rail profile. The track turned out less than satisfactory both visually and funtionally. The track was ripped up and replaced with a length of PECO code 55 N-scale track with most of the plastic sleepers removed. 

I tried to solder my own 9 mm gauge track on copper clad sleepers. My precision that day was probably adequate for 1/19, but not for 1/87! The Code 100 rail I used was also far too heavy. Start again!

With the diorama's diminutive size the ground work was fast accomplished. Rails painted rust, used ground coffee for earth and sieved gravel for ballast. Earth colours were slightly toned with diluted acrylic paint. 

Code 55 track glued in place. Landscape built up and prepared for mounting of a tree.

Ground texture and ballast glued on and treated with diluted paint. Hole for tree showing up in white.

With the ground textures dry, I added a few grass tufts before I attached the tree. The tree is the dominating element in the diorama and is supposed to highlight the small size of narrow gauge railways. The tree is a handmade commercially available product bought several years ago from German GATRA Modellbau Union. The tree was glued in place with AC-glue. Where the tree trunk meets the ground I built up a nice smooth transition with white glue and scatter material. Then crushed birch seeds were glued down immidiately under the tree representing dead leaves. When resonably dry I added static grass. In front of the track I used 2 and 4 mm fibres in two green colours. Behind the track I used 4 mm green and a mix of 12 mm green and straw. 

When the glue had dried I cleaned away the loose grass fibres and cut the top off those fibres I judged too high. Finally I sanded the edges of the exposed foam board and painted the areas in an earth colour. Once dry I could remove the masking tape and reveal the birch bark.

With tree and static grass added the mini diorama is basically finished. Effective construction time has probably not been more than 30 minutes. It's obvious that it is a much smaller scale than 1/19!

I'm now viewing a lot of images of PD-1 draisines to decide a livery for the model to be displayed on the mini-diorama. 

Friday, 3 March 2023

Soviet Narrow Gauge 1/87 Scale

Several of my modelling friends are happily modelling in a range of scales. Some even consider the variety of scales as a particular element of joy in their modelling. Apart from a few road/rail excavators I haven't done much modelling in other scales than 1:35 for the better part of 20 years and since 2018 exclusively in 1:19. Now and then a special challenge in a different scale can be fun, though. 

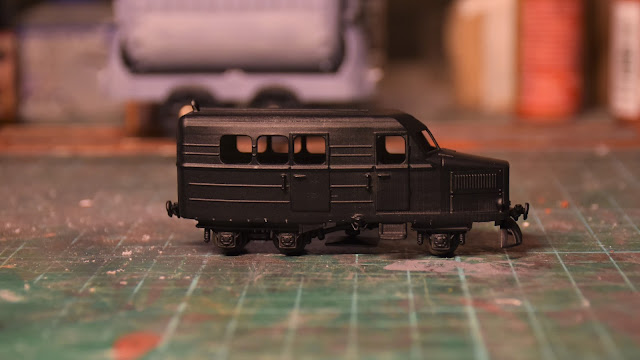
H0e scale PD-1 (ПД-1) draisine in 3D print from Ukrainian K-Models. 

For many years I have been interested in Soviet narrow gauge. Why? In the 1980s it was difficult to obtain information and that alone got me interested. In the 2000s I was lucky to visit some industrial lines with Soviet origen. Having a basic kowledge of Russian has also helped me seek out information online and in books. Until now I haven't been modelling anything from the 750 mm gauge due to the size if I stayed in my usual scales. Now I have found some promising possibilities in H0e (1/87 scale) from Ukrainian manufacturers.

With the current war in Ukraine one should think the Ukrainians would have their hands full and no time to produce models. Nevertheless they have a rather fine selection of models in 1/87 scale with 9 mm gauge of Soviet designed prototypes in the standard Russian/Soviet narrow gauge of 750 mm. I took the chance and ordered a few models being a little sceptical if the package would ever arrive in Denmark. My sceptisism was put to shame as the package arrived surprisingly fast and in good condition.

The PD-1 (ПД-1 in cyrillic letters) was designed in the 1950s for personel transport on Soviet narrow gauge lines, primarily on industrial lines, although the type also found its way onto some of the passenger carrying lines. The draisines saw service in most regions of the Soviet Union on industrial lines for logging, peat extraction and for quarrying clay, chalk, gypsum etc. 

Drawing of a PD-1 draisine. The bonnet seems a bit out of shape? The bonnet and engine came from the production line of the GAZ-63 2 t. lorry that was built in the years 1948-1968.

A PD-1 next to a somewhat larger AM-1 DMU on the Russian Tesovo peat line, now being developed into a museum. 

The PD-1 model is 3D printed in transluscent green material. The model is small measuring 7,5 cm in length, is 3 cm high and 2 cm wide. It is quite a difference from my usual 1/19 scale! The model comes preassembled with metal wheelsets and the rear wheel chaindrive fitted. In a ziplock bag are two steps to be added if wanted. There is no material for glazing in the windows and the model is basically an empty shell with no bottom. The wheels turn and the model can be made to run and it must be possible to equip it with a motor. My two PD-1 draisines will remain static models.

In green transluscent plastic the K-Model draisine shows off its detail very badly. A swift spray with black primer brought out some of the model's fine detail. Included are representation of the hydraulically operated turntable, fine reinforcing ribs in the bodywork and tiny springs on the axle assemblies.  

With the primer dry it is time to work out if a few detail parts are going to be added before I decide on a paint scheme. The draisines were found in quite colourful variants and almost any combination will go.

In the package from Kyiv was also a 1/87 3D printed kit of a Э-652б dragline excavator also from K-Models. A medium sized Soviet excavator that could be equipped with face showel and dragline alternatively. If the PD-1 draisines turned out a succes, I wanted to be able to add the two draisines to a diorama scene where I thought the excavator could be a good item to have standing in the background.

Reprint of original factory drawing included in the kit box. Great for checking out if any details need to be added.

The main excavator parts laid out on my worktable. The 3 part lattice boom is quite a fine piece of printing.

In the bottom of cardboard box was a greeting from the manufacturer in the form of a laser cut stamp in wood with a motive mocking the Russian war effort. That aside I have also been to the optician for a new set of spectacles. Going down in size modelling wise is costly!

The Ukrainian 'tractor brigade' pulling away a sadly looking Russian BMP-2.