Showing posts with label 750 mm gauge. Show all posts

Wednesday, 15 July 2026

H0e Coaches From Ukraine

Once again the workshop at Miniland in Kyiv has produced a couple of excellent 1/87 scale models and shipped them northwest to Denmark. The coaches are part of a larger order being gradually delivered as the models are finished. So far I have received two bogie platforms and a refrigerator wagon and I'm still expecting the arrival of some tank wagons and two PV40 coaches.

Another addition to my collection of Soviet narrow gauge rolling stock: Miniland built models of Ukrainian Pafawag coaches.

A total of 600 3Aw 750 mm narrow-gauge passenger cars were built between 1957 and 1960. 560 units were officially imported by the USSR. The coaches were almost exclusively known by the name of their manufacturer Pafawag (Państwowa Fabryka Wagonów) in Wroclaw, Poland. The factory opened in 1833 as Linke-Hofmann-Werke, in 1953 the company was renamed Pafawag and is today a part of the Bombardier group.

While most Pafawag coaches were standard passenger cars, the order also included variants used as VIP and dining cars. Most of the coaches, however, were fitted as 'Жесткий' (hard class) with simple, robust wooden slatted benches to maximize capacity and withstand wear from industrial and agricultural commuter traffic. 

The variants of the Pafawag wagons also included post and baggage wagons. Worth noting that this mention of the wagons is also simply naming them 'Pafawag' and not by any more specific type. 

Once the carriages reached the Soviet Union, local railway workshops soon carried out customizations to local needs. Several long-distance narrow-gauge lines in the Soviet Union required overnight accommodation, and workshops added internal bulkheads to convert the open coaches with seats to sleepers with simple, stacked longitudinal wooden berths.

Interior view of a Pafawag 'sleeper'. A sleeping passenger can just be seen lying in one of the upper berths. Most likely an image from the 1990's. The line's rural character is easily betrayed by the abundance of baggage in the top berths.

The 3Aw was the final development in a process that ironed out shortcomings in the original design. Soviet industry had begun to produce the PV40 coach in 1955, but the need for a larger and more technically advanced carriage seems to have prompted the need for assistance from the Polish railway industry. The original design 1Aw suffered from unstable running at higher speeds and the 2Aw sought to improve running and was built in almost 100 examples. The 3Aw was the final and most numerous version with final deliveries in 1960. 

Drawing of a standard 3Aw. Interesting to note that the drawing is printed in Russian, but the Polish company has signed and stamped in Polish. The Pafawags were long (almost 15 m) and became popular due to their better running compared to the shorter and more primitive PV40.

In model form my Pafawag carriages are built by modellers associated with Ukraine's largest model railway 'Miniland' in Kyiv. Some very talented modellers, fast and safe shipping as well as reasonable prices have made me a faithful customer. The wagons are most likely built from kits manufactured by another Ukrainian company Retro Trains Models. The carriages were shipped in a sturdy cardboard box in record time: only five days passed from receiving a notice that the wagons were sent to they were delivered on my doorstep.  Each coach is individually packed in a cardboard box lined with foam. Opening the box and removing a foam lid gives access to the model. I paid ca. 220 € for two coaches and considering the excentric prototype and quality provided I find that most reasonably.

Long and sleek with toilet in one end and a stove in the other. A modern coach by Soviet narrow gauge standards in the late 1950's.

The models have fully detailed interiors. Hard to see from my photos.  

My two 3Aw are finished in different liveries: the original green and blue as currently used by several of the 'childrens' railways' having replaced the old Soviet 'pioneer railways'. Both models are with Ukrainian Railways' lettering. If you wish to display green coaches with Soviet markings, I think you are best advised to reletter yourself by ordering a decal sheet form RTM. The wagons display a full interior, but I haven't yet had the courage to find out if I can gain access to the interior to install passengers.

The 3Aw bogies are remarkably detailed their small size considered. They are difficult to appreciate when seen from usual viewing angles on a layout, but in a close up they look really good. Compare with the image of a prototype bogie below.

A prototype bogie with decorative white painted wheel rims.

The underside of the Pafawag carriages is less detailed than the freight wagons in my collection. As I don't display my models on their sides it really doesn't matter. What can be seen from the side is present.

The steps are etched metal with 'see through effect' and the bogies are equipped for power pick up for internal lighting.

As usual the assembly of the wagons has been done with excellent workmanship, and the painting is of no less quality. The company logo of Ukrainian Railways and lettering looks painted through a stencil resembling the style used on the real carriages perfectly.

A good representation of the usual stencilled lettering between the central pair of windows.


The length of a Pafawag is clearly visible when coupled to a TU4 locomotive.

Both Pafawags are packed safely away in their boxes again. The summer of 2026 is dedicated to 1/19 scale modelling.

Sunday, 18 January 2026

TU4 Finished

As usual it took far longer to get the TU4 model on the worktable and some work done. I last worked on the loco in August closing up the upper body and frame and getting a good fit with the lower frame part holding the bogies.

The tiny TU4-1135 is finished and photographed on a white background. 

One thing keeping me away from the task before me was probably the myriad of tiny etched metal parts to be fitted including steps, hand rails and door handles. During the Christmas holidays I bit the bullet and began drilling holes for the handrails, thinking that they were the largest parts and would provide me with some confidence if I succeedded with them. With some careful work I got the handrails removed from the etched fret and mounting them on the loco with AC glued went resonably trouble free. Footsteps under the cab doors were next and I finished off with the characteristic 'red banner' insignias on the bonnet tops. I decided to omit the door handles as they are probably a bit beyound my current abilities in H0 scale. 

The handrails were fitted in many different ways on TU4's during the years depending on model, owners' preferences and the wear and tear the locomotives were invariably victims of. Consequently there is no 'right' way of fitting e.g. the front handrails. Where I had drilled to mount the handrails I had to do some filling as my smallest drill was a bit oversize. This proces didn't work out to my full satisfaction and I'm getting a good supply of tiny drills for my next 1/87 scale project.  

Handrails are being installed - fiddly work that was seriously challenging my 1/19 scale accustomed eyes and fingers. No major disasters, but please don't look too closely on the finished model! 

K-Models has not included buffers in the kit, probably thinking that you'll fit some of your own choise. As my TU4 is going to be a static model I looked for some really good buffers of the standard Soviet type to fit. I found them in the RTM kit of the TU7. I plan to build the TU7 as an operating model and it will consequently have standard H0e couplings fitted, making its kit supplied buffers redundant. The buffers are 3D printed to a very high level of detail. Once I had removed the printing supports I was astonished to find that the chains actually worked! It's a testemony to the level that 3D printing has progressed to when you can have tiny coupling chains in 1/87 scale work directly out of the printer. The buffers were AC glued into holes drilled in the cut-outs in the loco's front.

Assembly of TU4 locos at Kambarka Engineering Works. The centre engine could be TU4-1851 judging by the chalked on number above the buffer. To the right possibly a TU5 (a slightly heavier and faster version of the TU4) during construction. Archive image.

When I had finished working on the body of the loco I added a scratch built centre mounted gearbox between the bogies. Two rectangular pieces of 2 mm thick plasticard and two circular shapes punched out of thinner plastic were glued together, sanded to shape and stuck on with AC-glue. It's nothing more than a coarse approximation built after prototype photos. I also added a few pipes for compressed air and hydraulic oil from thin wire. Not much of this will probably be viewable once the finished model is placed on an overgrown track on a future diorama.

Construction is finished and the model now awaits priming and painting.

After construction and sanding the worst glue marks, the window openings were masked and the loco primed with my usual 'Chaos Black' primer and painted green with red trim and orange handrails. I used Vallejo Air 71.134 'Imperial Japanese Army Medium Green' for the body's main green colour and 70.946 'Dark Red' for front skirts and frame trim. For the orange handrails I went with 70.910 'Orange Red' from Vallejo. From prototype images it seems that the roof is usually painted in the same colour as the body and so I left the roof in green and will rely on the weathering to make it stand out.

Halfway through air brushing the green I took this snapshot of the TU4 on my painting turntable from IKEA.

A few days later and details have been picked out in contrasting colours to convey a little of the characteristic colourfulness many TU4's locos displayed.

Before adding the kit supplied decals for TU4-1135 I gave the the decal locations a layer of gloss varnish to help the decals to lay down well on the surface. In 1/87 scale the decals are quite small and particularly the decal above the front coupling took some careful work to position more or less correctly. As usual I used Mr. Hobby decal solutions for best possible application of the small decals.

When the decals were in place I weathered the locomotive lightly. I'm building the TU4 as a non-operational loco that have been recently withdrawn from traffic. Hence no missing parts due to cannibalisation or heavy rust. I used my usual combination of oil washes, Vallejo weathering paints and dust spraying with the air brush. I restrained myself as much as possible as I figured I could easily overdo the weathering in this small scale. Once I was resonably satisfied with the weathering I added the kit glazing to the windows. As I had built a rudimentary instrument panel in the cab, the front glazing had to be slightly converted to fit. Fortunately I had done this in advance when access to the cab was easy. The side glazing had to be separated into two single pieces on both sides due to my way of fitting the cab handrails (the etchings were cut over length and protrudes into the cab), disturbing fitting of the original glazing. I glued the clear parts in place with 'Mikro Kristal Klear' that dries completly clear.  

Left side view of the TU4. Considering it has a length of roughly 9 cm I'm rather pleased with the result. This isn't exactly 1/19 large scale modelling!  

Right hand view of TU4 1135. The scratch built gearbox is just visible behind the air resevoirs.

With the TU4 finished I have reached the final milestone of an assembly process that I started in July 2024. I have been doing a lot of other modelling projects while working on the TU4. I have finished e.g. 3 skips and the Fowler loco in 1/19, completed basic landscaping on the layout as well as finishing a H0e MD54-2. Now I will turn my attention to a loco in 1/19 scale. No less daunting, but more in tune with what I usually model.

Most recently finished loco 'dumped' in the ballast with the next project on track! A rebuild of my Accucraft Baguley-Drewry is next on the list.

The 1/19 Baguley-Drewry locomotive is wider than the 1/87 TU4 is long. My eyes will be less tested on the Baguley project!

Monday, 22 December 2025

New HOe Wagon Arrived

Ice cooled reefers on Soviet narrow gauge? Yes, particularly the narrow gauge lines located in the agricultural regions of the Soviet Union were equipped with isolated refrigerator wagons. The 1/87 scale model of a Soviet narrow gauge reefer is part of a larger order that will arrive piecemal with irregular intervals from Ukraine. I was so satisfied with the quality of the two platform wagons that arrived in September that I had to have more!

Fresh out of its box. Another item for the Soviet narrow gauge collection.

The model is handbuilt in Ukraine by 'Miniland', the organisation that operate Ukraine's largest 1/87 scale model railway in Kyiv. The reefer is supplied in a tailor made wooden box with a laser cut outline of the reefer on the top of the lid and foam lining cut to fit tightly around the model. 

The prototype 'isothermic' wagon was built by the East German manufacturer 'VEB Waggonbau Bautzen' in 1954. As the term 'isotermic' reveal the wagons weren't exclusively for keeping their contents cool but rather at a constant temperature. In fact, the wagons were equipped with a heating stove and could consequently also keep the freight from freezing. Bautzen called them 'Kühlwagen' and in Ukraine they were known as 'Льодовик' literally 'glacier', so I guess the main role of the wagon would be to keep meat, fruit and vegetable cool in the warmer months of the year. The wagon was insulated with a layer of 20 cm thick insulation material and could carry 2 tons of ice in compartements to keep the freight cold.

As everything on the Soviet narrow gauge railways the reefer wagons were quite large with a carrying capacity of 15 t. Via thermometers the temperature could be monitored from the outside. Ladders on the ends gave access to roof boards that were used when filling the ice compartments.

Works photograph from Bautzen showing a light coloured 'Kühlwagen' - cooling wagon. The wagons were seen in light grey (perhaps white?), green and brown colours. 

A preserved reefer in the railway museum in Anykščiai at the 'Aukštaitijos' 750 mm narrow gauge railway from Panevėžys to Rubikiai in Lithuania. The thickness of the doors are evident. The wagon has lost many fittings, including the end ladders.

The wagon is priced at 116 € and that is only a little more than a pretty standard H0 Danish passenger car  - and the reefer comes with a nice storage box rather than a flimsy one made from cardboard. Being very good quallity, a rare prototype and handbuilt by a craftsman/woman, I don't consider the price high.

Brake cylinder, back up air tank and piping. Hard to believe this is 1/87 scale and hand made. 

Good, clean decal application. Paint has been applied without faults. Nice work.

Roof running boards around one of the openings for filling the internal ice boxes. Notice the drain leading water over the wagon's end.

Delivery was swift and from ordering to delivery a mere 6 days passed. Quite hard to understand how that is doable from a country being the victim of a Russian invasion and suffering devastating air attacks on its cities almost every night. All the more reason to appreciate the careful work laid in the detailed model!

Tuesday, 30 September 2025

Soviet Bogie Platform Wagons

In my continued proces of building up a collection of Soviet narrow gauge rolling stock, two platform wagons arrived today by mail. Quite unusual for such rather rare prototypes they are out of the box delivered finished and ready for service (even if I don't have a layout to use them on).

 
Two new platform wagons unpacked and photographed in the garden with a MD-54-2 and a piece of mining machinery as load.

The protoype for the models is a simple steel framed platform wagon with sheet metal floor and cast steel 'american-style' bogies and central couplings. Pockets for stakes to enable transport of wood etc. are placed on the outside frames. Several types of platform wagons were built by Demikhovo Engineering Works (DMZ) with some of them having very low sides and some strengthening beams across the load area - probably for transporting logs. The Demikhovo Engineering Works (Демиховский Машиностроительный Завод, ДМЗ) in Demikhovo near Moscow was founded in the Soviet Union in the 1930's building machines for the peat industry including bogie hoppers by the thousands. Today the company is the Russian Federation's main producer of EMU's. 

Drawing and data sheet of almost identical platform wagon built by DMZ. It's fun that the gauge is stated as being 1520 mm - clearly a mistake!

Works photograph of a platform wagon from Demikhovo.

The wagons are handbuilt in Ukraine by the Ukrainian 'Miniland' model railway organisation that is best known for operating Ukraine's largest 1/87 scale model railway in Kyiv. They are not what I would consider cheap, but the quality/price ratio is well balanced and I already have more models on order. Packaging on arrival from Kyiv is top quality, and once cardboard box and bubblewrap was removed I had a tailor-made lasercut wooden box in my hands. The box will help protect the models from all but the most viscious mishandling.

The contents laser engraved on the lid of the wooden box supplied as a safe home for the models.

With the lid off the wagons can be seen fitting into the foam lining of the box. Thin plastic wrapping makes it easy to extract the models.

The models correspond to available drawings of Demikhovo platform wagons and both are assembled with care, bearing no visible marks from glue, solder or files etc. The wagons are equipped with full underside detail like air tank, pipes and brake rodding. Paint is well applied, probably by air brush, and the lettering is clear and the wagons carry individual numbers and appropriate data.

Platform 1930 in light grey livery.

Braked platform 1262 with brake compartment built from steel sheet and profiles.

Underside detail on platform 1930. The only thing missing is the brake shoes.

As an extremely utilitarian design the Demikhovo platform wagons weren't the kind of rolling stock anyone took a particularly interest in. Consequently most images show prototype wagons heavily weathered and worn. As long as all eight wheels touched the rails and the couplings pointed in the right direction all seems to have been fine. I look forward to add weathering to the models in the future. For the time being they will stay in their nice box.

Platform wagon loaded with two substantial concrete elements. This particular wagon seems to have been light grey in a distant past. Surely an inspiration for my future weathering work on the two models.


Friday, 14 March 2025

MD-54-2 in 1/87 Scale

The mailman rang the doorbell and delivered a package from Ukraine with yet another 750 mm gauge Soviet locomotive model in 1/87 scale. The company K-Model from Kyiv has a large range of H0 scale model cars and vehicles. Added to that is a small number of 750 mm narrow gauge models in the same scale. I have shopped in Kyiv before and am in the proces of  building (now and then, at least) their TU-4 loco.

Two 1/87 scale MD54-2 locos right out of the parcel from Ukraine.

MD54-2 locomotives were built by the Istinsk Machine Building Plant (200 km southeast of Moscow) between 1953-1962. The type was designed as a replacement for older small narrow gauge locos for 600 and 750 mm gauge of Soviet manufacture and a wide array of locos acquired as war booty and reparations. A riveted frame with two axles on elliptical springs carried what was basically the upper body and mechanical parts from the DT54 tracked tractor. A total of 1817 MD54-2 locomotives were built (a small number by Soviet standards). A very similar loco was the MKD-35 built primarily for the smallest industrial railways with 600 mm gauge where regauging to 750 mm wasn't economically viable. 


A lot can be said about the MD54-2 but it's not first in line for a design award!


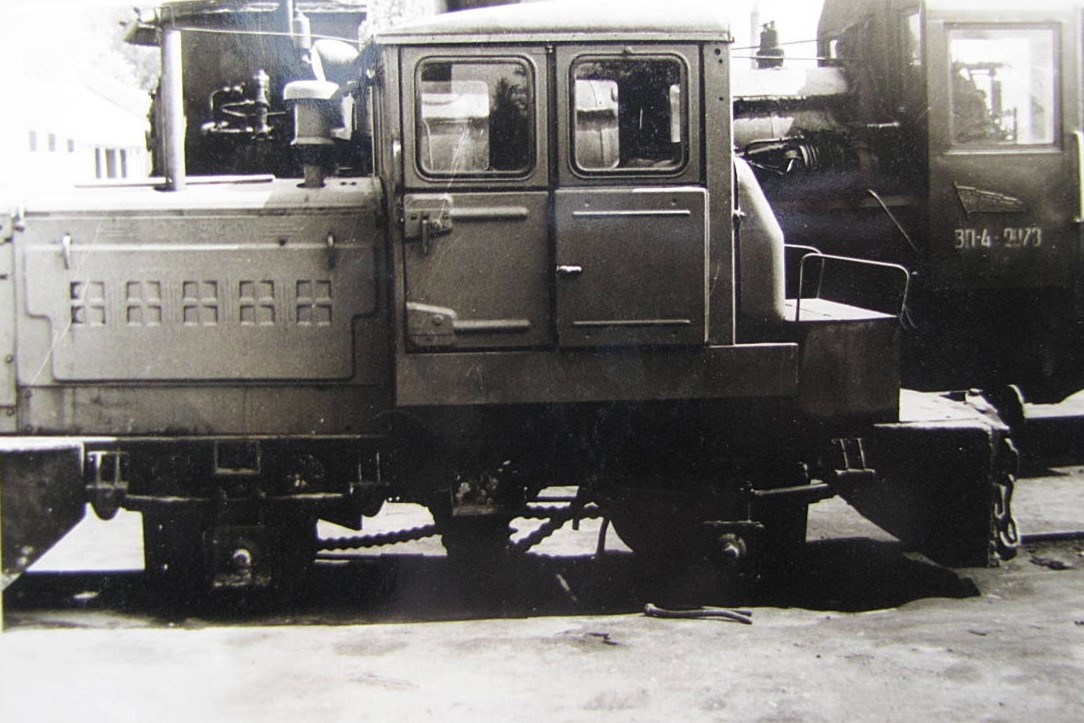
An 750 mm MD54-2 at the Pershotravenka porcelain isolator plant, Zhytomyr Oblast, Ukraine. In the background the company's VP-4-2073. Photo: L.N. Yanchuk.

The model is delivered assembled, painted and fitted with glazing in the windows. The model is tiny, measuring only 5.3 cm in length and 2 cm in width. Each loco is accompanied by a skip model that looks somewhat proportionally challenged. I bought two locos and the two skips are going straight to my box of spareparts.

The model is 3D printed, is unmotorized and fitted with metal wheelsets. Despite being resonably well protected by bubble wrap and a sturdy cardboard box some headlights and an exhaust pipe had broken off during transit. I could retrieve the broken off parts from the wrapping and they will be kept safe until I begin working on the models.

Image from Ebay showing the MD54-2 model with the accompanying skip. At least I can source two central buffers for a future project.

The K-Models' MD54-2 on a slice of birch in a landscape setting. A tiny model that will be a nice addition to my Soviet narrow gauge collection.  

MD54-2 1027 preserved at the Pereslav railway museum in the small town Talitsy in Yaroslavl Oblast, Russia. The colours could indicate that this is the actual prototype for the K-Models model.

The MD54-2 models are now packed safely away in a small cardboard box as they are not high on my list of modelling tasks. I have 1/19 projects that are far more important and I have begun assembling the new 1/10 scale skips as well. The most important thing is that I now have two MD54-2 locos in my collection. You never know how long small manufacturers survive in a niche market. 

Thursday, 14 September 2023

Progress in Small Scale

In March I bought some 1/87 scale models of Soviet designed vehicles from a Ukrainian manufacturer. I started work on them, but got sidetracked by my main modelling effort, the 1/19 scale Nystrup Gravel. I have now dug out the models from their cardboard box and begun a small test diorama. Work is progressing again.  

Circular diorama ready for a 1/87 draisine.

It was my plan to build a small circular diorama for one of the PD-1 draisines. I used a slice of birch tree trunk with a diameter of ca. 10 cm. I picked birch because it was easy to source and because it is a signature tree for many of the northern parts of the draisines' typical habitat: Belarus, Russia and Ukraine. Track bed and landscape contours were made from foam board and a length of homemade 9 mm gauge track soldered up from copper clad sleepers and Code 100 rail profile. The track turned out less than satisfactory both visually and funtionally. The track was ripped up and replaced with a length of PECO code 55 N-scale track with most of the plastic sleepers removed. 

I tried to solder my own 9 mm gauge track on copper clad sleepers. My precision that day was probably adequate for 1/19, but not for 1/87! The Code 100 rail I used was also far too heavy. Start again!

With the diorama's diminutive size the ground work was fast accomplished. Rails painted rust, used ground coffee for earth and sieved gravel for ballast. Earth colours were slightly toned with diluted acrylic paint. 

Code 55 track glued in place. Landscape built up and prepared for mounting of a tree.

Ground texture and ballast glued on and treated with diluted paint. Hole for tree showing up in white.

With the ground textures dry, I added a few grass tufts before I attached the tree. The tree is the dominating element in the diorama and is supposed to highlight the small size of narrow gauge railways. The tree is a handmade commercially available product bought several years ago from German GATRA Modellbau Union. The tree was glued in place with AC-glue. Where the tree trunk meets the ground I built up a nice smooth transition with white glue and scatter material. Then crushed birch seeds were glued down immidiately under the tree representing dead leaves. When resonably dry I added static grass. In front of the track I used 2 and 4 mm fibres in two green colours. Behind the track I used 4 mm green and a mix of 12 mm green and straw. 

When the glue had dried I cleaned away the loose grass fibres and cut the top off those fibres I judged too high. Finally I sanded the edges of the exposed foam board and painted the areas in an earth colour. Once dry I could remove the masking tape and reveal the birch bark.

With tree and static grass added the mini diorama is basically finished. Effective construction time has probably not been more than 30 minutes. It's obvious that it is a much smaller scale than 1/19!

I'm now viewing a lot of images of PD-1 draisines to decide a livery for the model to be displayed on the mini-diorama. 

Friday, 3 March 2023

Soviet Narrow Gauge 1/87 Scale

Several of my modelling friends are happily modelling in a range of scales. Some even consider the variety of scales as a particular element of joy in their modelling. Apart from a few road/rail excavators I haven't done much modelling in other scales than 1:35 for the better part of 20 years and since 2018 exclusively in 1:19. Now and then a special challenge in a different scale can be fun, though. 

H0e scale PD-1 (ПД-1) draisine in 3D print from Ukrainian K-Models. 

For many years I have been interested in Soviet narrow gauge. Why? In the 1980s it was difficult to obtain information and that alone got me interested. In the 2000s I was lucky to visit some industrial lines with Soviet origen. Having a basic kowledge of Russian has also helped me seek out information online and in books. Until now I haven't been modelling anything from the 750 mm gauge due to the size if I stayed in my usual scales. Now I have found some promising possibilities in H0e (1/87 scale) from Ukrainian manufacturers.

With the current war in Ukraine one should think the Ukrainians would have their hands full and no time to produce models. Nevertheless they have a rather fine selection of models in 1/87 scale with 9 mm gauge of Soviet designed prototypes in the standard Russian/Soviet narrow gauge of 750 mm. I took the chance and ordered a few models being a little sceptical if the package would ever arrive in Denmark. My sceptisism was put to shame as the package arrived surprisingly fast and in good condition.

The PD-1 (ПД-1 in cyrillic letters) was designed in the 1950s for personel transport on Soviet narrow gauge lines, primarily on industrial lines, although the type also found its way onto some of the passenger carrying lines. The draisines saw service in most regions of the Soviet Union on industrial lines for logging, peat extraction and for quarrying clay, chalk, gypsum etc. 

Drawing of a PD-1 draisine. The bonnet seems a bit out of shape? The bonnet and engine came from the production line of the GAZ-63 2 t. lorry that was built in the years 1948-1968.

A PD-1 next to a somewhat larger AM-1 DMU on the Russian Tesovo peat line, now being developed into a museum. 

The PD-1 model is 3D printed in transluscent green material. The model is small measuring 7,5 cm in length, is 3 cm high and 2 cm wide. It is quite a difference from my usual 1/19 scale! The model comes preassembled with metal wheelsets and the rear wheel chaindrive fitted. In a ziplock bag are two steps to be added if wanted. There is no material for glazing in the windows and the model is basically an empty shell with no bottom. The wheels turn and the model can be made to run and it must be possible to equip it with a motor. My two PD-1 draisines will remain static models.

In green transluscent plastic the K-Model draisine shows off its detail very badly. A swift spray with black primer brought out some of the model's fine detail. Included are representation of the hydraulically operated turntable, fine reinforcing ribs in the bodywork and tiny springs on the axle assemblies.  

With the primer dry it is time to work out if a few detail parts are going to be added before I decide on a paint scheme. The draisines were found in quite colourful variants and almost any combination will go.

In the package from Kyiv was also a 1/87 3D printed kit of a Э-652б dragline excavator also from K-Models. A medium sized Soviet excavator that could be equipped with face showel and dragline alternatively. If the PD-1 draisines turned out a succes, I wanted to be able to add the two draisines to a diorama scene where I thought the excavator could be a good item to have standing in the background.

Reprint of original factory drawing included in the kit box. Great for checking out if any details need to be added.

The main excavator parts laid out on my worktable. The 3 part lattice boom is quite a fine piece of printing.

In the bottom of cardboard box was a greeting from the manufacturer in the form of a laser cut stamp in wood with a motive mocking the Russian war effort. That aside I have also been to the optician for a new set of spectacles. Going down in size modelling wise is costly!

The Ukrainian 'tractor brigade' pulling away a sadly looking Russian BMP-2.