Wednesday, 5 June 2019

Veterinary's Station Wagon

Things are progressing on the 16 mm scale Nystrup Gravel. Now one of my car models is finished. Considering the small amount of work, the car project has taken ages to finish. I had set out to finish the Renault Juvaquatre model 1951 station wagon as a veterinary's car and tone down the model's shiny appearance a bit.
The finished Renault having just pulled into the side of the road between Nystrup and Skovby.

The model was taken apart by removing three screws. Carefully removing the upper bodywork I gained access to the interior and the underside of the mudguards. The engine bay was airbrushed with a few light passes with dark grey to tone the colourful engine down somewhat. I finished the engine area with applying a wash with heavily diluted oil paints. The underside of the bonnet received a very light spray of dark grey and matt varnish.


I air brushed matt varnish on the lower parts of the car and the underside of the mudguards. That took away the worst shine of the chromed parts. Next followed very careful dust effects with light earth colours.
The Renault taken apart. Rear bumper and license plate separated to ease painting and adding decal. Blanket from copper foil and two boxes to be added in the cargo area.

Blanket and boxes painted and fitted in the rear of the car. The boxes are leftovers from a 1:35 scale military kit.

The front license plate was too narrow and a piece of plasticcard was copied after the rear license plate. Both parts were painted black and prepared with gloss varnish. The decals were supplied by my usual supplier 'Skilteskoven'. Only this time I have changed the design of the decals. To ease application of the decals they now only include letter and numbers. The license plate itself will rely on a coat of black or yellow paint to achieve the correct background colour for white or black letter and number. The plates were glued to the car with AC glue. A light wash with black oil paint on windscreen wipers and rear morrior my first car for Nystrup Gravel in 16 mm scale was finished. More will follow!

The Renault is a large, sturdy vehicle with ample room for some stowage in the rear compartment.

The opening doors leave a rather well detailed interior to be seen.

The finished stowage for the veterinary. I failed to find details on the design of the small extra license plate carried by veterinary's vehicles. If info shows up, I will add the plate later.

Sunday, 2 June 2019

Serious Blog Interruption

More than a month has passed without posting. Work and my daughter moving to her own apartement has kept me busy. Consequently modelling has suffered. I now have only one teenager left in the house and a spare bed room. I wonder what to do with that...

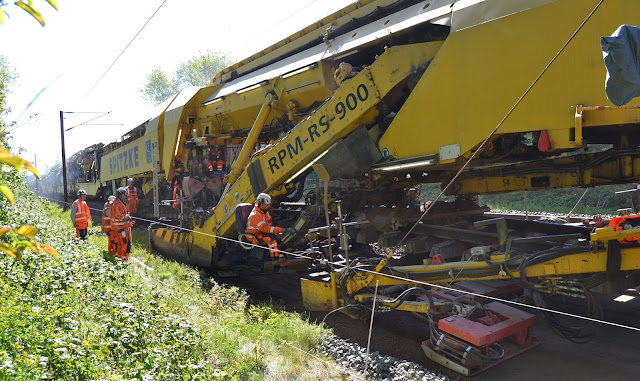
On a few occasions I have been out of the office to visit work sites on the railway. One of the visits took me to an impressive yellow machine 'Katharina die Grosse', a ballast and subballast cleaning and replacement machine. Coupled with wagons it stretched for more than 800 m in length - something quite different from tiny narrow gauge railways. Here are a few photos:

'Katharina die Grosse' is a Spitzke operated Plasser & Theurer RPM-RS-900. The machine was in Denmark to support a track work contract carried out by the company I work for.

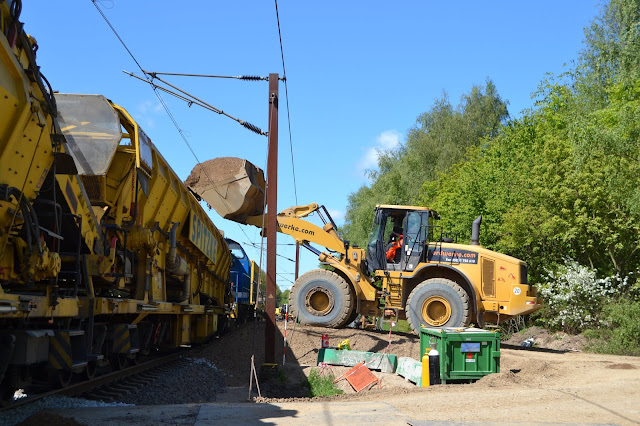
A train of MFS-100 wagons being loaded with gravel to supply 'Katharina' with gravel for the subgrade.
A nice day at the office, at least when the weather turns out splendid.
At different sites on the line other tasks were carried out by machines of a more modest size. Here a standard two-way Liebherr excavator digs out bad soil before a new subgrade from gravel is built into the dam.


Saturday, 1 June 2019

RC in a Lister

Even if the I P Engineering Lister isn't a fine scale model and the bonnet is a bit too large, I have been struggling to find room for battery and RC equipment. As the RC receiver finally arrived after a long wait, it was a bit too large for the location I had planned for it.
Hollow figure fitted on seat box giving me a chance to hide the RC receiver.
I had originally planned for the receiver to be fitted in the seat box, but the length of a RCT-Rx65c was too large to fit in the box. Remembering that large scale Modelu figures are printed hollow, I figured that the receiver could be fitted half way into the figure.

Having made the figure's bottom fit comparatively tightly to the seat box's removable lid, I glued the figure solidly to the lid with AC glue. With the glue dry, I took off the lid incl. figure and carved a rectangular opening through seat and the figure's bottom. Almost the entire receiver fits inside the figure.
Some parts for the loco are now finished and I have even primed the bonnet. The figure is patiently waiting for the AC-glue to harden.

Off with the lid on the box and an opening was quickly carved with my Dremel.

The figure almost swallows up an entire receiver. The wires will be held in the seat box and connected to battery and motor through a hole in the floor.
I'm currently picking up courage to solder up a test of the RC equipment and find out if I can assemble the circuitry and make it work before I pack it all away underneath the loco. As it is my first RC 16 mm scale loco I have no previous experience to rely on.

Wednesday, 17 April 2019

Auto Union Sports Car

Looking out for cheap cars in 1:18 on ebay has resulted in the arrival of an Auto Union 1000 S - a sports car with a 55 hp two stroke engine and a top speed of 130 km/h. The model came out in 1958 and its relative modest price and size seemed to be a good fit for a small business man's sports car in rural Nystrup. It could be Nystrup Gravel director Holm's replacement for his pre-war Opel Kapitain. His daughter having moved to Copenhagen to go to university, he could now manage with a sligthly smaller car.


My model is a Revell 1:18 die cast model with two opening front doors, opening bonnet and detailed engine. Once again a boxless bargain at 20 € . This car has obviously been in a collection in a smoker's home. After some careful removing of dust it has consequently spent 14 days in one of my sheds and is now practically free from the odeur of old tobacco. I have used the same trick with second hand books.

When I get around to it, the car will have Danish license plates, minor weathering and perhaps the rear license plate will have to be replaced? It looks enormous.

Monday, 15 April 2019

Figure For Lister

Progress on my Lister continues. I have fitted switch and charging socket under the bonnet and wires have been soldered on ready for conneting to RC reciever unit and battery. An open topped loco, the Lister has to have a driver installed and I have been wondering what figure to choose. I wasn't particularly satisfied with my first 16 mm scale figure from Modelu, but I finally decided to order another Modelu figure anyway.
Printed in black plastic the figure is being tested in place on my Lister. It is hard to see much detail on the figure due to the black plastic, but the level of detail is identical to my first Modelu figure.

Some of the wires under the bonnet can just be seen from this angle. Oil and petrol tanks are glued to a plastic bracket over the electric installation. The hood can be lifted off to gain access to the electric equipment.
The figure is Modelu's figure no. 1408 'Seated Workman'. I liked the sort of indifferent gazing of the figure. Just how I imagine one would feel running a slow moving Lister back and forth on a short industrial line all day long week after week. I'm now in the proces of adjusting the figure's rear end to fit the seat box - itself to be built now in plastic card to replace the foam board prototype.

I have also built a new brake column as the kit's original looked quite undersized and flimsy when compared with drawings. The new one was made from a piece of plastic turned with a file in a drill. A base plate from plastic was fitted with four bolt heads and glued to the bottom of the column. The top was fitted with two rings made from solder wire and the original hand wheel fitted.
The kit's original brake column next to the home  made version.
More news about seat box and plastic surgery to the figure in a coming post. Hopefully I will also be able to report that the RC equipment have arrived. A considerable amount of time has passed since I ordered the items and although a patient soul I am increasingly growing tired of waiting.

Tuesday, 2 April 2019

Tempo Hanseat

On my old 1:35 scale Nystrup Gravel I had some rather good looking lorries made from kits and kit conversions. In 16 mm scale the variety when it comes to lorries is markedly smaller - to put it mildly. Unless you want modern tractor units there is practically nothing exept a few horrendously expensive Mercedes and Opels in 1:18 scale. By more or less coincidence I was lucky to find a Tempo Hanseat three wheel lorry on ebay and to win the auction quite cheaply for a closing price of 22 €. The model has now arrived and I have handled and examined it, finding it good value.
The Tempo Hanseat unwrapped and photographed in my garden. I had to superglue one hubcab centre in place, having separated from the wheel during transport from the former owner in Germany. 
The Tempo Hanseat is an example of 'tax evasion engineering'. In Germany in the late 1920's cars not having four wheels were exempt from taxes and the driver didn't even have to have a license. Consequently several makers offered 3 wheeled delivery lorries to small businesses. One of those manufacturers was Vidal & Sohn offering 3 wheeled vehicles in several sizes and even a small 4 wheel van under the trademark 'Tempo'.
Dark blue Hanseat outside a Tempo sales room in Hamburg, 1949. Image from this online article on the Tempo history.

The front wheel can be turned a little for some dynamic posing. Here it is pointing straight ahead. 

The bonnet opens as on the prototype, revealing a simple model of the lorry's 12.5 hp 400 ccm engine. Most prominent in this view is the radiator and petrol tank.
The model is the 1:18 scale Minichamps 1952 version of a Tempo Hanseat with the high load area. The vehicle has a removable tarpaulin roof of a medium decent quality. I will probably be using my Hanseat without it, as I plan to put the vehicle into service of a local craftsman. I will fit license plates and decals, tools and building supplies in the rear as well as adding a little weathering.
The high tarpaulin cover makes the Hanseat loose its sleek and 'racy' lines.
And how, may one ask, could I be fortunate enough to buy this nice model for 60-80 € less than the usual price on ebay? It didn't have a box. Without a box these car models aren't worth much on the collectors' market. Once I'm finished 'mistreating' it with decals and weathering the model's value will have gone completely. For a collector, that is.

Monday, 1 April 2019

Visiting A Closed Railway

On our way home from a company event a colleague/friend and I visited the remnants of a metre gauge railway closed and lifted in 1930. Despite being closed so long ago, surprisingly many traces remain, including several station buildings, bridges and long sections of embankments. While the station buildings may interest some, I find the bridges and earth works much more interesting. Probably because they have more relevance for the type of industrial railways I'm interested in. I have a hard time visiting dismantled railway lines without imagining how they would look in model fitted with scale track and trains.
Kolding-Egtved Railway was a small private railway wirh a gauge of 1000 mm and a length of 27.8 km. While the track was lifted in 1930 there are still many traces of the railway. Here is a cutting northeast of Almind. Obviously the cutting still carries traffic today.
Northeast of the small town of Almind there is a 600 m long very well preserved combination of cutting and embankment easily accessible from a gravel road. The curved cutting leads to an, by Danish narrow gauge standards, impressive embankment over a stream.

The northern end of the embankment. The terrain falls steeply to a stream led under the embankment in a small tunnel. 

The tunnel leading the stream through the embankment is built from stone blocks and red bricks.

A view through the tunnel shows how the construction is in a near perfect state despite almost 90 years without maintenance. How well would a construction built today survive without maintenance?

The top of the Almind embankment is well cleared and showing trace of regular traffic. 
Further north in the small town of Gravens two steel girder bridges are preserved and marked as local heritage locations. From the former station building in Gravens, one can follow the old railway line for almost 3.5 km to the next station Brakker. Most of the distance laid out as a bike path or gravel road.
The preserved bridge east of Gravens. The bridge west of Gravens is of the same type, but the girders much heavier attacked by rust.
Kolding-Egtved Railway was opened in 1898 and built with 12.4 kg/m rails and untreated pine sleepers. Some of these were quickly replaced by steel sleepers as rot set in.
KEJ M 1, a petrol powered AEG-railcar with a single bogie coach in Kolding 1930. The number of spectators could indicate that this might be the last train on the line?

KEJ in the proces of dismantling. The work party is working uphill towards Kolding.