![]() |
| End plates and axle boxes during construction. I used Tichy Train bolt heads on the axle boxes. |
Wednesday, 16 September 2015
Frame Detail on Alpha-loco (1/35)
The frame on my Alpha-loco is now fitted with axle boxes, frame ends and couplings. Everything is made from plastic card and profiles. I'm struggling a bit with the many types of materials in the frame of the loco - choosing the right type of glue seems to be critical. I will be fitting a backing piece to each axle box to 'beef' them up (they seem to be lacking depth) which will also help to keep them more safely attached to the frame.
Sunday, 6 September 2015
Trailer from Solvang Construction (1/35)
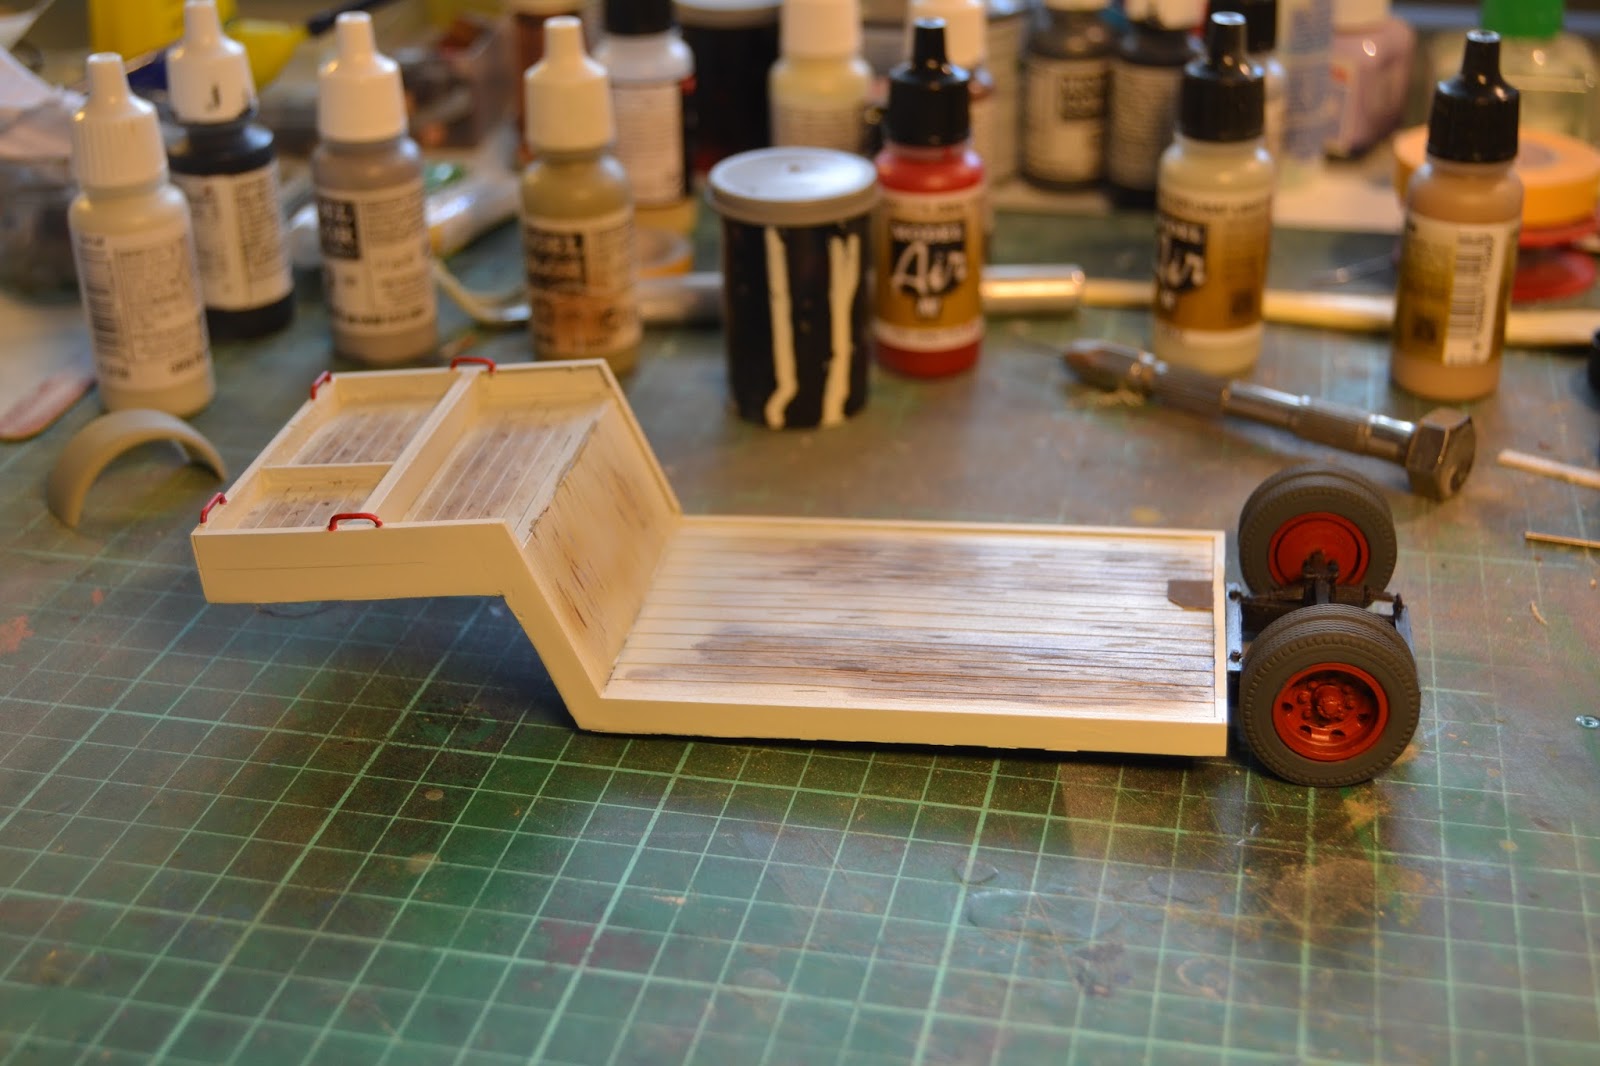
The trailer from 'Solvang Entreprenørforretning' (Solvang Construction) is almost finished. It still lacks the final weathering, which will only be applied when I unite the trailer with the Bedford O. Both kits are from MMK-models.
I will not portray the trailer as a worn out vehicle, but the load area of trailers take a serious pounding and paint has a hard job clinging to the timber floor. First I scratched the floor with the tip of a scalpel and followed up with a wire brush. After a coat of grey paint I worked the worn areas with oil paint in several colours and added scratches with different grey and light brown acrylics.
Trailer painted and weathering of the load area in progress. The paint is Vallejo 'Silver Grey'.
|
I will not portray the trailer as a worn out vehicle, but the load area of trailers take a serious pounding and paint has a hard job clinging to the timber floor. First I scratched the floor with the tip of a scalpel and followed up with a wire brush. After a coat of grey paint I worked the worn areas with oil paint in several colours and added scratches with different grey and light brown acrylics.
![]() |
| Mud guards fitted to the trailer. Track panels ready for the transport of a loco. The specially designed decals are from my usual supplier - 'Skilteskoven' (Forest of Signs) from Odense, the birth town of H.C.Andersen. |
Monday, 31 August 2015
Screaming wheels and clanking coupling chains
Sunday August 30. trains of skips were added to the running of the two usual passenger trains on Hedelands Veteranbane (HVB). Beside the 16 regular departures of passenger trains a short train of five skips made several trips to Rubjerg station. Once again the old gravel pits around Hedehusene filled with the sounds of skips being propelled over narrow gauge tracks.
Fitting in an extra train in HVB's usual Sunday traffic is not the easiest of tasks. Everything went according to plan and all procedures were adhered to. Quite a few enthusiasts had shown up and could be seen from the train taking up positions to achieve good photos of the day's varied traffic.
From a modelling perspective the day surely provided a lot of inspiration. Having served on a 1:1 skip train makes it so much easier to attempt to recreate one at home in 1:35 scale.
![]() |
| Petrol mechanical M 2 from 1943 racing through Brandhøj station with a train of five skips and a crew of three. |
![]() |
| M 45 (Jenbach, 1967) crossing the day's last passenger train with Da 7 (Henschel 18449/1921) on Sølund station. |
![]() |
| Most of the crew had dressed for the occasion. Here is one of them on the platform of the train's braked skip. |
![]() |
| Not directly inspired by the above image, this photo from Nystrup Gravel nevertheless resembles a bit.. |
![]() |
| A view over the skips as the train passes through a birch forest. A fine day! |
Wednesday, 26 August 2015
The Spares Box - What Would I do Without it? (1/35)
In many of this blog's posts I have mentioned that I used a part or a decal from the 'spares box'. Most modellers have one or more boxes or drawers where parts that go unused in a kit - or rescued from a scrapped model - are kept for future projects. Plastic sticks from lollipops, packaging band and parts from old printers are also held in my boxes. Some of my friends even donate odd plastic bits or kit parts they know they'll never use for my supply of spares. Thanks a lot!
I wouldn't last long without my collection of spares. My cardboard boxes have saved a project so many times I have lost count. Sometimes I can even complete a little project with nothing but parts from the boxes, as when I built a load for my Fordson 7V lorry. Recently I found a 1:35 concrete telegraph pole among my spare parts - just what I needed for a new factory building. You'll have a hard time finding a post on this blog that doesn't mention parts from the spares box.
Unfortunately it is not easy to guess what one might need for a future modelling project. As a consequence I have tended to save close to anything in my boxes. Even though I often use parts from the boxes, they seem to grow endlessly. As I obviously cannot keep everything I recently cleaned out one of my boxes. I didn't have the nerve to get rid of much, but I judged some parts (über extraordinarily) unlikely to be of any use and I got some parts of their kit sprues. That created a little more space in the box.
The great thing about the spare parts is that they are basically free, as they would otherwise be destined for the dust bin. Good for my wallet and a step towards 'sustainable modelling´ where no part is allowed to go unused?
I wouldn't last long without my collection of spares. My cardboard boxes have saved a project so many times I have lost count. Sometimes I can even complete a little project with nothing but parts from the boxes, as when I built a load for my Fordson 7V lorry. Recently I found a 1:35 concrete telegraph pole among my spare parts - just what I needed for a new factory building. You'll have a hard time finding a post on this blog that doesn't mention parts from the spares box.
![]() |
| Found in the spares box. With a little modelling putty, a few minutes of sanding, three new brass insulators, some paint and I had a new feature for a little factory complex. |
Unfortunately it is not easy to guess what one might need for a future modelling project. As a consequence I have tended to save close to anything in my boxes. Even though I often use parts from the boxes, they seem to grow endlessly. As I obviously cannot keep everything I recently cleaned out one of my boxes. I didn't have the nerve to get rid of much, but I judged some parts (über extraordinarily) unlikely to be of any use and I got some parts of their kit sprues. That created a little more space in the box.
| Two card board boxes with spare parts. The parts are not sorted or filed in any particular way. If I need a part I simply start looking! |
The great thing about the spare parts is that they are basically free, as they would otherwise be destined for the dust bin. Good for my wallet and a step towards 'sustainable modelling´ where no part is allowed to go unused?
Sunday, 16 August 2015
Experience Skip Trains on HVB August 30.
Most trains of skips these days are run on model railways. Full scale skip trains are mostly a thing of the past. At least in my part of the world. But Sunday August 30. Hedelands Veteranbane (HVB) is running special trains of skips between the Sunday's ordinary passenger traffic. That means two passenger trains and one train of skips on the line most of the day. Train crossings will be taking place at several stations along the line.
The skip trains on HVB will run to a tight schedule to fit in between the passenger trains. Skip trains leave Hedehusgård station at 11.50, 14.05 and 16.05 and Rubjerg st. at 12.55 and 15.10. If you have had a plan to visit HVB August 30. will no doubt be an exiting day to do so. There is even a chartered extra passenger train running before the usual traffic starts. See info on how to come to HVB on the railway's website.
![]() |
| Nystrup Gravel no. 8 with empty skips crossing the stream. These 1:35 scale skips are from Hesketh & Snoodyk. |
![]() |
| Shunting skips in a siding at HVB. It's not yet decided what locomotives will be doing service in the skip trains. |
Saturday, 15 August 2015
Drums and Power Pole (1/35)
While I had the air brush out to paint the interior of a lorry cab, I took the opportunity to also get some drums painted. They had been primed in Games Workshop 'Chaos Black' in advance. I gave the drums a quick blast of colour, not being particularly concerned if the paint covered equally well everywhere. I added a bit of rust on some of them.
After drying I gave the drums a wash of heavily diluted burnt umber oil paint. I mounted them on some wood profiles. In that way they are easy to place at different locations and vehicles.
While the oil paint dried on the drums I sanded down the prominent mould lines on the pole. The pole is 20 cm. long, meaning it would be 7 m. when enlarged 35 times. After sanding and a little Humbrol putty in the worst sink holes, I applied a rough
surface to the pole. I covered a small area (half a length on one side) at a time with plastic glue. I left the glue to soften the plastic for about a minute
and then worked the area with an old tooth brush. It left a slightly
rough surface without it looking out of scale. After priming and painting the result looks as below.
I drilled holes in the top of the pole and mounted three nice Part insulators. After painting and a little weathering I consider the pole ready to mount next to the bakelite factory building (must finish the construction of the building first, though).
After drying I gave the drums a wash of heavily diluted burnt umber oil paint. I mounted them on some wood profiles. In that way they are easy to place at different locations and vehicles.
![]() |
| Five of the drums fitted to a few boards (so as not to scratch the lorry's load bed). |
![]() |
| Ready to depart to the bakelite factory with a full load of chemicals. |
I drilled holes in the top of the pole and mounted three nice Part insulators. After painting and a little weathering I consider the pole ready to mount next to the bakelite factory building (must finish the construction of the building first, though).
![]() |
| Pole fitted with turned brass insulators and weathered. |
![]() |
| A close up of the insulators. Now I just need an insulator enthusiast to tell me I have used a type of insulator not used in Denmark! |
Thursday, 13 August 2015
Harvest Time Approaching (1/35)
In the fields around Nystrup the small farmers are busy harvesting their fields. The most progressive ones have equipped themselves with a combine harvester from German manufacturer Claas.
My combine harvester is the Universal Hobbies' Claas 'Europa' in 1:32 scale. It comes pre-assembled directly from the box. I have seen several Gauge 1 railway modellers use the combine right out of the box as a load on flat wagons. I took the time to pick out some details in contrasting colours - particularly on the engine, add a few decals and add some small details. A few spanners are placed at the driver's station and I fitted a home made broom too. The combine was given a light weathering of black oil paint and a little dust all covered with a layer of matt varnish.
![]() |
| Cloud cover is low and rain will soon put an end to harvesting. |
My combine harvester is the Universal Hobbies' Claas 'Europa' in 1:32 scale. It comes pre-assembled directly from the box. I have seen several Gauge 1 railway modellers use the combine right out of the box as a load on flat wagons. I took the time to pick out some details in contrasting colours - particularly on the engine, add a few decals and add some small details. A few spanners are placed at the driver's station and I fitted a home made broom too. The combine was given a light weathering of black oil paint and a little dust all covered with a layer of matt varnish.
![]() |
| Here is my home made broom. Three pieces of plastic, a little glue and some paint. |
Subscribe to:
Posts (Atom)