Wednesday, 6 December 2023

Sisal Coarse Grass

During a few evenings I have untwined, glued and dyed a handful of sisal rope for some coarse grass. A very simple task and one of the many unstressful railway modelling activities. I used two different dyes - a dark green and a light grey. The light grey sisal strings have worked fine as dry or dead grass in track areas before. Now I want to try them in bigger tufts mixed with dark green ones.

A cruel snapshot with bad lighting to show how the sisal grass looks when newly planted. Small pieces of the foam underground are still lying around on the layout's surface. Once fully dry I adjust height of the tufts and fit more if needed.

I simply cut lengts of 5-7 cm of a string of sisal rope. The pieces of rope are then glued with PVA glue to keep the fibres together. When the glue is dry, the lengths are roughly untwined, dyed and left to dry. They are then further worked to spread out the fibres and cut down to fit the area and position. The tufts are then planted with PVA glue in holes cut in the layout's landscape. Once dry the height of the tufts can be further adjusted and teased out to form clumps of high grass.

Green sisal grass can be seen left of the Lister - to the right a small tuft of grey sisal can just be recognized.

The sisal coarse grass isn't a new method for me. I used it as an experiment on the gradient to the lorry loading ramp in larger lumps for the first time. I think it makes a good contrast to the thin static grass I use for the majority of grassed areas on the layout. I'm still looking to find out how to fit a representation of spikes to the coarse grass. 

Lengths of sisal rope being glued with PVA glue. After drying the individual sisal strings are being untwined to resemble plant strands.

Sisal fibres with light grey dye drying.

Two colours of sisal coarse grass ready to be planted on the layout. 


Thursday, 23 November 2023

PD-1 Draisine Finished

With little time for modelling lately I have accomplished very little at the worktable. The only finished item for a long time is the little 1/87 scale Soviet PD-1 draisine from Ukrainian K-models that I have painted and weathered. Calling it finished is actually not quite true as it lacks galzing in the window openings. 

The finished PD-1 draisine seen from the front. 

The painting began with the question of what colour to paint the draisine. The answer wasn't easily found as there has been so many interesting liveries for this type of draisine. I finally decided on a quite conservative green colour with a horizontal orange stripe with details picked out in red. I have another draisine that I'll probably give a heavily weathered, worn and faded paintjob.

Painting is in progress. Lots of faults to correct and parts still needing correct colours. 

With the paint scheme decided I airbrushed a layer of Vallejo 'Deep Green' 70.770 on the upper body taking no notice of eventual overspray. The draisine is a tiny model compared to what I usually work on, so it took a little adjusting of eyesight and aiming before I got a few good thin layers of green on the model. Once dry I painted the orange stripe free hand and touched up the uneven edges with green. The roof was brush painted grey. The roof line may not be quite straight, but I have been comforted by PD-1 prototype images also showing some hamfisted painters' work. Frames and under body were painted in  'Black' 70.950  and 'Dark Grey' 70.994 while fuel tank and cow catcher were picked out in 'Ferrari Red' 71.085.

For numbering I used decals from two old decal sheets from plastic kits of Soviet military vehicle. The numbers were cut and added to the cab's doors and a decal with the text 'люди' (people) fitted on the rear doors to warn approaching vehicles that the draisine could possibly be filled with people rather than clay, peat or minerals. The type of sign was standard on Soviet lorries or vehicles in industry used for passenger transport, although I have never seen it on a rail vehicle.

The large tree illustrates the small size of the narrow gauge draisine.

The yellow sign on the rear doors and the orange stripes adds a bit of variety to the green body. The Ukrainian bicycle parking in the foreground adds a hint as to where in the Soviet Union-area the draisine is working.

Light weathering was applied on top of an overall coverage of satin varnish. Standard wash of heavily diluted black oil paint was followed by added wash of rust and some selcted spot repairs of paint with different tones of green. A draisine with heavier weathering is planned so this was kept rather clean.

The images were taken with my 1/19 scale backdrop as background. The draisine has been a fun project during a time where my time for modelling has been limited. I'm looking forward to begin some projects for the 1/19 scale layout's further development.

A slice of birch is a fitting base for a small Soviet draisine with blue and yellow bicycles left in the grass. 

Tuesday, 24 October 2023

Visiting Railways in Sweden and Germany

I have lived through some pretty modelling deprived weeks lately. Work and travelling has prevented progress at worktable and layout. Fortunately some of the travelling has been to railway locations in Sweden and Germany. 

One of the locations in Sweden was particularly interesting as it clearly illustrated why narrow gauge industrial railways were once popular. On a privately owned estate a 600 mm railway with light rails provided transport for timber to a small saw, processing the timber into boards. Short of using a horse to pull out the felled trees, a railway was the only method in an area either hilly or very wet. As trees were cut individually and not 'area harvested' no modern forest machine could navigate the area without destroying neighbouring trees or nature. See the website of the Örkaggans Järnväg here

The railway's loco 4 'Edvin' (Simplex 9335/1948). Today running with a 10 hp Hatz engine. Here seen pulling no less than 3 timber wagons up a considerable gradient.

The railway's owner pouring sand from old oil cans like there was no tomorrow! Wet weather and a healthy growth of moss didn't exactly help traction.


With my own plans of making simple trackwork and my experiments with wooden rails the simple, homemade turnouts on Örkaggans Järnväg obviously caught my attention. The points have no frog and only a single tongue rail present. Simple points very similar have been used on industrial railways in Denmark too, and it was interesting to study working examples in detail.


The trip to Sweden saw me and my mates visiting several other railways. A small selection of images can be viewed on my Flickr site. Captions should enable you to get a resonable idea of what we saw.

A week after my visit to Sweden I was off again exploring railways at the 31. Internationales Feldbahntreffen hosted by Frankfurter Feldbahnmuseum and Feld- und Grubenbahnmuseum Fortuna. With well over 120 participants it's a good to see clubs teaming up for the task. The event took place at Frankfurt for 2 days and the moved on to Grube Fortuna for the last 2 days. Both locations with 600 mm gauge , comparatively short lines, but with many and very friendly volunteers. The amount of well restored and operational locos and rolling stock was equally impressing! More images from the Feldbahntreffen can be viewed at another of my Flickr-folders.

A selection of steam locos in front of 'Lokhalle 1' at Frankfurter Feldbahnmuseum.

Lok 1 (Henschel 23170/1936) from Grube Fortuna visiting Frankfurter Feldbahnmuseum. Here with a lovely train of skips crossing the huge lawn of the Rebstock Park.

Frankfurter lok D 7 (Ruhrthaler 3347/1955) with standard DIN-skips.

In the forest near Grube Fortuna: loco 28 (Deutz 5464/1927) type MLH228 with a short train of underground skips.

Hand-over of the traditional bar sign from the German hosts to next year's hosts from the Hedeland vintage railway, Denmark. The ceremony took place in front of O&K 9244/1921.

With eight days of narrow gauge trainspotting in 3 weeks what passes for normality has set in again. I'm having one of the H0e Soviet PD-1 draisines set up ready for air brushing before I will be devoting more time for my main 1/19 scale effort. 

Tuesday, 19 September 2023

Mining Equipment in 1/87 Scale

With my intial diorama experiments in 1/87 having been quite satisfying I have been making minor additional investments in track and machinery in the scale. As I had to buy a length of track for the small circular diorama, I bought a variety of Code 55 points and track in 9 mm gauge for a future larger diorama in the scale. To accompany the Э-652б dragline excavator from Ukrainian K-Models I thought some underground mining equipment would look good next to a 750 mm siding. Fortunately a German company, Micro_Miners has taken up the production of mining equipment. 

'That's not a 1/87 scale skip' you might say, but look carefully. The 1/87 skip is on the sleeper next to the 1/19 scale skip's right wheel. The 1/19 skip is 8 cm in length whereas the 1/87 one is barely 1,5 cm!

The models from Micro_Miners from Germany are a relatively new and highly detailed range of 3D printed models depicting equipment from the mining industry in DDR (East Germany). Even if the state fell apart and 'closed' in 1990 many of the machines produced in DDR for mining and industry were considered state of the art in the communist world. There is no denying that some of the designs looked decidedly 'cool'.

Two mining vehicles on tires in 1/87 scale. Photo: Micro_Miners' web site.

The following items were delivered swiftly and professionally packed:

8 'Hunte 0,63 m³' 

12 'Stapelboxen/Lagercontainer'

1 'Gleisbohrwagen SBKNS-2'

1 'Universalfahrlader UL 2/1'

1 'Wurfschaufellader LWS160' 

The 'Wurfschaufellader' (overhead loader) in the box was quite a surprise as I hadn't ordered one! It may have been sent to Denmark by a mistake or simply as a generous gesture by Micro_Miners with the added benefit of filling the cardboard box completely?

Good and sturdy cardboard boxes protects the small and delicate kits from hard handling.

A novel way of shipping fragile items. Hot glued to the bottom of the box avoids using huge amounts of plastic wrapping to protect the kits and the parts don't rattle about in the box. 

As the first image illustrates, the skip models are extremely small in comparison with my usual 1/19 scale models. A 1/87 0,63 m³ mine skip is only 1,5 cm long and 1,4 cm high with a width of 8 mm. To say that the models are tiny and fragile looking is an understatement!

My skips came 4 to a box. I have only separated one mine skip from the supports that carry the model during the 3D printing process. Separating the model from the supports seemed a daunting task, but with a little care and a sharp scalpel it worked out quite easy. The resin is surprisingly strong and I broke nothing on the little mine skip, despite my expectation of damage.

I'm not going to explore these little models more for the time being. The tiny skip will be wrapped in thin paper and packed away. The large scale model railway needs attention. Through my modelling I have learned that when nice models appear on the market it is wise to buy while one can. With small (sometimes enthusiast run) manufacturers the models may soon be impossible to source. Particularly 3D printed items that are often only printed on demand. My advise is: If you see something you like buy it (if you can afford it, of course).

One mine skip ready for separating from the supports.

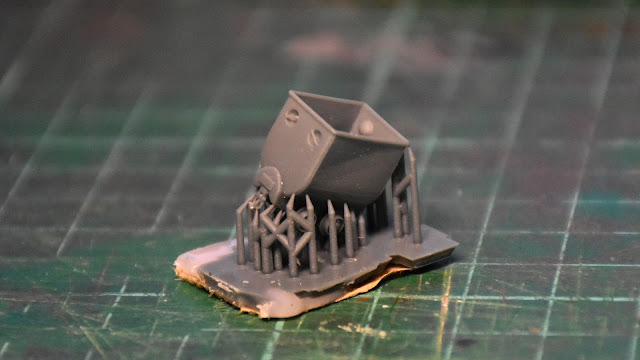
As the model is completely in 3D printed resin the wheels don't turn and the model is for static use only. All major details from the prototype is present on the model - even couplings and the small handles for hand pushing in the mine galleries!

A rear view of a 1/87 mine skip showing the level of detail possible with modern 3D printers.

Thursday, 14 September 2023

Progress in Small Scale

In March I bought some 1/87 scale models of Soviet designed vehicles from a Ukrainian manufacturer. I started work on them, but got sidetracked by my main modelling effort, the 1/19 scale Nystrup Gravel. I have now dug out the models from their cardboard box and begun a small test diorama. Work is progressing again.  

Circular diorama ready for a 1/87 draisine.

It was my plan to build a small circular diorama for one of the PD-1 draisines. I used a slice of birch tree trunk with a diameter of ca. 10 cm. I picked birch because it was easy to source and because it is a signature tree for many of the northern parts of the draisines' typical habitat: Belarus, Russia and Ukraine. Track bed and landscape contours were made from foam board and a length of homemade 9 mm gauge track soldered up from copper clad sleepers and Code 100 rail profile. The track turned out less than satisfactory both visually and funtionally. The track was ripped up and replaced with a length of PECO code 55 N-scale track with most of the plastic sleepers removed. 

I tried to solder my own 9 mm gauge track on copper clad sleepers. My precision that day was probably adequate for 1/19, but not for 1/87! The Code 100 rail I used was also far too heavy. Start again!

With the diorama's diminutive size the ground work was fast accomplished. Rails painted rust, used ground coffee for earth and sieved gravel for ballast. Earth colours were slightly toned with diluted acrylic paint. 

Code 55 track glued in place. Landscape built up and prepared for mounting of a tree.

Ground texture and ballast glued on and treated with diluted paint. Hole for tree showing up in white.

With the ground textures dry, I added a few grass tufts before I attached the tree. The tree is the dominating element in the diorama and is supposed to highlight the small size of narrow gauge railways. The tree is a handmade commercially available product bought several years ago from German GATRA Modellbau Union. The tree was glued in place with AC-glue. Where the tree trunk meets the ground I built up a nice smooth transition with white glue and scatter material. Then crushed birch seeds were glued down immidiately under the tree representing dead leaves. When resonably dry I added static grass. In front of the track I used 2 and 4 mm fibres in two green colours. Behind the track I used 4 mm green and a mix of 12 mm green and straw. 

When the glue had dried I cleaned away the loose grass fibres and cut the top off those fibres I judged too high. Finally I sanded the edges of the exposed foam board and painted the areas in an earth colour. Once dry I could remove the masking tape and reveal the birch bark.

With tree and static grass added the mini diorama is basically finished. Effective construction time has probably not been more than 30 minutes. It's obvious that it is a much smaller scale than 1/19!

I'm now viewing a lot of images of PD-1 draisines to decide a livery for the model to be displayed on the mini-diorama. 

Tuesday, 12 September 2023

Plank Road at Lorry Ramp

With the recent adding of grass near the loading ramp the only 'naked' areas remaining on the segment was the road area below the ramp as well as a short piece of track lacking ballast. The plank road under the ramp's chute needed lengthening and the rest of the road area covering with a suitable mix of sieved gravel. That work has now been finished (as if a model railway is ever finished!).

Current status at the lorry loading ramp at Nystrup Gravel. Ground work is finished as far as plank road and gravel surface concerns. I still haven't got a lorry to display and the Ferguson acts as replacement vehicle.

With a mix of differently sized grey stained planks produced, they were glued to the layout's surface. Some withered grass tufts were placed up against the plank retaining wall under the chute. A few green tufts were placed at the end of the loading area to illustrate a more humid ground. A few black spots were painted on the layout surface. They are the beginning of some small waterfilled potholes I plan to install. If they don't come out as expected they can easily be filled in.

The stained planks have been glued in place under the loading ramp's chute. The planks helped avoid lorries getting stuck in rainy weather and wet conditions. The plank road is known from several Danish industrial railway locations and Nystrup Gravel naturally used the method too.

A first layer of gravel and sand in differing tones was spread over the loading area with a plastic spoon. I decided to keep the gravel quite level without the ruts many modellers would have created in a similar area. I have gone with a quite subtle level of uneveness. More can always be added if I decide to. A few dead leaves were scattered where they would assemble due to wind and traffic. As usual the gravel was glued with diluted white glue.

The first layer of gravel and sand in differing tones is being glued down. I use a syringe loaded with a mix of PVA glue, water and washing up liquid. It's Friday afternoon and I enjoy a glass of homemade grape juice with vodka and sparkling water - always add a level area the size of a glass on each layout segment!

The next task at the loading area will be working with the colours of the gravel layer and work on the puddles.

Despite the amounts of gravel loaded into lorries the loading ramp at Nystrup Gravel was a cramped location. Lorries had to reverse under the chute with not much room for manoeuvering.


Thursday, 7 September 2023

Excavator in 1/19 Scale?

In 1/35 scale I had two excavators for my Nystrup Gravel layout. I never had anywhere to display them, as I didn't get to build a gravel pit module, so they were usually only used on special photo occasions. I presented the models and the history of Nystrup Gravel excavators on the blog 10 years ago. It's hard to imagine a gravel company without at least one excavator and I have to find a way to build or acquire one in 1/19 scale. The problem is that excavators are rather large machines...

The Menck M 60 in 1/35 scale was a large and complicated model. Both regarding building and displaying. Here I have carefully transported the model out in a real 1:1 scale gravel pit.

With both my Menck and Ruston & Bucyrus excavators beeing large and rather complex models in 1/35 scale I have been rather sceptical regarding the chances of having an excavator in 1/19 scale. There is nothing scale like commercially available and scratch building even a small excavator like an Ruston & Bucyrus RB-10 seems like a lot of work (although I know talented modellers have done it).

Recently I got a hint from a friend sending me an image of a lorry based excavator. A simple lattice boom with clam shell bucket mounted on a cut-down cab-less lorry chassis. Surely not an excavator for a high production output, but sufficient for extracting that high quality gravel in a corner of the gravel pit.

A model of the excavator could be made from a rebuilt die-cast Ford A pick-up with a lattice boom constructed from soldered brass profiles. The difficult part in creating a model of the ungainly excavator will probably be how to establish the details of operation: was parts of the excavator's functions motorized through the lorry's engine and how was the cabeling and pivoting arranged. I'll try to figure that out by closer study of the image.

Loading skips with sand at the Alslev gravel works. The two-skip train is pulled by a locomotive from Nagbøl Machine Works. Photo: Alslev Sognearkiv B20314.