Showing posts with label DDR. Show all posts

Tuesday, 19 September 2023

Mining Equipment in 1/87 Scale

With my intial diorama experiments in 1/87 having been quite satisfying I have been making minor additional investments in track and machinery in the scale. As I had to buy a length of track for the small circular diorama, I bought a variety of Code 55 points and track in 9 mm gauge for a future larger diorama in the scale. To accompany the Э-652б dragline excavator from Ukrainian K-Models I thought some underground mining equipment would look good next to a 750 mm siding. Fortunately a German company, Micro_Miners has taken up the production of mining equipment. 

'That's not a 1/87 scale skip' you might say, but look carefully. The 1/87 skip is on the sleeper next to the 1/19 scale skip's right wheel. The 1/19 skip is 8 cm in length whereas the 1/87 one is barely 1,5 cm!

The models from Micro_Miners from Germany are a relatively new and highly detailed range of 3D printed models depicting equipment from the mining industry in DDR (East Germany). Even if the state fell apart and 'closed' in 1990 many of the machines produced in DDR for mining and industry were considered state of the art in the communist world. There is no denying that some of the designs looked decidedly 'cool'.

Two mining vehicles on tires in 1/87 scale. Photo: Micro_Miners' web site.

The following items were delivered swiftly and professionally packed:

8 'Hunte 0,63 m³' 

12 'Stapelboxen/Lagercontainer'

1 'Gleisbohrwagen SBKNS-2'

1 'Universalfahrlader UL 2/1'

1 'Wurfschaufellader LWS160' 

The 'Wurfschaufellader' (overhead loader) in the box was quite a surprise as I hadn't ordered one! It may have been sent to Denmark by a mistake or simply as a generous gesture by Micro_Miners with the added benefit of filling the cardboard box completely?

Good and sturdy cardboard boxes protects the small and delicate kits from hard handling.

A novel way of shipping fragile items. Hot glued to the bottom of the box avoids using huge amounts of plastic wrapping to protect the kits and the parts don't rattle about in the box. 

As the first image illustrates, the skip models are extremely small in comparison with my usual 1/19 scale models. A 1/87 0,63 m³ mine skip is only 1,5 cm long and 1,4 cm high with a width of 8 mm. To say that the models are tiny and fragile looking is an understatement!

My skips came 4 to a box. I have only separated one mine skip from the supports that carry the model during the 3D printing process. Separating the model from the supports seemed a daunting task, but with a little care and a sharp scalpel it worked out quite easy. The resin is surprisingly strong and I broke nothing on the little mine skip, despite my expectation of damage.

I'm not going to explore these little models more for the time being. The tiny skip will be wrapped in thin paper and packed away. The large scale model railway needs attention. Through my modelling I have learned that when nice models appear on the market it is wise to buy while one can. With small (sometimes enthusiast run) manufacturers the models may soon be impossible to source. Particularly 3D printed items that are often only printed on demand. My advise is: If you see something you like buy it (if you can afford it, of course).

One mine skip ready for separating from the supports.

As the model is completely in 3D printed resin the wheels don't turn and the model is for static use only. All major details from the prototype is present on the model - even couplings and the small handles for hand pushing in the mine galleries!

A rear view of a 1/87 mine skip showing the level of detail possible with modern 3D printers.

Monday, 26 February 2018

East German Tractor Finished (1/35)

My kit of a Soviet built DT-74 tractor belonging to the East German company 'Baustoffe und Klinker Kombinat VEB Klinker- und Ziegelwerke "Ernst Wollweber" Betrieb Grobzka' is finished. In the last post on the tractor I had more or less finished construction and had begun painting. I kept the tractor in 5-6 main parts to make painting and weathering easier. Had I assembled the model completly before painting it would have been close to impossible for me to achieve a believable weathering.
Cab test fitted. Engine painted and weathered. Tracks and chassis have weathering in progress.

Rear view with the cab removed. The dials are Archer Transfers with a layer of gloss varnish
Dozer blade glued in place. Cab and sliding doors ready for installing.

The DT-74 isn't a large tractor. Here seen with a 1:35 figure for size comparison.Weathering is a multi-layer thing consisting of a base of acrylic colours, oil and acrylic paint washes, mud made from plastic putty, several passes with thin acrylic paint through the air brush for dust. Worn metal is made with a soft pencil rubbed against the selected surface.

A rather battered workhorse from the brick works' clay depot.

Decals are custom designed by my usual supplier 'Skilteskoven'. They supply decals in any language!

Perhaps some day my little foray into DDR-modelling will result in another model from the other side of the iron curtain. But for now it's back to Denmark in the early 1950's. Two new projects are on their way. One on four wheels of two different sizes and the other with four flanged steel wheels of equal size.

Wednesday, 14 February 2018

DT-74 Painting Begun (1/35)

Despite my somewhat disappointing mixing up of suspension parts, I have carried on working on the DT-74 tractor.

The usually tedious work of cleaning up individual track links were over faster than anticipated due to good moulding and very little flash. Fitting tracks made from individual links can be a little tricky. The bottom run is the easy part, whereas the upper run, particularly with the track sagging, is more difficult. I kept the upper track run in one piece with a length of masking tape. The masking tape allowed me to position the track links more or less as I wanted them, without them falling apart. The tracks were glued with CA glue. 
Track fitted. Engine and dozer blade test fitted to check fit and clearances to other parts.
Engine and drive train consists of only a few parts. Assembly is easy, but make sure everything lines up correctly. As only one side of the engine will be visible I didn't attatch details to the hidden side of the engine. I don't bother spending time and energy with detail that can't be viewed on a model. I feed the unused parts to my spares box.

Assembly of the dozer blade and its mounting didn't present any challenges except for the repair of a broken beam on the bracket holding the hydraulic cylinder controlling the blade height. In order to assemble the cab in a sequence allowing easy painting and weathering, I decided to finish the cab floor assembly first and paint it. I will then glue the pre-painted cab front to the floor. The rest of the cab is only fitted when finishing the kit.
As I separated the seat from its moulding block I damaged the front. I had to repair the damage with plasticcard and filler. I added a little wear to the seat now I was working on the part anyway. For the pedals I exhanged some of the etched parts with brass wire.

Current status is that I have primed chassis and tracks, cab floor, and engine parts. Several of the parts are also now covered with their main colour. Next up is detail painting and weathering. I'm painting the model in 5-6 sub assemblies to make it easier to fit and paint interior detail and to apply a prototypical weathering of all the 'hard to get to places' there is on the model. I expect some touch ups of both paint and weathering after I have brought all assemblies together.
First paint on the tractor. All of it put on with air brush.

Basic weathering applied to the inside of the chassis and on the cab's and engine's underside. The three parts are now ready to be glued together.
Engine, cab floor and radiator fitted to the chassis. The dark grey piece of solder wire is the hydraulic hose supplying oil to the dozer blade lifting mechanism. As this side of the engine will be hidden there is no detail fitted.

Monday, 8 January 2018

First Progress in 2018 (1/35)

Having done little modelling up to the end of 2017, I'm now beginning to make progress on the tracked tractor from Balaton Modell. I have the suspension units and running gear in place and have readied all track links for fitting. Engine and drive train is also ready to be fitted.
The DT-74 on all its 16 wheels sitting on my somewhat scarred cutting mat. Unfortunatly I should have paid better attention to the instructions and my archive material...I misplaced two of the suspension units. Despite the fault I'll carry on the build. I guess it would be possible to fit the units wrong in real life.


An educational poster of the DT-75's running gear. On the DT-74 a single suspension unit could be used on all four positions on the tractor. A way to cut down the number of unique parts in the tractor and simplify construction and logistics. Also a way to confuse modellers how to hand the units as I mixed up the front suspension units.

To overcome the dissapointment of not being able to assemble a simple kit correctly, I turned to painting a few 1:35 figures. They have been tucked away for years in a box without getting worked on. Now they are finally in a process of being finished.
I started the figures in December 2013 as part of a military lorry project. Contrary to the lorry I never finished the figures. Both are from Ultracast (figures 35011 and 35036).

Friday, 8 December 2017

Nystrup's East German 'Twin' (1/35)

I've been somewhat quiet modelling wise for a few weeks. Some of the time has been spent on going through the papers and photographs of Nystrup Gravel's cheif mechanic Thorleif Petersen. Some of the information made me want to build a model from an East German company - the VEB Klinker- und Ziegelwerke "Ernst Wollweber". Thorleif had a special affiliation with that company and visited it many times during his trips to DDR.


Box top illustration of Balaton Modell kit no BM3545. The Wollweber company had a Soviet built tractor with dozer blade of the DT 74-type.


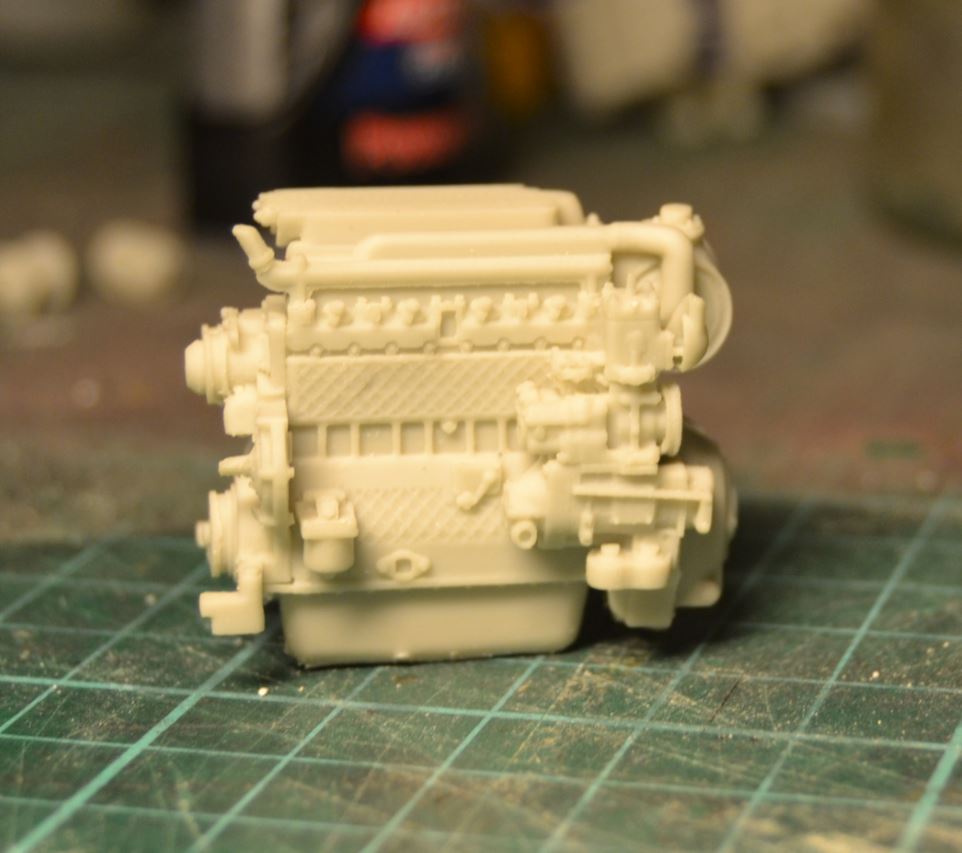
The resin kit is well designed and cast. A look at the one-piece casting of the tractor's engine should confirm that. 
The parts of the tractor are well cast: no air bubbles and very limited mould lines. The majority of them separate well from their casting sprues. What I find amazing is the fit of the parts. It takes very little work to make the parts ready for assembly. The suspension assemblies fit together with no preparation straight from their sprues - just like a high quality plastic injection kit. Currently I'm ready to fit wheels and suspension units. 

Frames and final drives assembled and ready for suspension units and wheels. Two suspension units to the left.

Individual track links during assembly into track runs. The fit of the links are next to perfect. 

Judging from some of the papers Thorleif's travelling to and from DDR had to do with his memebership of the Danish Communist Party. As a young man Thorleif went to fight in the Spanish civil war as a volunteer. He kept his socialist preferences and was part of a communist resistance group fighting the Germans around Nystrup. He attended several party schools in DDR and took some engineering courses in Karl Marx Stadt as well.