Thursday, 2 December 2021

International Model Railway Day

I have recently learned that 2. December is 'International Model Railway Day'. Why we need a particular day to celebrate railway modelling and why it has to be in December where everyone (well almost) in the Western World is completely engulfed in preparing Christmas I have yet to understand.

With average modelling skills a lot can be made without support from the large manufacturers of model railway equipment: Nystrup Gravel's little Lister railtractor pushing the company's old coach along the track with a worker posted as lookout. Everything created on the basis of products from very small businesses, fellow modellers and basic materials.

I like railway modelling as a pastime, but I couldn't care less if young people would rather have another time absorbing interest than small landscapes with trains on them. As long as they learn something and the interest gives them (and hopefully many others) joy in life, they might for me choose wind surfing, chicken breeding or volunteer to help social disadvantaged citizens. (The latter activity may even be preferable to railway modelling).

The only ready to run-model locomotive I own. Now it's been completely disassembled to be rebuilt as I like to have individualized models on my model railway.

Railway modelling is a hobby and some hobbies disappear as society changes. Stamp collecting is in an obvious crisis (at least here in Denmark where no one hardly ever posts a letter), pigeon racing has seen better days and railway modelling is a star that probably did shine brighter years ago. Many from my generation or older, find joy in railway modelling but it's obvious that recent generations have other interests and only a limited likelyhood of getting into railway modelling, at least while they are young.

If need be I can even manage without metal rail profiles. My first experiment with wooden rails. 

I know there is an industry depending on producing modelling equipment to make profits and clubs needing new members to run and maintain huge model railways. As I buy very little from the traditional railway modelling trade I could probably continue modelling even if Märklin or Bachmann should stop trading. Consequently I'm letting the national federation of model railway societies in Denmark, the big clubs and the trade make their contribution to railway modelling's survival as a hobby. I have a new figure to paint.

Sunday, 21 November 2021

Layout Developing

During the summer a lot of small tasks on my little layout has brought it to a stage, where I can actually begin to image how it may look once finished and fitted with a photographic backdrop and relief building. 5-10 minutes of work a few evenings a week sums up over time.

June 2020: with intermediate Peco SM32 Code 200 track, woodwork in progress and brick shed test fitted.

 
November 2021: handbuilt Code 143 track finished, fascia painted and the most basic of basic ground cover in place. Loading ramp still in progress.

With 1/19 scale being considerably larger than 1/35 I have found that my old methods (particularly when it comes to landscaping) aren't always working in the larger scale. Most grass mats haven't the height for other than well kept lawns, my carefully sieved ballast is too fine and almost any modelled item has to have texture to appear realistic. There is constantly something I have to do differently or a need to explore a new product. It naturally tends to slow down progress, but the need for designing new solutions is good fun and what I looked for when I decided to move up in scale. Despite the need for some investments, the scale change hasn't worked out expensive. Probably because I do a lot af things myself and aren't looking to aquire expensive live steam locos or large amounts of rolling stock.

Here in Denmark its is as unprofitable as ever running a 16 mm scale industrial line. Fortunately the domestic supporting structure for the little line is doing well. The future for Nystrup Gravel is looking bright and prosperous despite the line's utter lack of any reasonable income.

Monday, 15 November 2021

Baguley Testing

After having done some work on the modules' track and experimenting with deteriorating sleepers I have dusted off the Baguley-Drewry diesel locomotive I aquired in the beginning of 2021. As the loco needs a complete strip down for rebuilding into battery and RC-control and the upper body needs some rebuilding and detailing, I had to begin by taking the locomotive apart.

To my surprise a test run on the layout showed that the Baguley-Drewry could negotiate the sharp curve to the loading ramp. Not that such a large locomotive's use on track with a radius/gradient like this would be particularly realistic.


Once I had taken a good look on the model and examined it for damages or missing parts, I began to find out how to take the locomotive apart. With two quite hard to reach screws undscrewed, I could remove the locomotive's body. The body was set aside and I unscrewed the 6 power pick-up units. A quick job and after unsoldering the feed wires to the motor, all track power parts could be carefully removed.

With the frames clear of unwanted parts I tested the motor and transmission. My loco is 32 mm gauge and a few of the raised grub screws holding the wheel discs solidly in place on the axles, would regularly hit parts of the metal frame. With a small file I took off just enough af the metal frame to avoid conflict with the wheel parts. I also tightened the screws holding the lid to the gear box on the central axle. That almost completly removed the growling sound from the gears. With a tiny drop of oil in each of the eight main axle bearings the mechanism worked effortlessly after running-in. I avoided extra oil in the rods' bearings as the complete chassis assembly is going to be degreased and repainted.

First thing I did after taking off the body was to remove the electrical pick-ups. I will run the loco with battery power and RC.

Testing the Baguley-Drewry with a simple 9 V battery. With a few adjustments with a small file and tightening of screws as well as some running in, the loco began to behave nicely on my rudimentary test bed.

I haven't yet quite figured out what type and size of battery will be needed to power the loco. With a tiny layout the Baguley-Drewry will not be asked to perform challenging tasks and a tiny battery will probably be sufficient. Currently there is a global shortage of RC receivers and consequently controlling the locomotive will probably be handled with a LocoRemote Wifi unit and mobile phone.


On the body I'm getting ready to tackle the loose and detached windows in the cab as well as preparing the many other tasks planned to transform the loco to the loco Nystrup Gravel apparently bought from the Danish sugar beet railways.

Sunday, 14 November 2021

Track, Weeds and Ballast

Some months ago I posted a few images of my track building on a Danish railway modelling Facebook group. One comment I got was that I should try make a few really bad sleepers with missing spikes. A good idea that I began working on almost immediately. Now I have tested a few methods to show track damage. So far only on a very small section of track.

Track with split sleeper, flowers and coarse grass in the ballast. Static grass will be added later.

With a lot of prototype inspiration and interest in track deterioration I made a list of faults that would be obvious to an interested spectator. The list included:

  • Missing spikes
  • Split sleeper
  • Plants growing through (or in) the sleeper
  • Empty spike holes
  • Vegetation in ballast

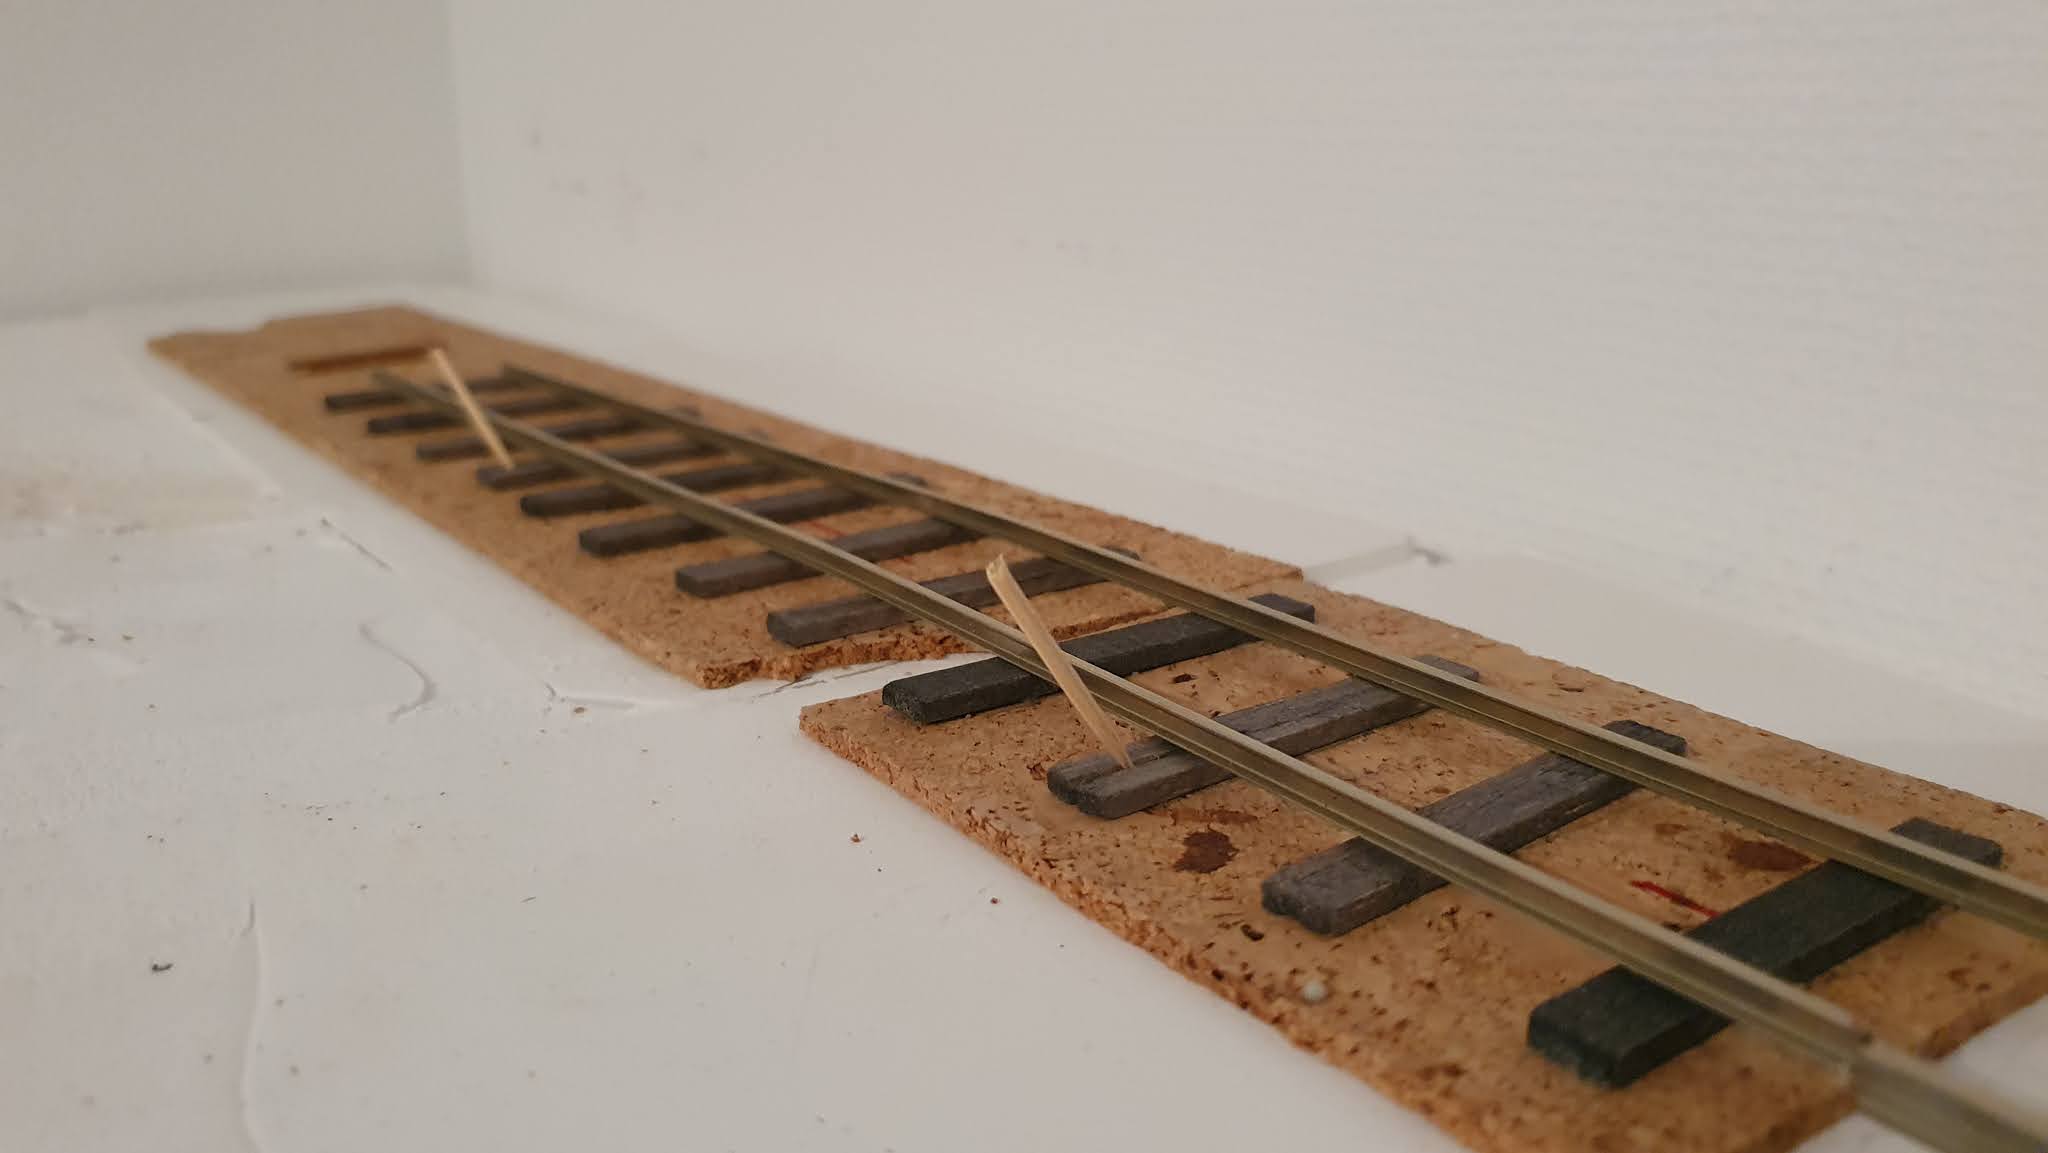
I first made a couple of sleepers with heavy structural weathering. A handfull of sleepers were mistreated thoroughly with knife, file and steel wire brush. I made sure to split a few of them halfway lengthwise before staining. When gluing the sleepers to the cork underlay, I used toothpicks to keep the splits open while the glue dried.  

Sleepers glued in place for another length of track. The halved toothpicks are holding splits open while the glue dries.

While I was spiking the track, I deliberately left out a few spikes here and there. Where they were left out I drilled a hole to illustrate where a spike had worked loose and dissappeared. At one spot I pushed a spike half way down (don't do this on the inside of the rail, as you will most likely foul the clearance for the wheel flange).

Rail painting was done with different enamel and acrylic rust and brown paints. I tried to mix colours and to use slightly different colours randomly along the track. When reasonably satisfied I added a thin wash (made from rust coloured oil paint and turpentine).

As I used to when I modelled in 1:35 scale I planted some of the vegetation before adding ballast. For me it's easier to represent coarse vegetation growing up from below when my artificial grass and plants are actually placed under the ballast layer. For thinner grass I plan to use static grass applied with a electrically powered dispenser. A first for me as I previously used grass mats and tufts on the old 1/35 scale version of Nystrup Gravel.

First flowers added near a split sleeper. I used marguerites from Busch (item no. 1207) made for H0 scale.

Being a gravel producing company Nystrup Gravel's ballast is naturally gravel. Not the best quality as that went to customers, but gravel with too much dirt and clay content was judged fine enough for ballasting the company tracks. 

The very small test area with ballast and grass made from sisal rope. More vegetation and weathering is planned and I will gradually let it spread over the Nystrup Gravel track.

Sunday, 7 November 2021

Land Rover Series 1

Nystrup Gravel wouldn't be complete without a Series 1 Land Rover. On the 1/35 layout I had a Land Rover belonging to the local fire brigade. For my new 1/19 scale layout I have been looking for a Landy model, but have been put off by horrendously high prices for a Series 1 from the producer Minichamps. There are other manufacturers of Land Rover models in the scale, but with less detail than the Minichamps one. Now I have purchased a Minichamps Land Rover Series 1 1948 model for a relatively modest sum (approximately half of the usual price).

My newly aquired Land Rover Series 1. As every other car model in my collection it will be fitted with additional detail and weathering.

While I'm certainly not an expert on early Land Rover models and different production batches, it did occur to me at the time of buying, that the Minichamps labeling as a 1948 Model couldn't be right. The grill didn't cover the headlights as it did on the first 1948 model and when I checked some references the external doorhandles dates the model to be built after June 1951. As my modelling period is vaguely identified as 'the beginning of the 1950's' I'm not worried about those small differences and question about model year. It's a great little model and as the car can be posed open topped it will look good with a driver figure and some tools in the back.

Front view of the front with nicely etched metal grill including Land Rover logo.
 

The Land Rover Series 1 wasn't a large car with a wheelbase of only 80 inches.

'World dominance' type of advertisement for the classic British 'go anywhere' vehicle.
 

The first 1948 model Land Rover cost £450. Remarkably passenger seats, a spare tyre, a starting handle and even doors were optional extras at first to be bought separately. Despite the Land Rover's utilitarian status these elements were soon included as standard. Only six years after the delivery of the first Land Rover the factory in made its 100,000th Land Rover and by the time the Series I was replaced in 1958, nearly 200,000 had been produced. Actually the Series I was not named as such until the release of the next model - exactly as World War 1 wasn't known as such until the time of WW 2.

The Minichamps model includes detachable bonnet with a view to a detailed engine.

With a softtop plastic casting being easily removable, there is an excellent view into the Land Rover's interior. Windshield can be folded forwards over the bonnet and the doors' upper parts can be detached to enable til car to presented in a very basic form.
 

I haven't quite decided what role the Land Rover will have in my Nystrup Gravel universe. Perhaps a vehicle belonging to a farmer or a foresty official from the estate running the large woods near Nystrup. No matter what it feels good to have a Land Rover in my collection.

"It looks very sturdy and usefull" says workshop manager Thorleif Petersen (to the left). "Maybe, but slow and unglamourously" replies Kjeld Hansen. The two men didn't share taste regarding vehicles.

Friday, 29 October 2021

Nystrup Gravel Mentioned in Monumental Work on Danish Petrol Stations

No subject seems to be too small or mundane to escape unnoticed by writers and authors. Now Danish petrol stations have been treated in a book that must be considered as the difinitive and a monumental work on the subject. A whopping 472 pages of information, almost 800 pictures and stories about the people manning and customers using the small oases supplying fluid fossil fuel. And the book is in Danish - a language spoken by only 5.8 mio people. The author is Nils Bloch, a Danish writer with several railway books on his CV, a range of university degrees as well as years of active service for railway preservation.

There is a small chapter devoted to petrol stations in model and the petrol pump at Nystrup Gravel is given a favourable caption although it is a very modest creation.


Front cover of the book. The subtitle translates into 'High octane nostalgia' which is indeed a fitting description.

With a fascination of old petrol pumps I installed the red petrol pump on my first  1:35 scale Nystrup Gravel module in 2003. I wanted to create some of the atmosphere from the fueling areas at small industrial railways. The pump was a Plus Models resin kit that doesn't appear to be available any more.

The loco shed module on the 1:35 scale version of Nystrup Gravel during construction in January 2003. The fuel pump is seen in naked unassembled resin being test fitted in front of the shed. Sleepers are ready for track building.


Another image of the Plus Models pump on my old 1:35 scale layout. Here a Ford A tanker is slowly backing up to the pump's filler pipe to replenish the supply of petrol.


I can't build a layout without a petrol pump. Until a better model is aquired or built this rebuilt Pennzoil pump from a cheap Chinese manufacturer is destined for use on the 1/19 scale version of Nystrup Gravel. See info on the pump on this earlier post.

Monday, 25 October 2021

Long time since last posting

Time flies. It's been ages since my last posting, and it actually reflects the progress made on my small layout pretty well. Not much has happened due to work, illness and a heap of other activities. Now I'm slowly gearing myself up to modelling again and what more entertaining activity than rail painting should be able to inspire me?

The 2.3 m long module 1 is down on a pair of trestles to have the other side of the rails painted.

It's probably no secret that I ventured into railway modelling on the basis of an almost lifelong interest in real narrow gauge industrial railways and that I'm volunteering on a 700 mm gauge vintage railway. With two operational steam locos each turning 100 years old, we couldn't avoid celebrating with an event involving the railway's friends, partners, the local community and the volunteers making it all possible. During an august weekend we hosted a formal reception with invited VIPs as well as special trains for enthusiasts and a full day of all steam trains for our passengers. More images from the event on my Flickr-site.

From left to right; No. 3 (O&K 7459/1921) and Da 7 (Henschel 18449/1921) posing together on Hedehusgaard station. Celebrating the loco's 100th birthdays in lovely sunshine.

After a long day of service the two locos have returned to the loco shed and service area, to be cleaned and readied for the next day's service.

Unfortunately all the sunshine and happy everyday life dissappeared when I managed to catch a bad stomach infection. For a full 3 weeks I was completely and utter out of service. Fortunately I enjoyed the luxury of a loving family and the benefit of living in a society providing free medical treatment and salary during sick leave. With both strength and weight loss it took some weeks to regain my usual stamina levels - but then I'm not 51 anymore! 
 
My very first tufts of rough green grass from unwound sisal rope. I'll keep on experimenting to make it look better. If nothing else it's really cheap.

With other matters having priority of attention, only minor progress can be reported on the loading ramp. My experiments with white glue and sisal rope have also continued. This week, though, I lifted module 1 from it's usual position on top of the book shelves and placed it on a pair of trestles to facilitate painting of the rails on the side facing away from the front of the layout. I'm almost done with the first layer of paint and will continue with spot painting and a wash with diluted oil paints before the module returns to it's usual position. Hope to return with news a bit more exiting during the coming months.