Tuesday, 24 March 2015

Rails Vs. Conveyor Belts

Among the papers from Nystrup Gravel I have found material that shows, that the company was approached by agents with the purpose of making the gravel company choose a conveyor belt to replace the narrow gauge railway. Nothing ever happened. Both management and key employees were satisfied with narrow gauge - not for the same reasons, though. Nystrup Gravel did use conveyors, but only for loading and unloading skips and during the sorting processes.

Front page of a brochure from Roulunds Fabriker found among the papers from Nystrup Gravel. Roulunds Fabriker was bought by A. P. Møller (the company behind Maersk Line) in 1960.

A belt for a conveyor isn't just any belt.
The conveyor belt salesmen had more luck with other gravel companies - companies that eventually prospered and outlived Nystrup Gravel. One of the clients could have included Conglomerate Aggregates - the company that took over some of Nystrup Gravel's old pits for further working.

Thursday, 12 March 2015

Building two Steel Pill Boxes (1/35)

Having found an image of Nystrup Gravel's small O&K steam loco transporting two pill boxes I just had to build those in 1:35. Fortunately Polish kit manufacturer RPM does a kit of exactly that type of German pill box. That the kit isn't very good is not too disturbing. It has the right shapes and provides a good starting point. As the kit is cheap the relationship between price and quality is certainly within an acceptable envelope.
No peaceful box art for this kit. Not usually seen on my work table...

I assembled the main parts of the pill box according to the instructions. I skipped all interior parts. They are by far the worst in the kit and as I needed the two pill boxes 'closed up' for transport any work on the interior would be a waste of time. I'm not keen on spending time modelling stuff that I can't see when the model is complete. Before closing op the models I glued in a generous amount of old screws. This results in some nice heavy pill boxes that will keep their position once placed on a flat wagon. I had quite good help and info on the kit and assembly from my Brazilian modelling friend Marcos Serra. He has recently built two pill boxes and I used his blog posts as a guide. You can see them here (with an Opel 1,5 ton lorry) and here (with an armoured recovery vehicle).
Basic pill boxes from the RPM kit.

With the main parts fitted I applied plastic putty to the seams and sink marks. I sanded everything smooth before I added a thin layer of thinned plastic putty with an old stiff short haired brush. I used my standard plastic glue to thin the plastic putty. The glue/putty mix stippled on is supposed to look like a rough cast surface. I think that only the top part of the pill box was cast, so I applied the mix only to the top. The seam lines from the mould were done with stretched sprue - glued on before the putty was applied. Where I had overdone the cast effect I sanded the surface lightly.

Primed pill boxes after my putty treatment to mimic a rough cast effect.
As the pill boxes around the German air field were being installed in the autumn of 1944 I guess they were painted according to the then standard German paint scheme. I used colours from Vallejo's Air series that are premixed and ready for use in the airbrush. I didn't research the colours but chose colours (sand yellow, green and rust brown) readily available from my paint drawer.

Freshly painted pill boxes. I had great fun camouflaging the steel turrets.
When the paint was dry I gave the pill boxes a wash with heavily diluted oil paints. This changes the hues of the colours and make the colours blend a bit together. When the wash had dried I added a little ground up pastel chalk to mimic a dusty surface.

Finished pill box fitted on wooden stringers and placed on one of my flat wagons. The wooden structure that has sneaked into the picture is completely unrelated to the pill box. It is part of the shelf system to be installed in my grounded standard gauge van.

Now I can run a very unusual train on my 1:35 narrow gauge railway. By no way a train that will run often, but it will be a nice contrast to all the serious traffic of skips. And a reminder, that German authorities were planning to continue the fight against the Allies in Denmark. Fortunately that situation never materialized due to a combination of swift British action (including a dashing ride by T-Force) and sensible German commanders.

Sunday, 8 March 2015

Steel Pill Boxes (1/35)

One of Nystrup Gravel's 600 mm. lines passed close by the outer defensive perimeter of the air field the German air force was building at Mellemaaen during the occupation of Denmark. It made the railway unique among Danish industrial railways in having a view to several machine gun positions from the train. My research now reveals that Nystrup Gravel's railway on one occasion was used to transport steel pill boxes.

An image taken during the occupation years clearly showing Nystrup Gravel No. 2 transporting two steel pill boxes. The train is about to pass under the viaduct for the road to Ubehage and is probably en route to the northern line to unload the pill boxes south of Mellemaaen. Photo: From Thorleif Petersen's archive.
The steel pill boxes were transportable and designed to be dug into the ground. The front top of the pill box was of thick, cast steel, while the part designed to be buried was much thinner. Transportable steel pill boxes were first used during the World War One and many were used in the hastily constructed Dutch defensive lines before the German attack in 1940. When the Germans were pushed back in the defensive, they designed and deployed many pill boxes themselves. Dug in and camouflaged properly they were hard to see and offered small targets to the attacker.

Rear view of a steel pill box in position. The small hole in the front, where the machine gun would stick out, is visible through the open hatch. Photo from the local historical archive in Skovby.
Most of the pill boxes north of Nystrup and Ubehage were removed after the war and sold as scrap, but one of those that could be seen from the railway is still there today.

Two pill boxes salvaged in the late 1940's waiting for transport to the scrap merchant. Photo from the local historical archive in Skovby.

Monday, 2 March 2015

Standard Gauge Wagon (1/35)

Isn't Nystrup Gravel's railway 600 mm. gauge? So why a standard gauge wagon, you might ask. Well, I will be using this goods wagon as a shed in a factory yard on a new module I'm currently planning.

The wagon is a laser cut kit from Norwegian producer Proinor. The company has a long history of producing Norwegian wagons in 1:32 scale and has recently begun offering Danish wagons in the same scale. In fact the output has been soaring. Despite me having to choose a small wagon due to limited space I was nevertheless left with a difficult task of choosing a wagon from Proinor's selection of short wagons. I finally chose the type Qa (Proinor 32-230) as it is not only small but also old, which is important as the wagon will have to fit credibly in the role of an old wagon used as a shed. Proinor kindly sold me the wagon without axle boxes or brake gear - no need for them as my wagon will be solidly grounded.

A finished Qa-wagon from a Proinor-kit. Photo: Arild Tangerud.

The class Qa was a Danish State Railways wagon built in the years from 1865 to 1873. Only 6 m. long and with a wheelbase of 3 m. most were taken out of service in the 1920's. Some survived longer as department wagons while others were sold off as sheds. In this way the wagon will fit in well as a shed on my railway in the early fifties.

Some of the parts for the Qa-wagon. Probably the largest wagon ever to hit my work bench!

Sides and inner ends about to be glued to the floor. I cut out a door and will fit laser cut windows in place of two of the hatches in one of the wagon's sides.

Outer ends being fitted. I use standard white glue and a generous number of metal clamps.

The wooden kit assembles with ease. The parts are finely cut and the fit is impressive. Very little glue is needed so I used it only sparingly in thin layers. There are no traditional instructions with drawings or exploded diagrams. Instead the kit is supplied with a CD with images showing the building process. I also used the excellent articles on building Proinor kits by Arne Nielsen available here.

On the image below is the wagon's current status.  I have painted floor and interior walls and given them a quick weathering. I am now in the process of fitting the wagon with a partial interior as well as lights.
Rough shelves being fitted along one side of the wagon. More shelves to be installed as well as a work bench and table.

Sunday, 22 February 2015

Gas Generator Citroën and Ford Double Cab (1/35)

I'm currently waiting for parts for a loco project. For that reason most of what I model just now isn't on flanged steel wheels, but on rubber tires. Besides having finished my gas generator Citroën I'm building an unusual lorry.  I have begun working on the double cab Ford belonging to haulage contractor Hansen. Last summer I bought some resin parts from Brazil and they are now being united with a converted chassis from the ICM-kit of a Ford T917G.

The Citroën ready to receive the upper body. Painted Nemrod-figure and home made sack for fire wood on the back seat glued in place. Meanwhile the Ford lorry is having its Brazilian cab test fitted in the back ground.

After assembling the gas generator with AC-glue it was painted medium grey and given a wash with heavily diluted brown oil paint. That served as foundation for the rest of the weathering. Due to unclear instructions I'm not sure I mounted the gas generator the proper way on the car's rear end. I couldn't find any useful info on this particular type of gas generator in my books or online.

The Citroën painted glossy black with chrome radiator grill and white visibility mud guards.

After fitting the gas generator only the lengthened gas pipe to the engine needs to be fitted before windows are fitted and the model finished.
A snap shot of the finished car. With white mud guards, gas generator but head lights without black out covers the car dates to immediately after the German occupation of Denmark. As such a little out of the time frame I normally model.

Not all roads around Nystrup had a hard surface, so I gave the car some dust on the lower sides and wheels.
A view of the rear mounted gas generator and lengthy gas pipe to the engine. I now have a narrow gauge loco, a tractor and a car mounted with gas generator. It could be fun having a lorry with a gas generator, too.

Wednesday, 18 February 2015

Fuel Transport to the Pits (1/35)

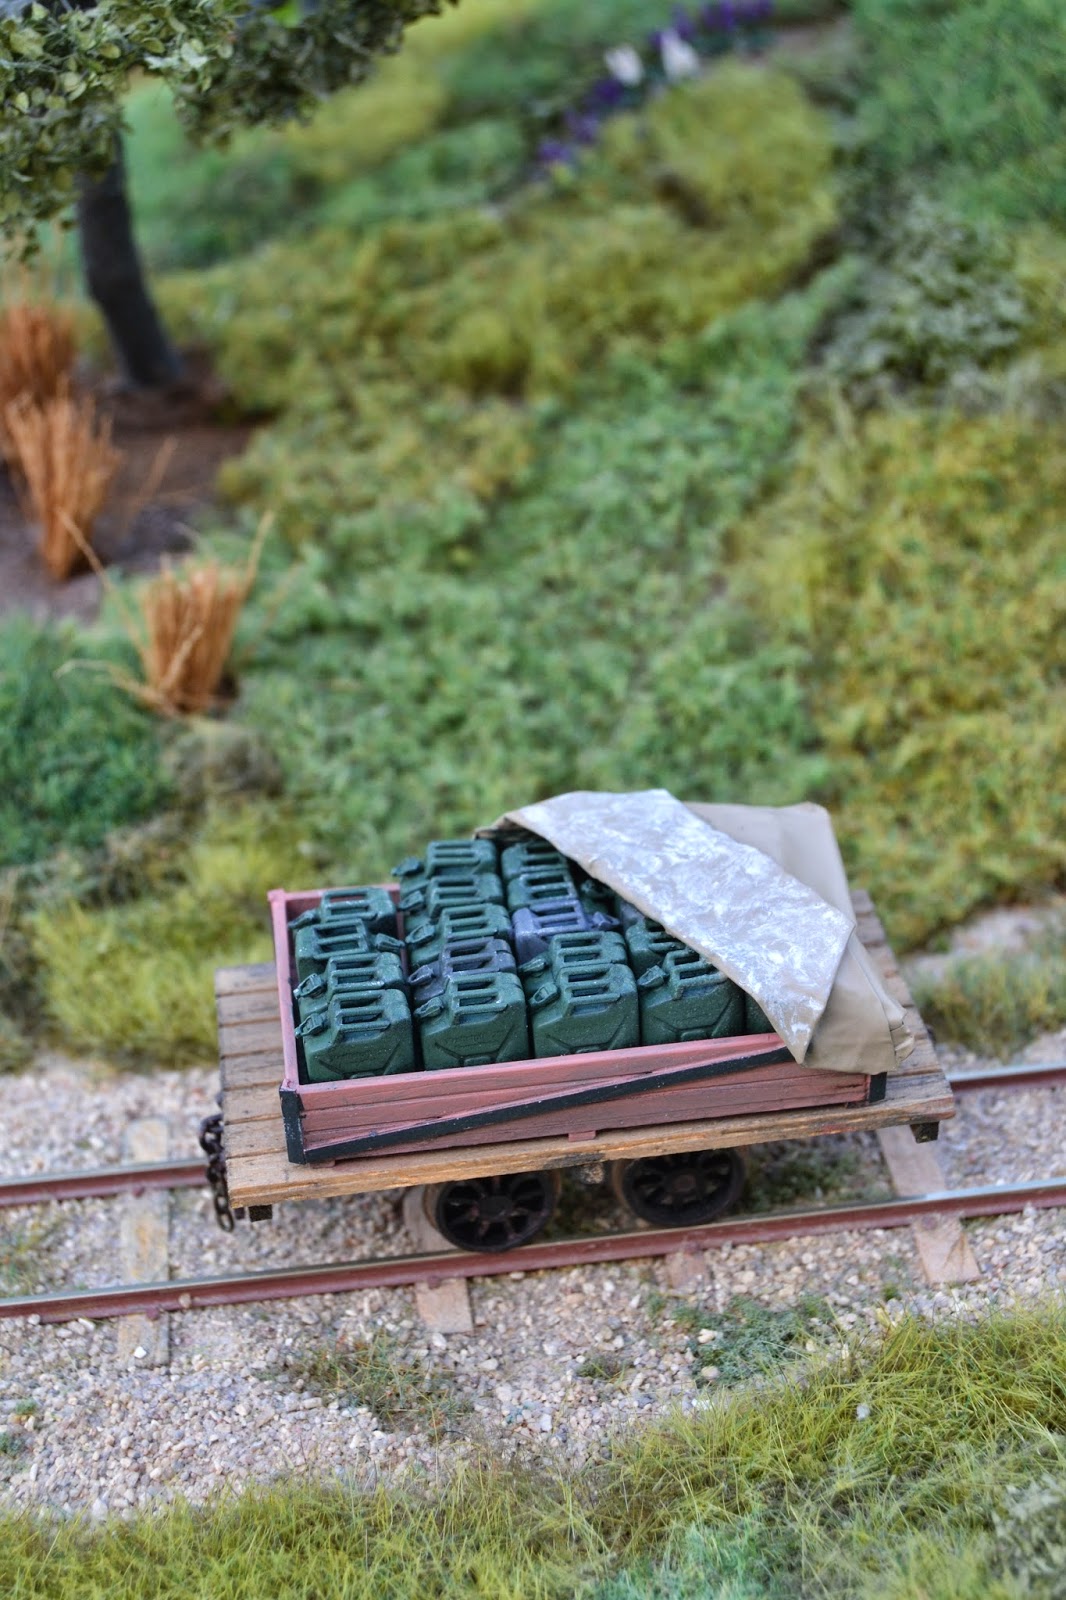
In the days before the Gauge 1 exhibition I built a little load for one of my old wooden flat wagons. They are some of the earliest 1:35 scale wagons I built. Nystrup Gravel had two and used them for many different tasks. An archive photo shows one of them loaded with cast iron stoves. On a second image one of the wagons (they were unnumbered, so it's difficult to know which one) is loaded with jerry cans with fuel for the machines in the gravel pits. The cans were loaded in a large low-sided open wooden crate covered with a tarpulin.

Morning train with fuel for the gravel pit machinery. The first rays of the sun are hitting the wood behind the cutting.
I built the crate from plasticard and plastic strip filling it with jerry cans from several sources. I was careful when placing them in the crate, as I wanted only one type of can to show where the tarpulin had been rolled away. The tarpulin was made from thin copper foil cut to fit and modelled over the loaded crate. Easier than rolling out a thin piece of Milliput and using it as a tarpulin and less messy than using a piece of paper towel and thinned white glue.

A view down on the jerry can box.

The load is painted in somewhat bizarre colours; the crate being sligthly pink and the tarpulin light tan. A splash of colour is refreshing among the dark, dusty and rusting skips normally rolling over the tracks at Nystrup Gravel. A nice, quick project!

Wednesday, 4 February 2015

Chubby Driver with Funny Hat (1/35)

A great advantage of modelling in 1:35 is the good quality figures on the market. Even though the majority are military figures some of them can be rebuilt into civilians. The number of true civilian figures in 1:35  is steadily rising, though. A marked contrast between the new railway modelling scale of 1:35 and the traditional of 1:32 is in fact the detailed figures in 1:35 scale. Most of the figures I have seen available in 1:32 looks like toys and not miniature versions of humans compared to the figures in 1:35.

Recently I found a new colourful figure from the Czech company SKP Models which I thought would fit in well on Nystrup Gravel as a lorry or loco driver.

A new driver for a loco at Nystrup Gravel.

Assembled but unpainted figure. Photo from Jadar Hobby's website.
While I think the figure is meant to be from more recent times than the 1950's, I think it will be a believable character on the Nystrup scene. The figure is available directly from SKP-Models, but I bought mine from Jadar Hobby in Poland as I was having a package sent up north anyway.