Monday, 23 June 2025

Fowler Progress: Paint and Decals

I'm not the fastest of railway modellers. 3 years after I took delivery of a Fowler in 1/19 scale for Nystrup Gravel I'm still working on my personal interpretation of an early 1930's Fowler in Danish service on 600 mm gauge. But now the loco is finally approaching a finished stage. This week I had basic painting and decal application done. 

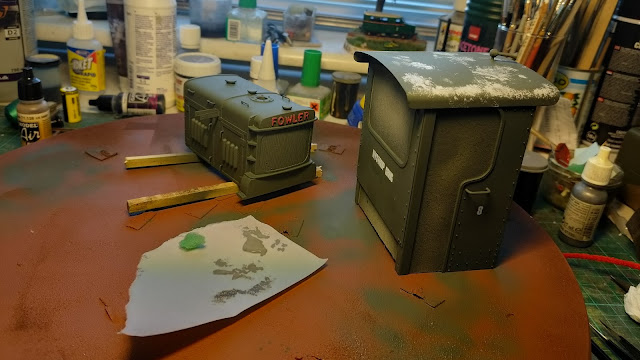
Snapshot of the freshly repainted Fowler on my worktable.

With large openings in the cab the Fowler presented me with quite a task masking these before painting could commence. Rather than using only masking tape, I cut some scrap cardboard to a tight fit for door and rear cab wall openings. The cardboard was fitted to the cab with Tamiya masking tape. Front windows received only masking tape. One advantage (except saving masking tape) is that the cardboard allows touch points for careful handling of the cab during painting, something that masking tape wouldn't provide.

I airbrushed cab, bonnet and gearbox cover with thinned Vallejo 70.897 'Bronze Green' and highlighted the Fowler lettering with brush painted 70.946 'Dark Red'. My loco was originally delivered from Essel Engineering with a black roof. With the Nystrup locomotive originally meant for service in the tropics I guessed the roof would have been painted a light colour to reflect sunlight. I painted the roof bronze green like the rest of the upper body (because that would have been an easy option for the workers at Nystrup Gravel). I then added a peeling effect to the roof by first dabbing light grey paint randomly over the roof area with a torn up piece of a kitchen scouring pad. When dry I applied natural metal paint with a new little piece of scouring pad, this time concentrating on places where I had applied grey paint. The effect is meant to look like green paint flaking away from a grey layer of paint, itself peeling away from a zinc paint.

Cab and bonnet painted green on the Ikea 'Snubba' turntable I use for conveniently turning models during painting. 

My new Harder & Steenbeck airbrush is easy to use and produces a very steady flow of paint easy to control. Cab openings are covered with cardboard fixed in place with masking tape. 

First stage weathering of the roof in progress.

For the painting of the gearbox cover I used cling film to protect motor and electronics. More gentle and far easier than using only masking tape.

Decals are leftovers from my 1/35 version of Nystrup Gravel. They were custom made for a Menck excavator and as I always order spare decals I could now add numbers and lettering from my stash of unused decals. Before the decals were applied I gave the areas where they would be placed a cover of gloss varnish. This helps the decals to sit well without the dreaded 'silvering effect' - much better than had I applied them on a matt surface. I used decal solutions to make the decals adhere as best as possible to the cab sides. First Mr. Mark Softer (makes the decal go soft and flexible) and when the decal sits right, Mr. Mark Setter, that helps the decal stick to the model. Once dry I gave cab, bonnet and gearbox cover a layer of matt varnish. That helps preserve decals and paintwork and covers the gloss varnished areas. 

Next up is final installation of headlights and sandboxes as well as detail painting and final weathering.

Wednesday, 11 June 2025

Large Scale Skips Finished

After some very enjoyable work and a long drawn out weathering process the two laser cut 1/10 scale skips from Dutch  Feldbahnfactory are finally finished. They are now ready to be taken into use as conversation items on a cupboard next to my table in the company office where I work.

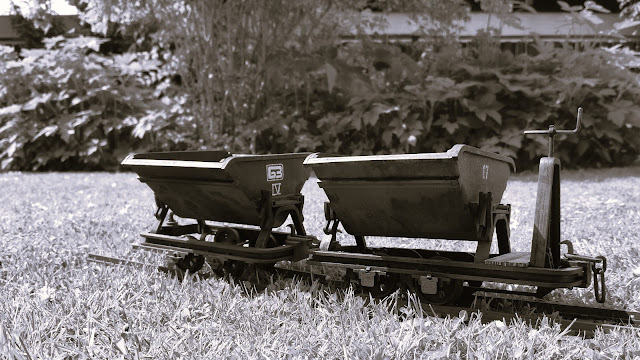
Summer is here and it's nice to photograp skips on a newly mown lawn.

The two skips were taken on as a challenge to build something  in an even larger scale than 1/19. Being 1/10 scale the skips are massively larger than anything I have ever done in my modelling career. I placed the two skips on my 1/19 scale layout and they simply dwarf my usually rather large skips. 

'Huge skips in my yard!' shop manager Petersen is obviously thinking, wondering where they might have come from.

Comparing with a pair of his own steel skips the size becomes even more apparent. The brake skip is 22 cm in length.

I placed a H0 scale mine skip on the brakeman's platform to illustrate the difference in size between 1/10 and 1/87. The close-up photo also shows up some of my hamfisted assembly of the skip body. I should have spent a little more time sanding...

Primarily the skips have been done as a fun and relaxing project like the Ukrainian futuristic drones and their Niva mothership. Something to revitalize my modelling mood and give me an understanding of different ways of handling kits. 

Last time I mentioned the skips they were almost finshed and lacking only the last weathering, having been held up by the need to replace my air compressor. With the compresser situation fixed both skips were given a very thin overall spray with light earth and sand paints. I'm merely misting the paint on. Several light passes are much better than too heavy a first spray. I added more paint (but still only a light cover) where dust will usually assemble. in advance both skips had been washed with a thinned rust coloured oil paint. I added graphite powder inside the skips bodies to represent the wear from gravel sliding out of the skips. I also used graphite to represent wear on the brake handle and buffers. Some oil spill may get represented with gloss black later, but I'm giving it more consideration. I'm not sure the effect will work in the large scale. 

Ready for service. Or not, as the gauge of the skips are 60 mm compared to Nystrup Gravels gauge of 32 mm.

The 1/10 scale skips have been a really fun and relaxing project. Many thanks to Feldbahnfactory for bringen the kits out. I wish the little company luck with their endeavour. Should I ever wish to explore more modelling in 1/10 scale another skip and a small loco would be tempting.

Two well used skip resting in between construction tasks. Skip IV appears to have the logo of the Borzhava narrow gauge railway in western Ukraine.

With the two skips finished the modelling table needs some cleaning before I continue adding lights and final layer of paint on the 1/19 scale Fowler loco. I'm looking forward to get that finished and continue a long list of projects on my small Nystrup Gravel layout.

Thursday, 5 June 2025

New Air Compressor

Having just taken a new air brush in use my trusty Italian air compressor suffered a terminal breakdown. It must be close to 20 years old and has never given any warning that it needed repairs of any kind. Oil changes have been faithfully executed and I don't know what I could have done to avoid the breakdown. A new compressor was needed and from ordering at a Danish air brush shop to delivery only four days passed (even including a weekend).

The new compressor in place on its little wheeled platform that allows me to roll the compressor under the worktable. 

The compressor is a Polish produced Adler AD-5000 compressor with a 4 bar limit 3 liter tank and a 150 W motor. I have test run the compressor and it is pretty silent in operation with a noise level comparable to my old Italian compressor. With a new air hose and connections the preassure stays the same and there is no air leaking. That could not be said about about my old equipment, probably due to leaking hose connections.

Solid box for the compressor.

Discard the box and this is what's left. The instructions are basically needless. Plug the cord in the socket and switch on the power and you are ready to paint.

Time for modelling has been very limited lately, but now the equipment is no longer an added challenge. I'm longing for some time at the modelling table!

Sunday, 1 June 2025

New Airbrush

My old Gabbert airbrush had begun to show declining performance the last few times I used it. No fault of the airbrush itself, but probably the somewhat negligent cleaning and handling on my side. Having served me well for over 25 years I guess it's time for a new airbrush to take over the thankless task serving me.

The new tool in my workshop is a Harder & Steenbeck Ultra 2024 airbrush. A good quality airbrush without it going over the top with features I'm not going to use often. 


I didn't buy a load of accessories for the air brush. I only added a cleaning station and new 3 m hose as well as better cleaning tools to the order.

I actually managed to get the Gabbert airbrush working again and now I'm in a situation where I even have a spare airbrush to help me over periods of troubles with the new one. You can't be too well prepared these days.

With the large scale skips almost finished I'm now ready for painting the 1/19 Fowler. If it wasn't for a terminal breakdown of my Italian air compressor! New one ordered and expected to arrive this week. No end to the obstacles served me on my way to finishing my second 1/19 scale locomotive model!