Friday, 31 May 2024

More Modelu Figures

In early May I received new Modelu figures to test as drivers in Nystrup Gravel's Fowler diesel. A lot more was in the package and I also mentioned the figures being sorrounded by supporting web of thin posts. They help the figure to remain firmly supported during printing and initial curing. Here is a closer look of how Modelu figures are looking before the supports are removed.

The two additional figures from the Modelu double figure sets 11208 and 11219 figures and a fox from set 31101. The maze of support sprues are evident. Unfortunately the right figure's right thumb seems to have suffered a fracture not even the supports could avoid.

The supports are easy to remove and shouldn't keep anyone away from investiong in one or several of Modelu's excellent large scale figures. I would count the Modelu figures as one of the most influential additions to 1/19 scale railway modelling. Modelu's figures are light years better than the usual caricature garden railway figures. They may be good enough in the garden, but on a small indoor layout like mine... never!

Apart from the loco crew I had the following sets added to the package:

0134 'Man with spade'

0148 'Man Kneeling'

31101 'Foxes'

'Man with spade' will be a good representation of track worker having been at work tamping a few sleepers with the spade. 'Man kneeling' could be representing a mechanic tending to a problem on a loco with a few tools laid on a piece of old cloth beside him.

Apart from the selected loco driver and a single fox the rest of the figures go back in a cardboard box for storage. I have plenty of other projects.

Sunday, 19 May 2024

Playing Trains on the Porch

We've had lovely weather in Denmark for the last few weeks. While I like to model outside, I rarely run trains outdoors. Having finished a day's programme in the garden I fancied playing trains on the porch. I got out some Loco Remote straight track panels for a short length of track. The Lister was an obvious choice for propelling a U-tub steel skip back and forth. The birds were twittering and I had a glass of chilled rosé ready.

A small 1/19 scale model train on my porch.

The warm and quiet late afternoon had a good light and I took the chance to make a short film. Besides the sound of birds there isn't much sound on the film. I like the movement of the track panels where they cross some of the unevenness in the porch. It looks exactly how real track panels move in reality.


While I love to model and build stuff it's quite nice now and the to just sit and watch a simple train move back and forth on a length of track.

Friday, 10 May 2024

New Figures

Risk of overstaffing at Nystrup Gravel? It could be the case with the latest delivery from the busy 3D printing maternity clinic in Bristol, also known as Modelu. 6 new employees were included in the package. The figures were accompanied by two foxes to add a little life to the area behind the loading ramp. 

One of the new figures resting againgst the footplate of the Fowler (with added detail parts yet unpainted). Small remnants of the 3D printings supports can still be seen here and there on the figure.

As with earlier purchases from Modelu I've not planned getting all figures ready for service at once. The most pressing need is to get a driver figure for the Fowler locomotive. The idea is to select one or two figures from the two crew packs to be converted to a Fowler driver. I'll probably have to do minor surgery and a little sculpting as I did a lot when I modelled in 1:35 scale.

Modelu crew pack 11208 for the small England engine. Photo: Modelu

Modelu crew pack 11219 for quarry Hunslet engine. Photo: Modelu.

After a switft production time of one week and a one week postal and customs trip to Denmark I couldn't wait to open the package. Safely wrapped in several layers of bubble wrap inside a solid cardboard box the figures waited for me to examine them and test fit them in the Fowler cab. I had a surprise waiting for me. My earlier deliveries from Modelu have been of figures with the 3D printing supports removed. Now the figures are supplied with the complete support structure of a web of thin posts. They help the figure to remain firmly supported during printing and initial curing. The removal of the support posts isn't a difficult task. Only a sharp knife, a side cutter and some time is needed. What surprised me the most is the new level of detail. My 1/19 scale figures from Modelu has been adequate in detail, but I have often been disappointed by weak facial detail, soft and missing detail in clothing and bad demarcation from eg. trousers to shoes. Most of those objections are now gone. I'll be going into detail when I start working on one of the new figures. And by the way: the price has gone down as well!

The right figure from pack 11219 resting his back side on the low rear wall in the Fowler cab. To call him a perfect fit isn't quite true, but it's a close call.

Here the figure is seen from the side.

The left figure from pack 11208 was my second bet on a possible driver figure for the Fowler. He looks good too, but needs something the rest his right arm on. 

Peeking out from the cab. 

I'm quite confident that I now have a decent driver for the Fowler. Adding a little material to the back side of the figure from pack 11219 and adjusting the height (trimming shoes and cap) will obtain a near perfect fit in the cab. And the figure will even be removable and at the same being able to keep its position while traversing bad track (as all track is at Nystrup Gravel).

As for the rest of the figures pictures will have to wait. It's Spring and I'm too busy with the 1:1 scale vintage railway, maintenance of two wooden houses and real work. But one of the Modelu foxes sneaked out and was photographed near the lorry loading ramp.

A Modelu fox in 3D print has crossed the meadow covered by static grass from the photographic rendition of a wood where it usually lives. 


Thursday, 2 May 2024

Timber Bogies From the Archive

The archives from Nystrup Gravel have been mostly preserved by a local historical archive and are kept accessible to the public. Last winter I found a nice photograph from the early 1950's showing the Lister loco with two timber bolster bogies loaded with a large log.

Loco no. 3 picking up a pair of loaded bogies for transport to the yard where a lorry will bring the log to the railway station in Skovby for transport to Sundborg.

Of particular interest is the writing on the log end faintly visible in the photograph. The letters 'SU' marks the log as one destined to go to the Sundborg Sawmill. The sawmill in Sundborg is currently being recreated in 1/87 scale by a Danish modeller and the plans and progress can be followed on the Sundborg Blog. The blog is in Danish only, but the pictures will tell most of the story.

Tuesday, 30 April 2024

Timber Bolster Bogies Finished

Picking up where I left after having painted one timber bolster bogie from Rail Print with rust coloured paint, I continued detailing the remaining 3 bogies and giving them the same treatment with paint from a spray can with rust coloured paint with a slight texture. Now the proces has been finalized and all 4 bogies are painted and weathered.

Lister No 3 with finished bogies 79 and 72 loaded with a single log. 

For me painting is both a blessing and a curse. A curse because it involves a radical departure from the build phase and involves some substantial risks. Paint is put on in large volumes often covering the complete model. If something goes wrong the paint is often only removable with a lot of work and damage to details is often difficult to avoid. On the other hand painting is a blessing as it is a welcome shift to a more artistic part of modelling. I also love how the model evolves from a maze of different colours and materials to a uniform object beginning to look like the prototype. 

Part of Nystrup Gravel's small fleet of timber bolster bogies still unpainted showing the different colours of the printed parts. The most obvious added parts are the footsteps and manufacturer's plates. Hand rails and tiny bolt heads aren't showing as clearly.

Once the three remaining bogies had the last detail glued on I gave them a layer of rust colour straight from the rattle can from Belton. A standard 400 ml spray can managed to cover 4 timber bolster bogies - a testament to how large 1/19 scale vehicles are. I then added a random number of spots in varying rust tones around the bogies. The bogies were then airbrushed with Vallejo chipping fluid before I added the covering colour. The chipping fluid didn't airbrush well and went on in layers of varying quality. If I did something wrong in thinning it or if the fluid had gone too old I don't know. Before I began painting all wheel treads were protected with Tamyia masking tape cut in appropriate width.

Four bogies painted with 'Rosteffekt' from Belton posed for a snapshot on the layout before further painting.

I then added a mix of black and different dark grey colours to the bogies. I tried to avoid covering everything with black or grey pain, leaving some random rust coloured spots to show. That is first stage in representing bogies with flaked and worn paint. Second stage in that proces is wetting the covering paint with tap water and rubbing selected areas with a combination of toothpicks and a stiff brush. This makes the cover paint loose grip on the chipping medium below, causing it to chip away. Quite a clever way of producing rusted vehicles. I have tried the method before on some of my steel skips. I think the results are better this time due to the textured paint.

First couple of timber bogies (74 (closest) and 76) with dark grey paint and a thin twig from the garden. 1/19 scale takes serious twigs to produce a credible looking load! 

Close up of chipped paint made with Vallejo chipping fluid. The textured rust paint is clearly recognisable. 

Hand painting numbers. Best done completely relaxed and with the family out of the house. I did my numbers in 10 minutes between two appointments.

With the cover layer of dark greys and black applied I continued using brush painting for adding spots of different tones of greys and continued chipping to show more of the rust colours under the cover paint. I also handpainted numbers on the bogies' outer ends on the right side of the buffers with white paint and painted the wooden platforms on the brake bogies with a mix of acrylic colours. When the final chipping had been done, I added a layer of matt varnish to seal the result and applied some weathering with a wash of heavily diluted black oil paint and some rust streaking with burnt sienna oil paint. Worn metal on hand rails, footsteps, buffers and bolsters were done with a soft pencil and graphite powder. Graphite powder was also used to grease the bolster unit and the mating surfaces on the bogie to achieve a minimum of resistance in operation. 

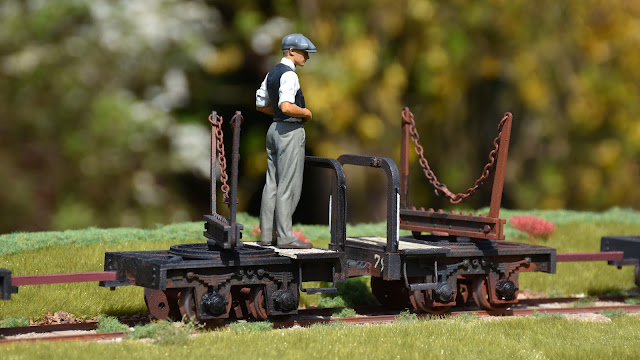
All four timber bolster bogies finished and photographed in the garden. From left to right bogie 76, 74, 79 and 72. All built and painted with little differences to set them apart from each other.

Braked bogies are usually positioned next to each other to allow the brake man to operate brakes on two bogies. Nystrup Gravel removed the brake system on their bogies, but the habit obviously lived on.

For those wondering how the Vallejo chipping fluid worked I'm glad to report that the initial troubles had no influence on the chipping. In combination with the textured spray paint I think the chipping has produced some nice surface detail. 

Close up of bogie 79 with a heavily rusted top. The textured paint show up well in most placec and the combined effect of chipping fluid and spot painting shows as well. Unfortunately some printing lines are also visible. I guess it's just me doing 3D print modelling - I never fail to loose patience when sanding.

One last shot of loco 3 with a set of new bogies on its way from the gravel pits to Nystrup.

I label the bogies finished, but they still need coupling chains, new coupling rods to replace the 3D printed ones and a few logs for a load.  

Sunday, 14 April 2024

Boxing People for Safekeeping

The small population of my Nystrup Gravel layout have been kept in storage on the layout and on shelves. That is not a sound long term solution. The figures represent no small investment in modelling time and money so they should be treated with no less respect than locos, rolling stock and cars.

Photographing in the Nystrup Gravel yard. My figures have to have some time off from the layout. But where to put them? I have now solved the problem.

Wanting to fix the problem fast, I didn't bother looking for a fancy wooden box, but found a cardboard box with generous size for my current and well into the future needs for storing 1/19 scale figures. I may upgrade to a wooden box if I stumble over a good sized box. For now the figures are much safer in the cardboard box than before. When I modelled in 1/35 scale I went to great lengths making tailor made wooden boxes for locos and wagons. I haven't quite reached the same level in 1/19 scale.

Cardboard box measuring 26 x 24 cm and 7 cm in height.

Bubble wrap lining inside the box with my figures added. Nystrup Gravel's population is all male.

Soft foam scrap pieces keeps the figures tightly in place when the lid is closed.

'People' written on the lid in stencilled cyrillic letters - just because I can.

The brown paper wrapper for my plastic cyrillic stencils bought in Leningrad, USSR, 1987. 

With about 30 minutes of design and work I now have a simple safe storage box for my figures. No more worries about scratched paint, broken off limbs or other damages. Safely tucked away in the box until picked out when their services are needed.

Friday, 5 April 2024

Detailing Timber Bolsters

Last month I received 4 bogie timber bolsters in 3D print ready to roll. As usual with 3D printed models I feel I have to remove the most visible traces of the printing proces - the thin lines of layered resin or plastic material. A lot of work with sanding sticks and sand paper will usually take care of most of it. I also wanted to add a little extra detail. I'm still working on the bogies and below is a status of the progress.

One rusty timber bolster bogie, a horse without harness and a bewildered workshop manager drinking coffee. Weekend approaching at Nystrup Gravel?

As I took a closer look on the timber bolsters I decided to limit my work on them to the following tasks:

  • remove most of the 3D printing layering lines by sanding (the paint I use help to hide the rest)
  • fill holes in the bogies' top plates (don't know why they are there?)
  • replace printed on footsteps with scratchbuilt metal items
  • add bolt detail
  • remove brake gear
  • add hand rails

Filling holes with putty and sanding (particularly the upper surfaces) was done on all 4 bogies in assembly line-style. After testbuilding the first footstep and fitting it on one side of a single bogie, I built and fitted the remaining three steps. I intentionally made two of the steps crooked as the steps were prone to be damaged by occasional derailments. From there I concentrated my efforts on a single braked bogie. The rest will hopefully follow in quick succession.

New footstep made from nickle silver sheet and brass wire next to the item to be replaced. The 3D printed part was too clumsy in my opinion and easy to replace.

'Pretty decent work', the Nystrup Gravel chief mechanic seem to think, 'Now three more steps needs replacing'.

From the beginning I had been a little disappointed with the look of the brake installation printed integral to the platform railing. As Nystrup Gravel's lines were without steep gradients braking, besides what could be accomplished by the locomotives, weren't necesarry during a train's movement. To keep wagons stationary on sidings a branch or a stone placed on the railhead would usually suffice. Only a few braked skips are documented on photos from Nystrup and consequently I decided to discard the brake installation. I presume it was removed on the real version of Nystrup Gravel to cut down on maintenance and to avoid complicating the operational environment for the workers who seldom were among the most mechanically experienced. 

Having cut away the brake installation from the platform railing I added handrails and corresponding bolt imitations. The railing was then glued to the bogie with AC-glue. More bolt heads from sliced octagonal plastic strip were added to bogie ends and under the axle box guides. Total sum of new parts added to the bogie reached 36. In addition I glued two pieces of lead under the bogie to increase its weight. 

The first 1/19 scale timber bolster bogie in rusty condition. Hardly anyone will notice my work adding bolt heads, handrails and replacing footsteps. But I know it's been done.

The bolster works as the real thing: lift the side support and it falls down to allow loading or unloading.

I separated bogie and timber bolster before painting to avoid everything being 'welded' solidly together by dried paint. I used a rust colour in a rattle can. The paint has a slight texture to it. I used a German made product 'Rosteffekt' from the brand Belton in a standard 400 ml spray can. The paint does smell quite a bit and it's probably best to use it outside the house - I did.  

The bogie will have a partly covering layer of dark grey paint over a covering of chipping fluid from Vallejo. That will allow me to create an impression of flaking and worn paint with rust showing through. But first I will finish the other three bogies.