Sunday, 7 April 2013

Jung Assembly Done (1/35)

One of the benefits of resin casting is the (relative) ease of production that enables manufacturers to model obscure prototypes. Very fine parts and prototypically thin edges can be made with resin. But most resins are brittle and not particularly well suited to the handling and mechanical stress that is unavoidable on a model railway. I think the Jung kit was designed for military modellers and most likely not intended for motorization. For a static model the resin is durable enough. As I will use the model to pull real trains I braced the frame of the locomotive with heavy plastic strip. It remains to be seen if the model will stand up to the ‘wear and tear’ of daily operation.

The kit parts makes it possible to build a 600 or a 700 mm. version of the loco. As Nystrup Gravel is using 600 mm. gauge the 700 mm. parts accompanied the kit buffers I mentioned in the previous Jung-post to the spares box. Two types of bonnet sides are also provided. I fitted the ones with the large Z-shape impressed into them. And yet more parts for the spares box!

In this Jung fact sheet the ZL114 is fitted with side plates without the flashy 'Z'. I just couldn't miss the opportunity to have 'Z for Zorglub' on the side of a simple industrial locomotive. Readers of the Belgian comic 'Spirou et Fantasio' will know the villain Zorglub.

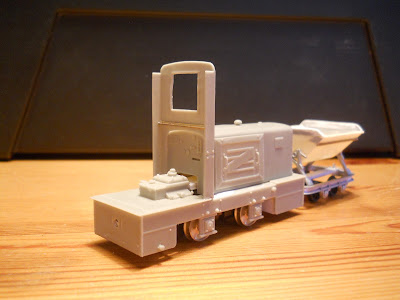
Cab front fitted. I did work on yet another Scale Link skip while building the Jung.
I added weight to the frame from scraps of brass. I struggled somewhat with a warped cab front, but managed to get it almost straight and glued in place. I will only glue the roof in place after having painted the interior of the cab. I decided not to fit the brake equipment as it would interfere with wires and easy handling of the Black Beetle. Sometimes you have to compromise.
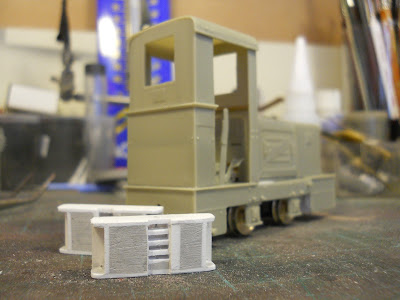
My renditions of the Jung cast metal buffers. They are built from plastic card and Humbrol putty. Next they will receive more sanding and a layer of primer before being sanded again.

Buffers fitted. Still a little sanding to be done before I can prime and paint. I replaced the seat with my own made from plasticcard. The warped cab front could perhaps be used to underline the loco's hard working past?

Friday, 5 April 2013

My Workbench (1/35)

Recently a reader of the blog asked how my workbench is arranged. Quite small and very simple is the short answer. In a recent issue of the internet magazine 'Model Railroad Hobbyist' one modeller took the readers for a impressive sightseeing through his perfectly laid out modelling workshop. Imagine, he had a whole room just for building models! The layout was housed in an other, much larger room.

My modelling is done on an area no larger than 100 x 150 cm. The image below was taken by leaning well back in my chair. So if anyone expected my workbench to be huge, well it isn't.
Cleaned up workbench. Building of the Roadcraft Bedford O-tipper in progress. To the left is a small vice (made in the USSR), a mini drill and airbrush (both German). To the right is two cardboard tubes with wood and metal profiles, an assortment of primer and clear varnish in spray cans. Brushes, glues, decal solutions and old film canisters used for mixing paint can be seen as well.
The worktable is actually built into one of the well known IKEA shelf modules called Ivar. As such I sit halfway into my storage of built and unbuilt models. Under the table I keep all my tools in a small plastic tool box next to my near-silent Italian air compressor. In the shelf to the left is a small stock of sheet plastic and profiles as well as prototype info on the models currently being built. The magnetic strip over the table is used for instructions during the building. On the wall behind me is my ever growing collection of books on industrial railways, railways in general, old lorries, construction equipment as well as the result of my own 'research' into Danish industrial railways. The 'cave' is accessed by squeezing past the house's 'stationary' laptop mostly used by me (all other computers and mobile devices in the house are very much mobile - but nevertheless always out of my reach!) and the small rolling cabinet that holds my paints and all parts 'electrical' - wires, switches etc.
Frontpage of the Danish Hobby Magazine, October 1967 showing a pipe enthusiast's workshop arranged in a closet. Looks cosy and notice the enthusiast is wearing shirt and tie while working! While my work area isn't that small, it shows that with imagination you can always find room for your hobby.
If nothing else I hope to prove, that modelling can be done even in very limited space - and that lack of room isn't a good excuse for not building models. Running trains may be difficult with limited space, but building trains can be done in a small closet.

Wednesday, 27 March 2013

Isn't spring coming soon? (1/35)

In Denmark where Nystrup Gravel is placed spring certainly hasn't arrived yet. Even though it is almost April and Easter is approaching there is still frost in the air and snow on the ground. In the old documents I have dug up from the archive of Nystrup Gravel it seems they also had trouble with the weather now and then. One year the managment gave in to complaints and bought stoves to heat up some of the buildings.

Cast iron stoves ready for installation. The all wooden flat wagon was used for all sorts of internal transports. The flat and its twin have been seen loaded with track panels, closets, stones, furniture, machinery and garbage.
My stoves are from Paulo Miniaturen. I bought my examples from Epokemodeller that carries a wide selection of Paulo products. One of the stoves is fitted in the loco shed where it provides a better work climate.

Monday, 25 March 2013

Jung ZL 114 (1/35)

In the fall I bought a resin kit of a Jung-loco from French manufacturer U-Models. I had hoped to fit a Bull Ant drive unit to the loco, but there wasn't room enough. Instead my Jung will run on a Black Beetle from Steam Era Models of Australia.

I have now begun to assemble the kit. The first step in the process was to make the BB fit in the rather narrow loco. After carving out room for the top of the BB I made a simple bracket from scraps of plasticcard. I'm glad that the bracket is hidden inside the loco, because it is one hideous piece of modelling! But the hodge-podge of plastic does its job and keeps the Black Beetle safely in place.
Current status of my Jung ZL 114. I still need to work a bit on the position of the rear axle boxes.
The kit comes with two different types of buffers. I chose to use none of them, although the castings are very nice. In daily use on Nystrup Gravel I suspect that my homebuilt buffers will be sturdier.


The two types of buffers provided in the kit. The lower type seems to have been quite rare - possibly a one-off? I think the buffer in the top photo will be too weak to work properly in normal service on any model railway. The resin being way too thin and brittle to stand the rigours of shunting skips.
The type of buffer I will fit to my Jung-loco. The cast metal buffer provides added weight to the loco.
The Jung model ZL 114 were built in approximately 800 examples between 1935 and 1960. Only few Jung-locos came to Denmark as Danish manufacturers had a firm grip of the market for small internal combustion locos.

Tuesday, 5 March 2013

Bedford O Tipper (1/35)

Along with many modellers I seem to buy models when they are available and not when I have time to build them. With my interest in a very narrow field of seldom modelled subjects it is an absolute necessity. The kits that suits my taste are mostly produced in very limited quantities or difficult to obtain. Sometimes the producers aren't in business for long. So I shop when I can and build later. This was also the case with my Bedford tipper. Bought three years ago the kit is only reaching my work bench now with the Opel finished (well almost, I noticed I hadn't fitted wipers at the windshield and I broke off the open door while taking pictures).

A preserved Bedford O tipper. See more restored Bedfords in this Flickr-album where I also found the blue tipper..
The Bedford O is a 1:35 resin and white metal kit from Roadcraft Models.The company is almost untraceable on the internet and probably best known for a 1:35 kit of a Series 1 Land Rover (that I unfortunately have never seen for sale). I have only seen Roadcraft Models advertised at Scale Link.

The kit is accompanied by some good instructions. An exploded view drawing shows what goes where while a small booklet with text explains how best to prepare, assemble and finish the model. This kit is obviously made by a modeller for modellers - and test built as well. The instructions are proof of that. Surely other short run producers could learn a thing or two (or 27) from Roadcraft Models!
Chassis building progressing. A little work on the tipper body has been done as well. I used two componet epoxy glue for the main parts. I like epoxy better than AC-glue when fixing large and heavy white metal parts together. The white metal chassis parts will result in a heavy model.
If you read Danish you can find a nice article on the Bedford O on the Sundborg-MJ blog.

Sunday, 3 March 2013

Planning Ahead (1/35)

I have always been planning my modelling projects well in advance before starting to build. Some projects needs planning because parts must be aquired from the other side of the planet, some because I just need to find out what a particular valve did and if the axles were really placed asymmetrically under the locomotive, some simply because I like to individualize each model - even if otherwise built out of the box - and that takes planning.

My list for 2013 (a list for a year's 'production' usually takes well into the following year to finish) is long as ever and contains a pretty normal mix of locos, wagons, lorries, landscape with some electronics and lighting projects added.
A loco I plan to build. The 'preserved' upper part of a pre WWI Danish built single cylinder IC loco. 
The classic Bedford O will be seen near Nystrup Gravel in the shape of a 1:35 kit from Roadcraft Models.
On the list I also have a Jung ZL114, two Hudson bogie wagons with steel sides, a crawler tractor, more lights and welding flicker in the loco shed and Tamiya's Citroën TA.

I must be a rather determined modeller as almost every model I have had listed on a piece of paper or in an electronic file has reached a finished state - sooner or later. What I like to model isn't changing much either and that probably raises my productivity a bit too.

Saturday, 2 March 2013

Finished Opel Kapitän (1/35)

Director Holm from Nystrup Gravel aquired a model 1939 Opel Kapitän just before the war broke out. Tight import restrictions made it impossible for him to get a new and fancy American car and he continued to use the Opel well into the 1950´s.
The director on visit at the loco shed. The weather is obviously warm as the rear door is left open for some fresh air.
I worried that the assembly of doors and roof would be very difficult, but the final assembly worked out fine. The warping of the roof was rather easily dealt with by taping it down while the glue set. A slight gap was taken care of with Humbrol plastic putty and sanding. The time spent on painting director Holm's yellow haired 20 year old daughter probably wasn't worth the trouble, as not much of her can be seen through the door.
The 1:35 Kapitän with the roof taped down while the glue dried.
After priming with 'Chaos Black' I painted the car with Vallejo's 71036 mahogany from the 'Model Air' range. It is prethinned and works great from the container straigt into the air brush - no fuss! I did the chrome lining and bumpers etc. with Vallejo 'chrome'. A steady hand and good eye sight is an advantage. The kit's decals weren't good. They all disintegrated when they came in contact with water. Not quite what you would expect from decals! I managed to save the dials for the dashboard, though. The license plates are from 'Skilteskoven' my usual supplier of special decals.

Even though the car turned out better than expected I think it will last some time before I set out to build another ICM kit. Even if ICM do some pretty interesting subjects, their kit design with many subassemblies and a lot of tiny parts makes building quite time consuming and painting difficult. Fortunately I have a Tamiya Citroën TA waiting to be built. Probably with only half the number of parts!

Previous posts on the building of the car can be found here:
Progress on the Opel Kapitän
Director Holm's Opel Kapitän