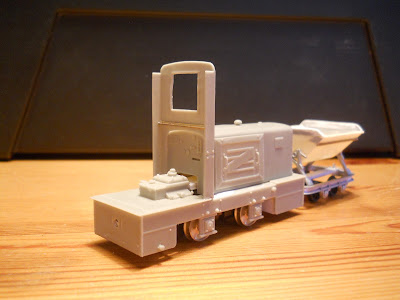
One of the benefits of resin casting is the (relative) ease of production that enables manufacturers to model obscure prototypes. Very fine parts and prototypically thin edges can be made with resin. But most resins are brittle and not particularly well suited to the handling and mechanical stress that is unavoidable on a model railway. I think the Jung kit was designed for military modellers and most likely not intended for motorization. For a static model the resin is durable enough. As I will use the model to pull real trains I braced the frame of the locomotive with heavy plastic strip. It remains to be seen if the model will stand up to the ‘wear and tear’ of daily operation.
The kit parts makes it possible to build a 600 or a 700 mm. version of the loco. As Nystrup Gravel is using 600 mm. gauge the 700 mm. parts accompanied the kit buffers I mentioned in the previous Jung-post to the spares box. Two types of bonnet sides are also provided. I fitted the ones with the large Z-shape impressed into them. And yet more parts for the spares box!
 |
| In this Jung fact sheet the ZL114 is fitted with side plates without the flashy 'Z'. I just couldn't miss the opportunity to have 'Z for Zorglub' on the side of a simple industrial locomotive. Readers of the Belgian comic 'Spirou et Fantasio' will know the villain Zorglub. |
 |
| Cab front fitted. I did work on yet another Scale Link skip while building the Jung. |
I added weight to the frame from scraps of brass. I struggled somewhat with a warped cab front, but managed to get it almost straight and glued in place. I will only glue the roof in place after having painted the interior of the cab. I decided not to fit the brake equipment as it would interfere with wires and easy handling of the Black Beetle. Sometimes you have to compromise.
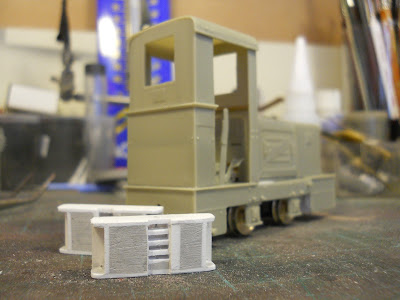 |
| My renditions of the Jung cast metal buffers. They are built from plastic card and Humbrol putty. Next they will receive more sanding and a layer of primer before being sanded again. |
 |
| Buffers fitted. Still a little sanding to be done before I can prime and paint. I replaced the seat with my own made from plasticcard. The warped cab front could perhaps be used to underline the loco's hard working past? |


Hi again,
ReplyDeleteGreat to see your Jung taking shape and how you've done the buffers. For mine, I've modified the larger type supplied in the kit. At this point, I'm very curious to see if the Bull Ant will actually fit in the available space. I may just have to "fatten" up my Jung to get it all in and working.
Cheers,
Pete
Hi Pete
ReplyDeleteMy research showed that I couldn't fit a Bull Ant in the Jung. I couldn't see any way to widen the loco. In the cases where the gauge was too large for the frames, Jung simply welded all the suff that keeps the axles in place on the outside of the frames as depicted in the kit. When 900 mm gauge was asked for, Jung welded some steel profiles to the sides of the frames to achieve the needed width.
looking forward to see your solution - also the buffers.
best regards
Claus
Hi Claus,
ReplyDeleteI've now fabricated and attached the two buffers. They are larger than the ones supplied with the kit. I'm still waiting on the Bull Ant so will hold off sending a photo until completion. What colour/paint are you using for your Jung?
Yesterday I received a Ford Thames chassis from Wespe for my company sand truck. I'm still not sure if the commodity will be sand or gravel.
Cheers,
Pete
Sounds great Pete
ReplyDeleteMinor progress on the Jung: http://nystrupgravel.blogspot.dk/2013/04/modelling-without-deadlines.html
I use Games Workshop 'Chaos Black' as primer. Most of my paint jobs are done with Vallejo acrylic paint.
Best regards
Claus
Hi Claus,
ReplyDeleteThe Bull Ant arrived in yesterday's post. Spent last evening in the shop watching "Wallander' on the Mac and trial fitting the chassis into the resin castings. It fits! Now the work begins. Nice kit but I've found a little warpage. I'm sure this is typical. I've not had much experience with resin before but warming up to it.
Cheers,
Pete
Hi Pete
ReplyDeleteLooking forward to see the Bull Ant fitted. I know the Wallander-series very well. It takes place in the southern part of Sweden, just east of Copenhagen. I know many of the town names - not least those that are (were) connected with railways.
Resin can be tricky, but with hair dyer, hot (boiling) water most warpings can be eliminated.
Best regards
Claus
Hi Claus,
ReplyDeleteI've got the Jung pretty well finished. It even has a slight lean to the right (over tired suspension) Will send a picture or two. How can I do this....your email address maybe?
Cheers,
Pete
PS Spring has finally come to the New Brunswick Hinterlands.
Sounds great Pete.
ReplyDeleteI got all the wiring and decoder fitted yesterday. So now my Jung actually moves!
You can mail me an image or two by using clausnielsen1969 @ gmail.com I'm looking forward to see your model.
Best regards
Claus