Wednesday, 27 July 2016

Varnish Water (1/35)

Although the Danish summer so far has been nice and warm, the little stream running under Nystrup Gravel's 600 mm. line has been filling with water during July. Not a lot, but enough to give the impression of a trickling stream during summer.

A view along Little Stream from south.

Having for too long considered what commercially available product to use for water in my little stream, I have finally taken the plunge. Having read of all kinds of trouble with several brands of model water and having witnessed other modellers' challenges I decided to simply use gloss varnish. I had a few small containers with left over Vallejo gloss varnish that I could use up on the project. 
The bridge over Little Stream seen from the north. The waste outlet on the right is from Banke's Bakelite. Water from the factory is let out untreated, which now and then cause a lot of dead fish down stream.

I brushed on 8 rather thick layers of varnish over the gravel bed. As the varnish wasn't quite clear anymore (I think the varnish discolours over the years if not used) the dried 'water' took on a rather pleasing, slightly muddy look. I managed to apply 2-3 layers in an evening, leaving sufficient time for the varnish to dry before the next layer was applied. Originally I had intended the water to be somewhat deeper. Now I like the look of the almost dried out stream and besides, with thin layers of varnish deep water isn't really possible.
Vallejo gloss varnish just brushed on has a whitish foggy look. It dries clear and gloss after a while.

Friday, 22 July 2016

Models Making History

On my visit to Deutsches Technikmuseum in Berlin I admired a lot of the museum's models. While all of a very high quality and extreme craftsmanship the ones that caught my attention the most were those showing the use of technology in context and not merely a free standing model of a single machine.

Model of a sleeper impregnating works 1930. Built by a Polish modeller for the Railway Museum in Warsaw.
The model of the sleeper impregnation works in the image above was ordered by the Railway Museum in Warsaw. When Poland was occupied by Germany in 1939 the museum was closed and the model taken to Germany in 1940. The model was exhibited in the then Verkehrs- und Baumuseum and later in the war damaged by allied bombing. Restored it now not only illustrates sleeper impregnation but also how museum exhibits moves around as history change.

Model illustrating the building of the Hindenburg dam connecting main land Germany with the island of Sylt. Model built primarily from paper and cardboard.

Close up of the skip train. The wheels of the skips appear to be metal.

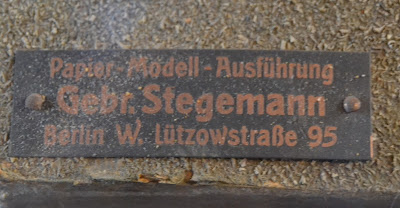
Works plate on the model showing it to be made by the Stegemann Brothers in Berlin.
The model is now as much a museum item as it is an illustration. Probably built around the time when the Hindenburg dam was opened (1927) it has survived the test of time, the Second World War, hard financial times and changes in museum priorities. It is also a sign of how good choices of materials in modelling combined with careful safekeeping will help a model survive. Today paper models from the Stegemann Brothers are handled the same way as original museum items are. Recently one of their models of an Egyptian pyramid was restored by a professional conservationist. I wonder if any of my models will survive as long as these two did?

An advert in the magazine 'Der Baumeister' April 1924 for Stegemann Brothers' paper model company. By sheer coincidence the Stegemann Brothers had their office at Lützowstrasse - Nystrup Gravel had their's on Lützowsvej.

Tuesday, 12 July 2016

Bussing Around (1/35)

As a result of some quiet vacation modelling my Opel bus is progressing well. The floor was finished with the use of Evergreen profiles and a little piece of plastic card embossed as tread plate. I glued the bonnet, front mud guards and the front part of the cabin to the chassis and floor. There were a few issues with the fit, but I managed to get everything lined up reasonable well. I've read that the real challenge begins with sides and roof...
Ready for primer. Until now a pleasant build despite some flash on some of the parts.

I couldn't resist taping roof and rear panel together to get an idea of the size of the bus. It is a large vehicle in 1:35 scale.
I had a big task with the many seats as each had four attachment points to be cleaned up. I primed them with 'Corax White' from Citadel while Vallejo Air provided the covering colour of mahogany. The floor is also painted with Vallejo Air: 'US Air Force Dark Grey'. Both seats and floor still needs weathering.
Test fitting the seats. It turned out I could have saved the work on two seats. They are surplus to requirement but will be kept in the spares box for future use.
A major task ahead of me is now planning how to prime, paint and fit the sides of the cabin and have the roof removable. To fit a few passengers at a later time the roof will have to remain at least temporarily detachable. A smaller task is detailing the dash board and driver's seat. I also have to get started on designing the decals and considering the colours of the bus. Maybe dark orange and green with a silver roof?

Visiting Deutsches Technikmuseum, Berlin

While on vacation with the family in Berlin I managed to throw in a visit to the German museum of technology. Germany is well known as a producer of industrial products and the museum reflects that. There are sections for aircraft, space, cars, railways, shipping to name a few. Unfortunately the historical brewery was closed during my visit. I didn't visit all parts of the museum with the same intensity, but spent quite some time in the railway, photography and aircraft sections. A full day is easily spent enjoying the museum.

Almost idyllic atmosphere outside one of the two large loco sheds containing most of the railway collections.
The museum is placed in several buildings on the area of a closed Berlin railway station. Some of the buildings are original railway buildings (two loco sheds and an impressingly long goods shed) as well as new buildings. I liked that the exhibits in the loco sheds were not restored to a shiny finish. Most of the locos and wagons looked well used reflecting their age and helping to tell their history. In the car section everything was sparkling shiny making that exhibition more sterile, in my view at least. 

A German Brigade wagon from the military 600 mm. railways. This one is fitted with a tarpaulin cover.
It is almost self evident that a German technical museum should display one of the well known Brigadeloks and this museum indeed has one. Here a somewhat rebuilt example by the Polish State Railways PKP Tx 203 (Borsig 10380/1919).
Besides all the 1:1 objects the museum relies on a large number of models to give the visitor an idea of how technology was used and to show a wider variety of items than would be possible in full scale. All the models are to a very high quality and certainly of museum quality. Some of them are indeed museum items with a fascinating history themselves. More on that in a later post.

750 mm loco on standard gauge wagon and 600 mm loco on its own track. The 750 mm. loco is HF 2822, a KDL 11 type loco built by Franco Belge in 1944. The 600 mm. loco is a Henschel 'Riesa' (28514/1949)
Among other historical sites in Berlin I also visited the Commonwealth War Graves on Heerstrasse. I thought it fitting to pay my respect to some of the young men that helped fight Nationalsocialism and ensure a democratic Europe. Thank you.

Friday, 1 July 2016

An Opel Bus for Nystrup (1/35)

The town of Nystrup had no standard gauge railway to provide transport for inhabitants and companies. The nearest railway station was situated in the town of Skovby 8 km. away. Most people in Nystrup used the bus route to Skovby as few had their own car. The bus route had two small buses built on a Ford AA lorry chassis and a large Opel reknown for its soft suspension.

Lately two 1:35 scale kits of buses have been released. Apart from the Ukrainian company Roden's Opel Blitz, Miniart (also from Ukraine) has done a Soviet GAZ bus. I was in some doubts as to which of them I should choose, but the Roden kit won out in the end.

I'm basically just building the kit out of the box without any additions apart from some minor home made details here and there.I'm getting some help from this build blog on a military modelling website.
The bus' chassis finished. Some modellers take a lot of trouble detailing engine and chassis on all their models. I'm only adding parts and detail that can be seen. I've left of most parts on the engine as I will build this model with a closed bonnet.
The floor of the bus completely hides the chassis when seen from normal viewing angles.

So far I have been somewhat surprised by the amount of flash on many of the parts. This is my first Roden kit so I have no idea if they are all like this or if I have just been unlucky. I plan to fit the bus with a driver and a few passengers. I will probably have to build the driver myself. Sitting passengers will have to be bought. I already have a standing passenger from MK35. Decals will be designed and specially made to have prototypically correct text and markings on the bus.