Sunday, 30 September 2012

Director Holm's Opel Kapitän (1/35)

At the moment a lot of civilian cars are coming out from the large manufacturers of military models. Both Tamiya, Bronco and ICM have released cars that have ended up on my shelves (mostly awaiting assembly). As I write these lines, I see news of yet another Opel from ICM. This is one more reason I'm glad that I model in 1:35 scale. So much to choose from!

To many people at model railway exhibitions cars are more 'era defining' than the trains. Cars and lorries on my layout thus carry a large burden - defining the setting as 'first half of the 1950´s'. The Kapitän is an ICM kit of what the company calls a 'Kapitän Saloon, WWII German Staff Car'. See the kit's layout on Armorama and Wikipedia.de on the Kapitän. There is no military fittings so the car can be used in a non-military role without any rebuilding. The car is a typical ICM kit with a lot of small parts. The layout of parts is not without issues, as the upper body has to be assembled from many parts. This does not make the assembly/painting sequence easy to plan. Until now the worst issue I have found is the fit of the headlight/radiator grill assemby. It needs quite a lot of filler and sanding to blend in.
Basic chassis constructed. Only the most basic parts of the engine was used. I see no point in detailing an engine that can't be seen when the model is finished. The unused parts went into my collection of spare parts. Never throw anything away! Photo from before I added the bad fitting front part.
In the early fifties a lot of cars in Denmark were still pre-war models. Even those who were well off didn't have easy access to new cars, due to tight import restrictions. The director of Nystrup Gravel, Jørgen Holm, still drives his 1939 model Opel Kapitän. His car was moth balled during the war and although being from 1939 hasn't seen much use. Director Holm fancied a new American car, but didn't get permission to buy one. Holm wasn't alone. In 1949 not a single American car was allowed to be imported into Denmark. To most Danes the price of an American car was prohibitive anyway.

The model is surprisingly large and will fit the status of director Holm very well. A respected man and conservative member of the city council needs a respectable car.

'Technik im Dienst der Bequemlichkeit' (Technology in the service of comfort). Opel commercial from 1939 on the virtues of the Kapitän - notice the newly constructed German 'Auto Bahn'.
From http://storm.oldcarmanualproject.com/opelkapitan1939.htm
See progress on the car on this newer blog post

Thursday, 27 September 2012

New Skips from Great Britain (1/35)

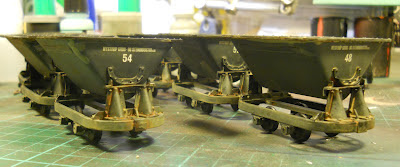
Six new Hudson skips are now in service at Nystrup Gravel. The skips are the newest skips at the company and acquired a few years after the war. Great Britain were in those years the primary supplier of things mechanical to Denmark.


The finished skips received a layer of black ('Chaos Black' from Games Workshop). I have found this paint to be excellent, not just as a primer, it also works fine as covering paint. The larger surfaces - primarily the sides of the skip bodies - were given a thin layer of black grey to give variation to the otherwise very dark skips. Gloss varnish were applied with air brush were the decals had to go. The company name on each end of the skips are from 'Skilteskoven' while the numbers are cobbled together from an Accurate Armour decal sheet. As I wanted the skips to have numbers in pretty much chronological order it took quite some planning and mixing of single digit decal cutouts. Not the easiest of tasks. As much as I like my rule to use materials from my spares box I will probably have decals designed next time I face a 'cut and assemble' decal task of similar size. A light weathering with acrylic and oil paint, pastel powders and matt varnish finished off the skips.

Decals in place and matt varnished for protection. Weathering of tubs' interior has started. On skip 47 I have fitted one of my home made coupling chains. A better representation of the real ones than my usual simple chain links of equal link size.

Basic weathering in place. All that remains to be done is to blend everything together with pastel chalk powder and  a little graphite for worn metal.

As will be apparent, the United Kingdom supplied a large part of Denmark's import of machinery. From the Danish year book 'Hvem-Hvad-Hvor 1950' (Who-What-Where). A most usefull series of books enabling one to look up basically every possible fact of Danish society dating back to 1935. The year book is still published. I wouldn't miss my complete collection for the world.
Overall this project was done quite quickly by my standards. From ordering to finished skips a mere month and a half went by. Not all my projects are like that - the Chevrolet-lorry took more than 7 years!

More images of the new skips here and here.

Friday, 14 September 2012

Skips on the Assembly Line (1/35)

You may all wonder: 'How many skips can this little railway possibly find use for?' And yes, the question is valid. Three rakes of skips is pretty much what it takes to keep a production process to go uninterrupted. At any time during the work day one train of skips is in transit between the works and the pits, one train is being loaded at the pit face, while the last is being unloaded at the gravel works. As I had only two rakes of skips I needed a third for my little railway.

After the war's challenging gravel transports Nystrup Gravel needed to replace 10 old, worn out skips. Having found no useable skips at the auctions over old German equipment after the liberation, Nystrup Gravel was fortunate to receive brand new, imported skips from Great Britain. As Denmark had a huge export of agricultural products to the UK an equal valuable stream of industrial products flowed back to Denmark. Including Hudson skips. Read a short history of Robert Hudson Ltd.

A page from a Hudson catalouge. Here sourced from http://www.yorkshire.16mm.org.uk/BuiltinLeedsnew.html
In a recent post I told about the Hudson 'Rugga' skip I found in my collection, and how it made me acquire more 'Ruggas' from Slater's Plastikard. They have now been built in assembly line fashion. It really speeds up production and six skips are quickly built. Probably also an indication of a well designed and produced kit? Although the work was repetitive I liked that I was not challenged every other second to figure out how to produce a tiny part myself and find ways to attach it to the model. Here I could really put my brain on 'stand by' and just build.

Six skips fitted with wheel sets - and the spare wheel set that came as a surplus. After a bit of adjusting all 12 wheel sets were rolling freely, promising good running from the skips. The red table testifies that I was again modelling outside - this time in my family's summer cottage.

Ready for skip bodies! Adding the six parts on each skip that carry the skip body took no more than 1-2 minutes.

Drilling shallow holes at precisely the right spot is made easy with the supplied etched brass jig. 

Assembly accomplished. 1:35 scale figure for size comparison. Evidently the figure is not as far progressed as the skip. He still needs the huge pocket on the right thigh scalpelled off, new arms and a head. The figure comes from the Zvezda figure set 'WW 2 Soviet Tank Crew'.
The skips will now be painted black and fitted with decals proudly spelling out the full name of the gravel company 'Nystrup Stone and Gravel Company Ltd'. Left over decals from a military kit will be used for numbering. Weathering will be limited as the skips are portrayed as relatively new.


Sunday, 9 September 2012

Bankes Bakelit's Ford V3000 (1/35)

Last time I wrote about the Ford lorry I had completed the construction. After a layer of primer I painted rear fenders, wheels and cab with Humbrol 14 gloss 'French Blue' and the floor of the load area Model Air 'Khaki Brown'. I airbrushed the sides of the cargo bay red with Vallejo 31. Floor and inner sides of the cargo bay were weathered and sealed with matt varnish. The chassis was weathered with oil paint and pastel chalk and also sealed with matt varnish. The tires where painted with Vallejo 168 'Black Grey'.

After some careful masking cab and the upper half of the doors where air brushed red. I found it a difficult, but funny, task. Unfortunately it didn't stay that way! My paint job ended in almost utter disaster as the paint crept under or through the masking tape. I managed to clean up most of the mess, but I still have that 'perfect lorry paint job' waiting for me somewhere in the future.

Lettering came from 'Skilteskoven' - my usual supplier of costum made decals. The little one-man business in Odense is celebrating it's 10th aniversery this year (and of course the owner has a 'real' job - you cannot live from making decals and signs for railway modellers in Denmark). On the cab doors the black lettering is placed on top of an orange rectangle cut from some left over decals from an old helicopter kit (remember: never throw anything away!). The license plates are from 'Skilteskoven' as well. Decal application was plain sailing. Decals from 'Skilteskoven' are nicely printed on thin decal film that responds well to my favorite decal solutions from Mr. Hobby.


Transporting barrels full of phenol for Bankes Bakelit. The Ford V3000 lorry is here seen crossing the viaduct taking the road to Ubehage over the 600 mm. gravel line.

A well kept Ford lorry from one of Nystrup Gravel's neighbours, Bankes Bakelit. It is easy to see that the drivers are concentrating their maintenance on cab and front, leaving the wooden load area much more to natural weathering.
The lorry is loaded with some very worn looking 200 l. barrels with chemicals for the production of bakelite. I lost the box years ago, but I think the barrels are from Tamiya.

How a break could have looked like in 1951 for the driver of one of the lorrys from Bankes Bakelit.
Despite the below average paint job I'm quite fond of my lorry. Now the company 'Bankes Bakelit' has been given a modelling tribute. Perhaps I can even create part of the factory complex as a background building on a future module?

Earlier posts on my Ford can be found on:

Another Ford lorry, here in the markings af the German Red Cross. A great model that would not look out of place in my collection wearing a more colourful livery and markings.
See more http://panzerserra.blogspot.dk/2012/09/ford-1941-panel-van-part-05-and-final.html


Saturday, 1 September 2012

Never Build More Than One Model at a Time (1/35)

... was the advice that I got as a boy when building model air planes. "You'll mix up the parts and will never finish any of the planes" was the message. Perhaps it was well placed advice for an easily distracted boy. Today I do quite the opposite. I rarely build on less than three models at a time, changing from one to the next as motivation and a sensible building sequence leads me to.

I have yet to unintentionally mix parts and have never left a model unfinished due to the fact that it was being build along with several others. That has probably something to do with expirience and the fact that my modelling is pretty entrenched when it comes to it's topic. I have now and then been tempted by other scales and themes, but have never been lead astray from 1:35 narrow gauge modelling on the Nystrup Gravel theme with French artillery railways thrown in for variety. As the scale and theme is decided it gives me great pleasure to jump from model to model as the inspiration leads me to. It may be what actually keeps me modelling the same theme.

Currently I'm doing work on a kit of an Opel Kapitän, a lorry, a Ferguson TE-20, six Hudson skips, fitting decoder and new O-rings on my Sala-loco, scratch building a closed speeder and besides that I'm working on several small projects on my modules. Certainly not what would qualify for a 'LEAN' process. But then, this isn't work and I do it because it is fun.

Current status on one of my modelling projects - the little speeder.

The Ford from 'Bankes Bakelit' being masked before application of the final layer of red paint.
The most iconic tractor in my opinion: the Ferguson TE-20. Rather than showing some glued white metal parts here is an image of a restored tractor at the Græsted Veteran Show, 2011.
My Sala-loco is currently dismantled for decoder fitting and replacing of torn O-rings. Here it is seen while passing the water tower at the loco shed. See images from the building of the Sala-loco.