Sunday, 25 December 2016

Sub Scrap (1/35)

A few weeks ago a friend of mine suggested I build a Billing Boat wooden kit of a small Danish fishing boat in 1:30 scale. I thought the project a bit too large for my Nystrup setting. The idea of some kind of a ship had caught my mind, though. No place in Denmark is more than 50 km. from the sea and despite Nystrup not being directly at the coast line, I began to wonder how something like a miniature boat could be squeezed in near Nystrup.
Two German miniature submarines being towed along a Danish road in May 1945. The Germans planned to operate the subs from Danish harbours. A large depot was established at the air field at Mellemaaen, near Nystrup.
The smallest 1:35 boat I was able to find was a German miniature submarine of the type Biber (Beaver). Luckily the Biber was one of three types of miniature submarines (Molch, Neger and Biber) found on the German airfield not far from Nystrup. Most of them were taken away for scrap in 1946-47 after evaluations by the British. In this way the presence of a rusty sub on a lorry around Nystrup wouldn't be completely out of the question.

The kit is from Italeri and quite easy to assemble although I put in some time getting rid of a seam along the top of the hull. As submarines really isn't what turns me on modelling wise I kept my own modifications to a minimum. I opend up a few of the bolted covers in the sides of the boat. To conduct technical examinations I suppose the British technicians removed them for easier access.
.
The two main hull parts ready for assembly.
The Biber assembled and ready for primer. Posed on a track panel the boat will most likely end up as a load on a lorry.

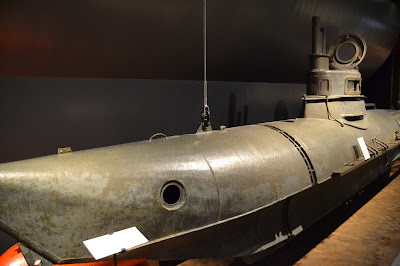
On my visit to the Berlin Technical Museum I had the opportunity to see a real Biber. Apart from its small size I was struck by the fact that the rudders were made from wood. As a weapon the Biber wasn't a success. Most were lost at sea because of mechanical failures, rough sea or because their 'drivers' died from carbon monoxide poisoning due to a badly designed exhaust system.
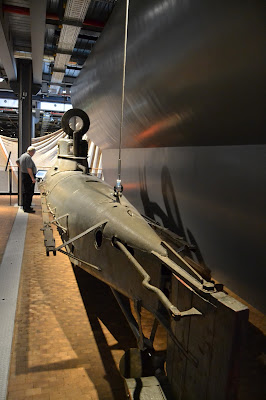
The Biber in the Berlin Technical Museum. Not much of a submarine at barely over six tons.

Also the Biber in Berlin is missing a cover. Notice the somewhat buckled surface of the boat.

Thursday, 22 December 2016

Modelling and Consistency (1/35)

Now that's a weird headline. But to me it's pretty straight forward, really. To be believable a model railway has to make a balanced and good impression. To me that means that all the elements of the model railway fit together. Period and theme seems to be major considerations for many railway modellers. It is for me too. I also try to get the same level of detail on trains, buildings, figures and road vehicles. To make everything blend together. Exactly like in reality, where a lorry isn't any less detailed than a locomotive.
Here is a scene from my humble effort of making a balanced and consistent model of a narrow gauge industrial railway. A train in a landscape, a tractor, water tower and a warning sign. All items modelled with the same attention to detail to avoid one to 'outperform' the others.
As railway modellers we tend to focus on the trains. So much that most railway modellers don't even pay particular attention to track as long as it works. My idea of the ideal model railway is one with good overall detail and trains matching the surrounding landscape - in both theme, period, level of detail and weathering. Much like a three dimensional painting with movement.

A section of track on the Nystrup Gravel line. My attempt at making track as detailed as everything else I build or use.

I have participated in the Danish Gauge 1 exhibitions since the event was first held in 2010 and I have seen my share of bare plywood layouts with expensive locos and rolling stock. The contrast is striking and unrealistic. Nevertheless this years event showed how the Gauge 1 scene in Denmark is fast developing. From the huge collections of mostly German rolling stock and locos in 'out of the box-condition' running on naked plywood ovals. To kit and scratch built rolling stock with realistic weathering running on landscaped modules set up to feature end to end running. Nystrup Gravel didn't participate in this year's version of the event. Due to a tight schedule and career priorities I decided to skip the event. I hope to return to the event next time and enjoy even more Gauge 1 modelling!

Examples of some of the modelling shown on the Gauge 1 event. A typical Danish four wheel passenger wagon and brick built station building. Both of them probably the result of many hours of work at the workbench. Note also how much better the track in the background looks compared to that closest to the camera. Photo: Lis Nielsen, 2016.

Tuesday, 13 December 2016

Nystrup Gravel's Wagons no. 49 and 51 (1/35)

It may have taken some time, but now the two Hudson bogie wagons are ready for service on the 1:35 scale version of Nystrup Gravel. I started building the wagons from two David Prowan kits back in September 2013. Now more than three years later the wagons are evidence that I finish what I start - also when modelling.


Nystrup Gravel used the two wagons to transport bagged sand for foundry use. Nystrup's foundry sand 'Multisand' was a specialised product sold to foundries in both Denmark and Germany. The two wagons were bought from Great Britain through the Danish dealer of narrow gauge equipment V. Spøer. The wagons were delivered with steel sides which were obviously discarded quite soon by the Danish workers as they hampered easy on- and offloading. At least one of the steel drop doors was left rusting behind the loco shed for many years. In the recent issue (108) of Narrow Gauge & Industrial Railway Modelling Review the Hudson bogie wagons are mentioned as having been delivered in large numbers to the British War Office for use in e.g. ammunition dumps.
The two Hudson wagons (one unloaded) photographed in front of 'Bankes Bakelit'. Apparently the original Hudson bogies were swapped for rebuilt skip frames at Nystrup.
When the second wagon was painted I could add the final weathering to both of them. I used pastel chalk for dust on the load area and graphite from a soft pencil for worn metal - primarily on the buffers on the bogies. I painted 19 sacks and added decals - enough for a symbolic load on one wagon. The next 25-30 sacks will be done when I need a therapeutic break from another project.

Being from etched metal and fitted with white metal bogies the wagons are comparatively heavy for their size. I fitted the bogies with a thin washer between bogie and wagon and small gap between the two to enable the bogies to adjust to uneven track. Time will show if more weight and washers are needed for safe running. 

Jung loco no. 6 shunting wagons 49 and 51 between the small industries in the western part of Nystrup.

Friday, 9 December 2016

Approaching the Finish Line - Bogie Wagons (1/35)

With a troubled history my two Hudson bogie wagons are now approaching the finish line. Being put back in a card board box several times due to missing parts or lack of motivation the wagons are now subject to a focused building and painting process. Fueled by the delivery of decals for the load of sacks and last week's progress on one of the wagons.
Cleaned up resin sacks and fresh decals from 'Skilteskoven'. The sacks will hopefully make the otherwise quite dull wagons a little more interesting.
With new found energy I glued on the 68 rivets (made from thinly sliced strched sprue) on the remaining wagon and primed it and its two bogies. A few of the cleaned up resin sacks were quickly painted and prepared for decals. When paint and varnish had dried I fitted the decals designed for the sacks. As expected the decals fitted perfectly on the resin sacks from Wespe Models.
One newly primed flat wagon and its almost finished cousin carrying a few test samples of sacks with foundry sand.


Straight from above: Three sacks with 'Nystrup Multisand' - the well known brand of high quality foundry sand from Nystrup Gravel, Denmark. The sacks still need a layer of matt varnish and a little weathering.

Next time you'll hear about the two bogie wagons they will be completely finished. I promise. You won't hear more about them for some time after that. I have a few other projects to tell you about in the time to come.

Tuesday, 29 November 2016

Flat Wagon Progress (1/35)

With soldering done the two wagons were washed thoroughly with hot water and a used toothbrush. When the wagons were dry I began fitting plastic details like brackets and rivets. The work adding rivets is somewhat tedious. Consequently my motivation hasn't been sky high.
One of the wagons with boards test fitted as low sides and sacks with foundry sand. The drawing is my concept for a decal for the sacks. I'm slowly cleaning up the many sacks - one more boring task!

Finally I pulled myself together and finished rivetting one of the wagons. It and the bogies got primed immediatly and now awaits painting.

Thursday, 17 November 2016

A Local Hobby Shop in Berlin

While in Berlin this summer I came across this fantastic shop front of a hobby shop. Apart from childrens' toys the shop carried a lot of plastic kits, railway books and a wide selection of Märklin model railway items inside. But most amazing to me was the old fashioned shop front with neon signs in old Märklin design. If you fancy a visit yourself, find the shop on Wilmersdorfer Strasse 157 in Charlottenburg, Berlin or visit the shop's website.
The costumer at the door seems to hesitate. No need for that as there is plenty of nice stuff inside! I must confess I didn't buy anything. But as I model a Danish narrow gauge industrial railway in 1:35 scale I didn't expect a lot of things relevant to me.

The iconic neon signs over the shop front windows. Must look wonderful when lit in the dark.

Thursday, 10 November 2016

A Long Story: Hudson Bogie Wagons (1/35)

Almost three years ago I started building two bogie flats in an attempt to recreate the two wagons used by Nystrup Gravel to carry foundry sand in sacks. The build process was stalled by several factors and the wagons somehow ended up in a box. The wagons have now returned to my work bench again and I'm determined to get them finished this time.
The box has landed. I can begin to plan what has to be done, how and in what sequence.

Status on the wagons is that all soldering is done and my home made bogies test fitted with cut down M2 bolts. As the kit's etched end angle profiles where too short I replaced them with pieces of brass profile cut and filed to suit.

The end profiles are filed to the right length in my small vice.

I got the vice as a birthday present in my early teens from my mom and dad. In more than one way a piece of history now. The Union of Socialist Soviet Republics was dissolved in December 1991
I'm now progressing with cleaning up my solder work which wasn't up to my usual standard. Next is fitting of small details like rivets. The load will need some work too, as the sand bag resin castings aren't exactly perfect. 
Both wagons ready for clean up. I bought the resin sand bags from Wespe Models on a Summer sale when I had another kit sent north anyway.