Monday, 13 January 2014

More From the Archives

I am currently in the midst of several modelling projects that seems to drag me into more work than I had anticipated. While that isn't too bad, as I'm sure they will end up being nice models, it can also be somewhat frustrating not finishing anything for some time. I suppose most of you fellow modellers know the feeling?

Fortunately the old Soennecken binder from Nystrup Gravel is able to supply a little content to the blog while you wait for progress from my work bench. This time I publish an image that I'm convinced isn't from Nystrup Gravel. As far as I know Nystrup never owned a loco like the one in the photo and the skips also look a little too large to fit the types used at Nystrup.


Train of skips on an unknown location in Denmark. The loco was built by the Danish company Kastrup Maskinfabrik. The company's logo can be seen on the radiator screening, while the plate with the works number has obviously been stolen, as it normally had its place above the screening. That the loco is missing any lights could indicate that the image is from Nystrup, as very few of Nystrup's locos were fitted with lights. But all known Nystrup locos were numbered, which points to another location. The size of rail (although difficult to see clearly) also suggest that the photo wasn't taken at Nystrup Gravel. Photo: Achive Nystrup Gravel.
One possible source of the image could be from a series of trips the shop manager of Nystrup, Mr. Thorleif Petersen, made to other gravel industries on the Danish island of Sealand. From a few letters in the binder it seems Mr. Petersen had an interest in locomotives and machines that went far beyond what was needed for his job at Nystrup.

Friday, 27 December 2013

Christmas Modelling (1/35)

Besides celebrating Christmas and spending time with the family I've had some time at the work bench. Subjects of the Christmas attention were my Schöma gas generator loco and a Danish army lorry.

I'm preparing the 3D-printed Schöma loco for fitting of the BullAnt I have ordered from Australia. To add strength to the loco's frame I fitted brass bars to the frame's end plates. They also add weight to the loco. More weight will be added later when I have determined how much room the drive unit, decoder and light arrangement takes up.

Like a turtle... The Schöma is having its frame reinforced.

Close up of the operation: the brass bar will provide strength to the frame and prevent the front plate from deforming. I have no experience with 3D-prints' long term stability and I like to be prepared for all eventualities.
The army lorry is an addition to a recovery column I started building a few years ago. So far the column isn't too long, comprising only two vehicles; a CMP with scratch built generator and a Scammell recovery truck.  Most Danish army lorries in the years after the second world war were equipment drawn from the British army's surplus. The lorry I'm building at the moment is a Bedford QL from a IBG kit. Large numbers of this type of lorry came to Denmark after the war. Most were in need of repairs after use in the war, some even had bullet holes in their bodywork. The 1:35 kit assembles with no fuss and I really like to build a kit out of the box now and then.

The chassis of the QL assembled and primed. The cargo bed with a load of spare wheels isn't quite as progressed. The two sitting figures are from Ultracast (figures 35011 and 35036) and very nice. In the fifties the Danish army uniform relied heavily on garments donated by the British army, so WW2 figures in British uniforms only need minor modifications to pass for Danish squaddies. The beret was only introduced into the Danish army in 1958 (in armoured troops) but I really thought it going too far to replace them with forage caps.
I intend to make the recovery column  a little longer in the coming years. Hopefully with two more CMPs to make the column a bit more uniform. Some day, on a stretch of road parallel to the gravel line, you might see the column pause during one of the early Cold War's many manoeuvres in the woods around Nystrup and Skovby.

The Scammell recovery lorry built from an Accurate Armour resin kit in 2008. The Danish army had a few of these imposing vehicles of unmistakably British design. My model still lacks Danish army decals - which are currently being designed.

Wednesday, 18 December 2013

A Review of 2013 (1/35)

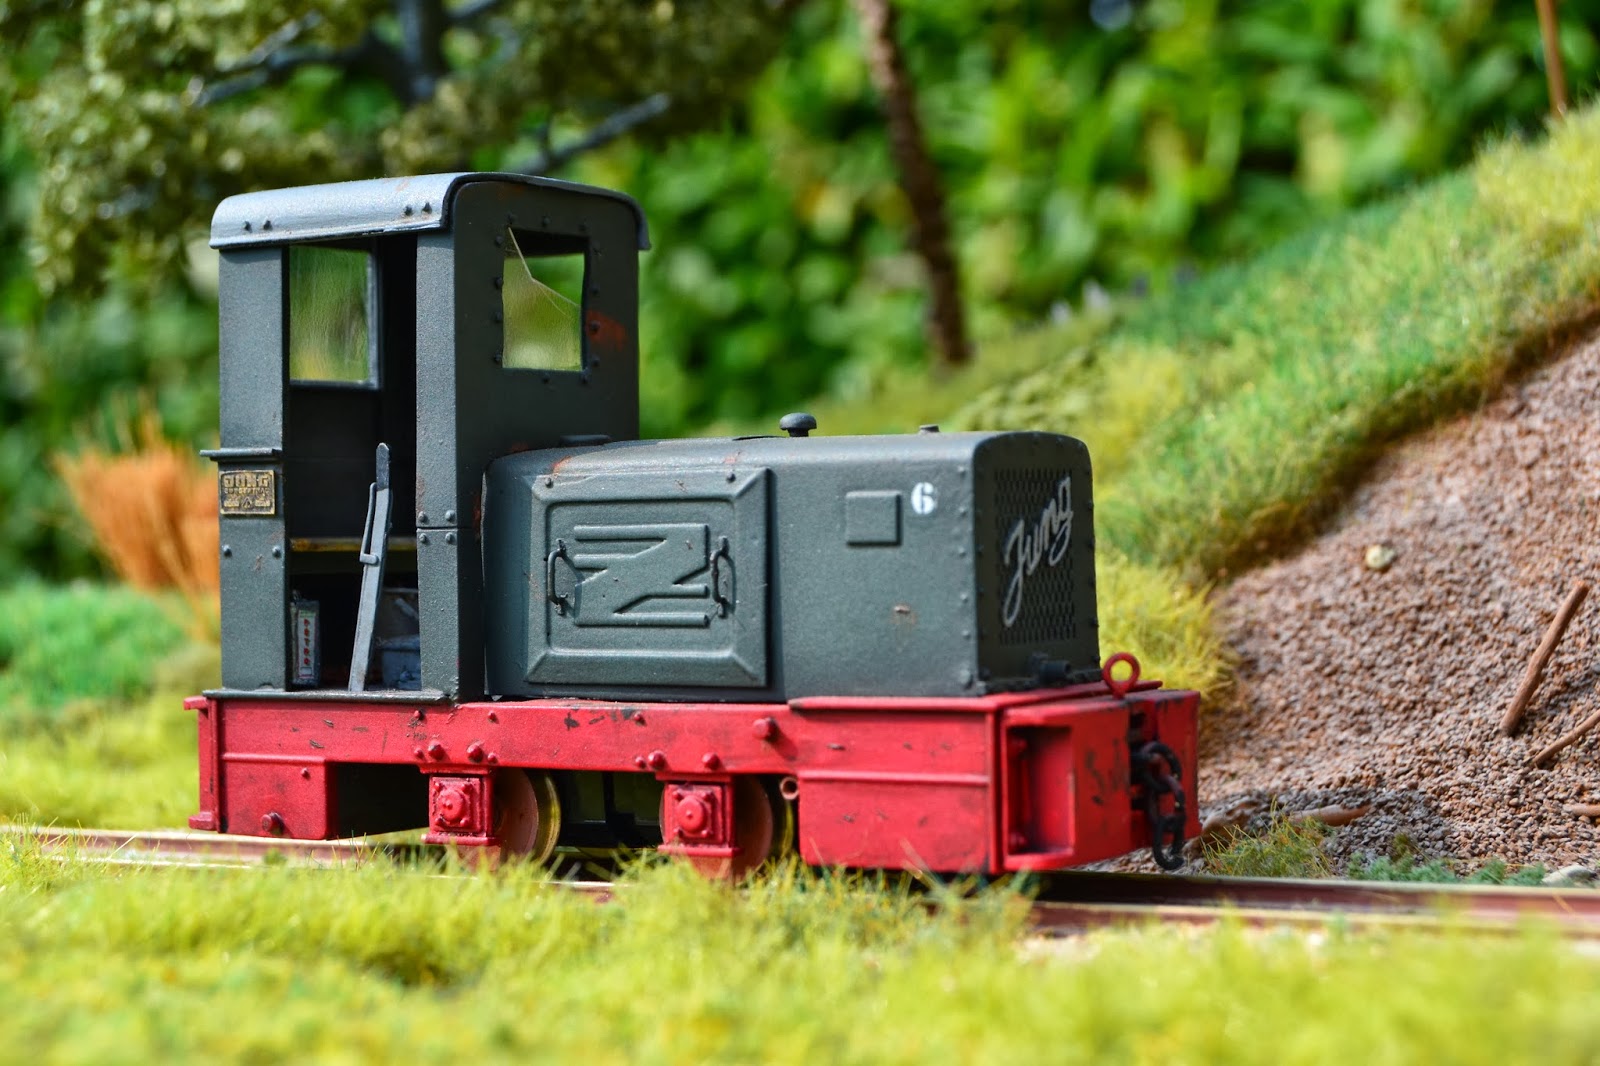
2013 turned out to be almost as productive as 2012. I managed to build a new resin kit of a Jung locomotive. Mostly from the kit's parts but as usual I couldn't resist fitting some scratch built parts, a specially adapted figure and my first custom made etched works plates with the help of Mark Hesketh. One of my older locos was fitted with decoder and new O-rings and could take its place among the serviceable locos at Nystrup Gravel.

The U-Models' Jung ZL 114 with etched works plates on the cab. The image serves as a reminder to me in Denmark that the cold and grey weather I suffer for the moment will give way to spring and summer in three month's time.
I also managed to finish several road vehicles (and a huge off road crawler tractor). Among the road vehicles were Nystrup Gravel's director's Opel Kapitän  and haulage contractor Hansen's Bedford O tipper.

My research in the history of Nystrup Gravel also made progress in 2013. I found a complete binder with papers from the company and quite a few old pictures. Here is one of the company's director's Opel Kapitän about to cross the viaduct over the gravel line.
In 2013 there seemed no end to the support from manufacturers for a modeller like me. A new etched brass O&K MD2 in 1:35 from Hesketh Scale Models and steel sleepered track panels from James Coldicott were very welcome. A surge of 3D-printed locos in 1:35 was suddenly made available on Shapeways. I bought my first and while the quality could be a little better, I was quite satisfied. And last but not least: What would be the release of the year (or the decade, dare I say!) is just about reaching the web shops: continental type skips in 1:35 in etched brass from the 1:35 industrial narrow gauge-alliance Hesketh & Snoodyk. I will now be able to exchange my old skips, first of all my Scale Link, some of which have served Nystrup Gravel since 1999. The Scale Link skips will not be scrapped but kept in reserve. I never throw out anything!

In October this little blog passed 30.000 page views. Just a fortnight later my collection of images on Flickr passed 100.000 view counts and November 2013 was the first month when Nystrup Gravel logged more than 3000 page views in a single month. I don't know if that is a lot in comparison with other related blogs, but I must admit being a little surprised that something so peripheral and downright weird as industrial narrow gauge modelling in 1:35 can attract that kind of interest.

As usual I have spent quite a few weekends at the 700 mm. gauge heritage railway HVB and besides helping explain industrial railways to modern families and preserve history the work also gives great first hand knowledge of what works in reality. An important ingredient in modelling. A few trips abroad provided me with visits to narrow gauge railways.

Surely the weather isn't always supportive of volunteering on HVB, but when the going gets tough, the tough gets going. Here the parasol I was holding to protect my friends from the rain has collapsed because of a sudden gust of wind. Working on a 1:1 railway surely is different from sitting at my modelling work bench. Photo: Finn Sørensen.
Despite all other accomplishments at or near Nystrup Gravel, the emergence of a twin to Nystrup's speeder no. 7 surely counts as the year's most notable occurrence. A 1:35 speeder built in Canada that exactly portrayed all features of my own little speeder really surprised me. I was incredibly honoured to see one of my models inspire a fellow modeller to build a model. I'm quite sure it was a once in a life time experience and I must look forward to other things in 2014. New skips, a running gas generator Schöma, a few road vehicles and perhaps the two bogie flats will enter service on my 1:35 version of Nystrup Gravel. The anniversaries of the battles of the Great War will probably lead to some modelling projects in the coming years. I don't expect to run out of inspiration.

Merry Christmas and Happy New Year!

Monday, 16 December 2013

Progress (Minor) on Two Bogie Wagons (1/35)

I have been making slow progress on the two Hudson bogie wagons. After having done the four bogies for project from rebuilt Scale Link skips, I started bending some of the etched metal parts while on a small vacation in the summer cottage. Returning from vacation brought a lot of non-modelling demands on my time and other modelling projects even managed to overtake the bogie wagons' place on my worktable. Now it's December and I thought it might be possible to finish the wagons before New Year.


Bending frame/bottom of the wagons. One frame/bottom has been bent up in my little etch bender from Mission Models. A full etch is seen in the top right of the image.
I think I mentioned, that the wagons come without bogies and their associated mountings. After some head scratching I made bogie mountings from scrap brass and nuts to fit my standard M2 bolts. To make life easier I have long time since standardized my use of bolts and nuts for mounting bogies, loco bodies etc. to M2, making sure I'm not in doubt what to do when a nut or bolt is lost. Unfortunately I was one M2 nut short.

My old supplier of small nuts and bolts had closed down so I ordered a nice selection of M2 nuts and bolts from www.modellbauschrauben.de in Germany.

A frame seen from below. Bogie mountings soldered inside the frames. On the other side of the brass piece with a hole in it is a M2 nut to take the bogie mounting bolt.
As a consequence of the missing nut, I decided to concentrate work on one wagon. With the end plates bent up and the associated angles ready to solder in place, it turned out that the angles were too short by several millimetres. Not wanting to worry about who's fault it was (me or the kit designer), I simply soldered the end plates in place. I will fit strengthening angles from brass or plastic profile later.

Being slightly put off by a missing bolt and short angle irons, I put both wagons back into their card board box. I will spend the coming Christmas Holidays doing some preparatory work on my gas generator Schöma and building a Danish army lorry. The wagons will have to wait...

Monday, 11 November 2013

Playing With Track Panels

This weekend I got to play with track panels. Not the 1:32 track panels I bought from James Coldicott, but 1:1 scale track panels with 7 kg/m rail in the gauges of 700 and 600 mm. On the heritage railway where I work as a volunteer, we are currently laying track in a large shed to house all the locos and rolling stock that isn't yet servicable. To maximise use of the building we lay the tracks close, and as the tracks isn't subject to much stress, we chose to use some old track panels.

Three weeks ago we picked out a number of track panels from storage. Itself not an easy task as trees and shrubbery during the years had shot up among the panels.

Loading track panels from the HVB storage facility at km. 1,5. After having chopped down a few trees the excavator could get to the 700 mm. panels having been in storage for more than 20 years.
Laying of track panels is easy and if our panels hadn't been old, a bit croocked and in need of a new sleeper or two, the work would have been no match for our experienced team.

One track is finished, one track is being adjusted while the third track is being assmbled. All with a gauge of 700 mm. Great to work indoor as it was raining cats and dogs outside!

Two tracks are finished. Gravel is poured in the third while the first 600 mm panel is already laid. To the right the laser we use to make sure the tracks are level and to the right height. In the background the excavator is loading a skip with gravel. Just because we like old technology we shouldn't avoid modern blessings that can help us.

3 tracks with 700 mm. gauge and one with 600 mm. gauge in place in the shed. In front is the traverser giving access to the depot tracks. Two more tracks will fill the empty foreground and provide more room for the railway's rolling stock. 

Among our supplies of 600 mm. gauge track panels we found these. They look quite different from what we are used to see in our stacks. From a search through my books and materials, I think they bear a strong resemblance to the French army standard track panel from World War 1. It just seems very unlikely that track from French army stocks should come to Denmark and would be so well preserved 100 years later? Please leave a comment if you recognise the type of track.

Sunday, 10 November 2013

Haulage Contractor Hansen's Bedford (1/35)

In Nystrup haulage contractor Hansen was the prime mover of gravel from Nystrup Gravel to costumers that didn't have the possibility to pick up gravel in their own vehicles. The gravel was loaded into lorries at the ramp at Nystrup. Hansen had a small fleet of lorries of quite a varied origin. In the mid 1950's Hansen still had some old ex. German army lorries, a postwar Chevrolet, while the pride of the fleet was the new Bedford O tipper bought specifically to offer fast and easy delivery of gravel. No need for hard work shovelling gravel from the lorry!
Hansen's Bedford O-tipper driving unloaded from Ubehage to Nystrup to pick up a load of gravel.
I started assembly of the Roadcraft Models' kit back in March and finished building in June. After the primer was dry, I air brushed bonnet, cab and rear body with Vallejo 967, Verde Oliva. Front bumper, radiator and front mudguards had a layer of glossy black while the chassis was given a coat of matt black. I applied custom decals from 'Skilteskoven' and they went on very fine, despite a quite demanding surface with metal strapping and rivets on the tailboard. I used Mr. Hobby's decal solutions to help the decals soften and adjust to the surface.
Basic colours applied to the lorry. Next is decals. In the background some of the old 35 mm film canisters I use for mixing and thinning paint. Good thing I kept a bag of them when I switched to digital photography!
I managed to destroy decals and paint on the cab doors when applying matt varnish. The Games Workshop varnish normally works fine on Vallejo paints (and did so on the tailboard), but on the doors something clearly went wrong. I just hate when things like that happens. Particularly when there is no obvious explanation. The doors were stripped of paint and primer and I started all over again. This time I chose to use Vallejo varnish to avoid further nasty surprises.

The license plates are the yellow 1950-1958 type with a single letter indicating which county the lorry came from. After painting I fitted a windshield wiper from the spares box.

I kept the weathering to a minimum. Basically a few washes with thinned oil paints and a light dusting with powdered pastels to represent dust. The rear body inside was weathered somewhat more and I applied a little dried gravel in the corners.

The Bedford O apparently parked on the ramp from the viaduct taking the road between Nystrup and Ubehage over the gravel line. At least no driver is to be seen in the driver's seat?
I peviously built Hansen's Chevrolet lorry and perhaps another lorry from the company will show up on the layout in the future?

Lorries made up a good percentage of the automobiles on Danish roads in the fifties. Almost a third of all automobiles were lorries. It reflects that only a limited number of Danes had the means to buy a car in those years.
Another scan from my collection of the 'Who, What, Where' year books. This time the 1950 issue.


Monday, 4 November 2013

Boxing Two Models (1/35)

Building models from scratch or kits is an exiting way of getting unique models. But it also gives me the challenge of how to preserve them from dust, excessive sun light or the accidental fall to the floor. I have earlier shown how I use some small boxes to store models. Recently I took a larger wooden box in use for two locos and thought I'd better share a few snapshots with you. My loco 3 (the Sala) and 6 (the Jung) now share a wooden box lined with tailor made foam insert to protect them during transport and storage. 
Working with foam to obtain a firm fit around the model.
Both models fitted in their foam beds. The foam bits glued to the box lid (left) applies pressure to the models when the lid is closed,  keeping them firmly in place. The loose foam bit (top) keeps the Sala driver from travelling freely around inside the box.
Box contents clearly marked with numbers in the font 'German Typewriter'. When you have to hand paint, there is no reason to pick a font that isn't compatible with the era of Nystrup Gravel.
Storing models in foam lined boxes is a mixed blessing if I am to believe several online articles. The foam can deteriorate and loose its tension, thereby reducing the protection it provides. That is one thing, but some foam types can actually degrade in a way that makes them stick to a model and even damage paint as a result of chemical reactions. I don't want that to happen, and although my foam lined boxes are still quite new, I check my boxes once a year to make sure everything is still well.

Those modellers modelling in more usual railway modelling scales have products available to them for storing their models. Some are generic and will fit serveral types of models, some are even made for specific models.