Monday, 11 November 2013

Playing With Track Panels

This weekend I got to play with track panels. Not the 1:32 track panels I bought from James Coldicott, but 1:1 scale track panels with 7 kg/m rail in the gauges of 700 and 600 mm. On the heritage railway where I work as a volunteer, we are currently laying track in a large shed to house all the locos and rolling stock that isn't yet servicable. To maximise use of the building we lay the tracks close, and as the tracks isn't subject to much stress, we chose to use some old track panels.

Three weeks ago we picked out a number of track panels from storage. Itself not an easy task as trees and shrubbery during the years had shot up among the panels.

Loading track panels from the HVB storage facility at km. 1,5. After having chopped down a few trees the excavator could get to the 700 mm. panels having been in storage for more than 20 years.
Laying of track panels is easy and if our panels hadn't been old, a bit croocked and in need of a new sleeper or two, the work would have been no match for our experienced team.

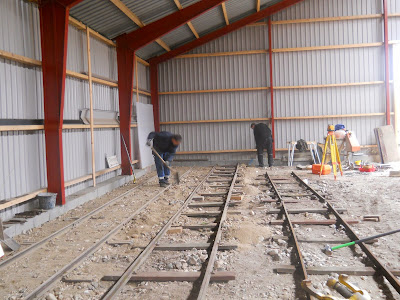
One track is finished, one track is being adjusted while the third track is being assmbled. All with a gauge of 700 mm. Great to work indoor as it was raining cats and dogs outside!

Two tracks are finished. Gravel is poured in the third while the first 600 mm panel is already laid. To the right the laser we use to make sure the tracks are level and to the right height. In the background the excavator is loading a skip with gravel. Just because we like old technology we shouldn't avoid modern blessings that can help us.

3 tracks with 700 mm. gauge and one with 600 mm. gauge in place in the shed. In front is the traverser giving access to the depot tracks. Two more tracks will fill the empty foreground and provide more room for the railway's rolling stock. 

Among our supplies of 600 mm. gauge track panels we found these. They look quite different from what we are used to see in our stacks. From a search through my books and materials, I think they bear a strong resemblance to the French army standard track panel from World War 1. It just seems very unlikely that track from French army stocks should come to Denmark and would be so well preserved 100 years later? Please leave a comment if you recognise the type of track.

Sunday, 10 November 2013

Haulage Contractor Hansen's Bedford (1/35)

In Nystrup haulage contractor Hansen was the prime mover of gravel from Nystrup Gravel to costumers that didn't have the possibility to pick up gravel in their own vehicles. The gravel was loaded into lorries at the ramp at Nystrup. Hansen had a small fleet of lorries of quite a varied origin. In the mid 1950's Hansen still had some old ex. German army lorries, a postwar Chevrolet, while the pride of the fleet was the new Bedford O tipper bought specifically to offer fast and easy delivery of gravel. No need for hard work shovelling gravel from the lorry!
Hansen's Bedford O-tipper driving unloaded from Ubehage to Nystrup to pick up a load of gravel.
I started assembly of the Roadcraft Models' kit back in March and finished building in June. After the primer was dry, I air brushed bonnet, cab and rear body with Vallejo 967, Verde Oliva. Front bumper, radiator and front mudguards had a layer of glossy black while the chassis was given a coat of matt black. I applied custom decals from 'Skilteskoven' and they went on very fine, despite a quite demanding surface with metal strapping and rivets on the tailboard. I used Mr. Hobby's decal solutions to help the decals soften and adjust to the surface.
Basic colours applied to the lorry. Next is decals. In the background some of the old 35 mm film canisters I use for mixing and thinning paint. Good thing I kept a bag of them when I switched to digital photography!
I managed to destroy decals and paint on the cab doors when applying matt varnish. The Games Workshop varnish normally works fine on Vallejo paints (and did so on the tailboard), but on the doors something clearly went wrong. I just hate when things like that happens. Particularly when there is no obvious explanation. The doors were stripped of paint and primer and I started all over again. This time I chose to use Vallejo varnish to avoid further nasty surprises.

The license plates are the yellow 1950-1958 type with a single letter indicating which county the lorry came from. After painting I fitted a windshield wiper from the spares box.

I kept the weathering to a minimum. Basically a few washes with thinned oil paints and a light dusting with powdered pastels to represent dust. The rear body inside was weathered somewhat more and I applied a little dried gravel in the corners.

The Bedford O apparently parked on the ramp from the viaduct taking the road between Nystrup and Ubehage over the gravel line. At least no driver is to be seen in the driver's seat?
I peviously built Hansen's Chevrolet lorry and perhaps another lorry from the company will show up on the layout in the future?

Lorries made up a good percentage of the automobiles on Danish roads in the fifties. Almost a third of all automobiles were lorries. It reflects that only a limited number of Danes had the means to buy a car in those years.
Another scan from my collection of the 'Who, What, Where' year books. This time the 1950 issue.


Monday, 4 November 2013

Boxing Two Models (1/35)

Building models from scratch or kits is an exiting way of getting unique models. But it also gives me the challenge of how to preserve them from dust, excessive sun light or the accidental fall to the floor. I have earlier shown how I use some small boxes to store models. Recently I took a larger wooden box in use for two locos and thought I'd better share a few snapshots with you. My loco 3 (the Sala) and 6 (the Jung) now share a wooden box lined with tailor made foam insert to protect them during transport and storage. 
Working with foam to obtain a firm fit around the model.
Both models fitted in their foam beds. The foam bits glued to the box lid (left) applies pressure to the models when the lid is closed,  keeping them firmly in place. The loose foam bit (top) keeps the Sala driver from travelling freely around inside the box.
Box contents clearly marked with numbers in the font 'German Typewriter'. When you have to hand paint, there is no reason to pick a font that isn't compatible with the era of Nystrup Gravel.
Storing models in foam lined boxes is a mixed blessing if I am to believe several online articles. The foam can deteriorate and loose its tension, thereby reducing the protection it provides. That is one thing, but some foam types can actually degrade in a way that makes them stick to a model and even damage paint as a result of chemical reactions. I don't want that to happen, and although my foam lined boxes are still quite new, I check my boxes once a year to make sure everything is still well.

Those modellers modelling in more usual railway modelling scales have products available to them for storing their models. Some are generic and will fit serveral types of models, some are even made for specific models.