Thursday 27 October 2022

Last Point Lever Mounted

With the wooden building in place and plans for work with ground cover in the area around it, I felt I should finish and fit the remaining point lever. The lever is a whitemetal kit from Feld-, Garten- und Grossbahn and is similar to another lever already fitted on the layout.

The point lever in place on the layout and working as planned. The sisal strands have just been glued in place.

As the point lever was already prepared for assembly it didn't take long to finish. The assembly was done exactly like last time, only this time I left out the direction marker to create a little variety. After assembly I painted the lever and added a bit more weathering than on the other lever. A thin steel wire was cut and bent to connect lever and turnout.

Painting and weathering in progress. I use a scrap of paper as a palette to mix and condition my paints.

The lever was mounted on a lengthened sleeper I had fitted while I built the track. A piece of timber was added to provide a safe foundation for the lever. I used thick AC-glue to fix the lever firmly to its sleeper. The bent wire was attached between lever and turnout. Perhaps something a bit more prototypically is needed at a later time. As I had a few strands of dyed sisal rope on the worktable, I added them around the sleeper end. 

The point lever fitted to the sleeper. A good drying time is adviced to allow the AC glue to fully harden.

Being a slow modeller there is often a huge difference of what I think I can accomplish within the next 2 weeks and what I actually get finished. At least I can now tick the point lever off my to do-list. Several small projects are in progress or in the design phase. Don't hold your breath, though, as things may take time.

Tuesday 25 October 2022

Get in Shape - Ride a Speeder!

Narrow gauge is great fun when you get to experience some of the charm of running historic vehicles in nice autumn weather. Last week I had the opportunity to propel a speeder along the track at the Hedeland vintage railway. It's not healthy always to sit behind the modelling table!

Meeting one of the ordinary trains on Brandhøj Station. In track 1 it's dieselelectric M 24 built by Nakskov sugar factory in 1962. Photo: Leif Johannsen.

The speeder has been restored by volunteers and it was one of the vehicle's first tours on the line after having been approved by the Danish Civil Aviation and Railway Authority. During the restoration the speeder has been regauged from 785 mm gauge to 700 mm and all wooden parts completely renewed due to rot. The speeder has two traction modes: human and wind power. As we have yet to design, make and fit a sail to the preserved original mast, the speeder was powered by human power alone.

The speeder is powered by moving the handle back and forth as well as using the pedals for extra power when climbing gradients.

The braked speeder waiting for the first train meet of the day.

The speeder was originally used on a railway line owned by the Danish governmental service building and maintaining constructions along Denmark's North Sea-coast protecting it from erosion by the sea. As the line ran mostly north-south and with a predominantely westerly wind, sails were an obvious source of traction for speeders on the line.

The speeder doesn't bear any identifying plate as to who built it, but there are some indications that it may have been built by Swedish Hults Bruk, now famous for their high quality axes.

Hults Bruk catalogue from September 1913 showing a speeder (bottom of page) of very similar construction to the one on the Hedeland vintage railway.


Speeder of similar construction photographed 7. November 1904 near Agger on the standard gauge line that transported building material for the dykes and groynes built to protect the coastline from erosion. The line was regauged to 785 mm between 1948-50. Gun barrels and cannon balls placed next to the track are salvaged from 'HMS St. George' and 'HMS Defence' that both stranded on the west coast of Denmark 24. December 1811. Only 17 British sailors survived out of a total of 1425. Photo: Vandbygningsvæsenets fotosamling No. 237.

The Agger line was comparatively flat, which can't be said of the Hedeland line. Consequently it's a benefit if the speeder's crew is of some physical capacity and endurance. But then again, it's good to do something else than just sitting writing or modelling!

Tuesday 18 October 2022

Danish General Election

Outside my house election posters hang in every lamppost. Driving to work posters also hang from many bridges and a selection of trees. A general election is approaching in Denmark. The posters are a well established tradition and the posters were also a well known sight around Nystrup in the 1950's when election time was due.

On a wooden pole carrying a lamp and electrical wires a poster highlights the virtues of the Conservatives: good conditions for businesses and making Denmark a magnet for trade. In the beginning of the 1950' many goods were still rationed or very scarce in the wake of the 2. World War.

Our general election in Denmark is held 1. November and you can see the cold facts of the election proces and results (naturally only after the last wote has been counted some hours after the polling stations have closed) on the website of the Danish Parliament. If you are not interested in Danish politics, just skip the link and keep reading about the election poster modelling and a little history. 

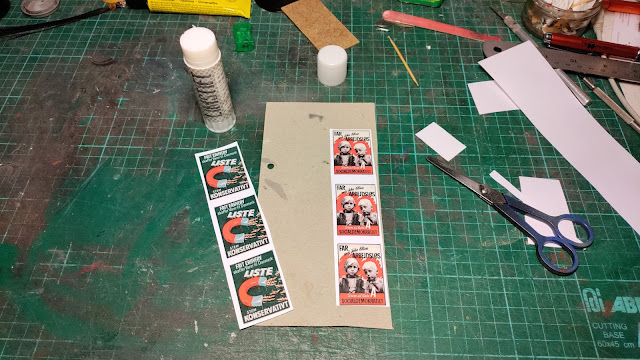
1950's election posters found online, printed out in appropriate size and glued to thin cardboard backing. Allow time to dry and cut out with a sharp scalpel.

Posters cut out and fitted with holes for mounting on lampposts and utility poles.

In the Nystrup Gravel universe and time frame voting and party membership was closely related to your profession and class. The persons on my layout consequently exhibits classic 1950's voting patterns. The owner and manager of the gravel company Director Holm voted Conservative as most larger business owners did. We already know that the workshop manager Thorleif Petersen was a member of the Danish Communist Party and voted accordingly. Some of the higher white collar employees (e.g. the company accountant also voted for the Conservatives as did the well dressed bank employee railway enthusiast visiting Nystrup Gravel now and then. A large majority of the company's blue collar workforce would most likely vote for the Social Democrats. The results of the 1953 general election that paved the way for a Social Democratic government can be found on wikipedia here.

The finished posters were mounted on a wooden pole made from a round wooden stick that I worked quite vigorously with a rough file to obtain a slightly tapering shape. I smoothed the surface somewhat with finer modelling files before I treated the pole with dark grey wood staining fluid and an assortment of thinned acrylic colours. The pole took no more than 10 minutes to make. The posters were fitted to the pole with painted copper wire even before the post had dried fully.

'Don't make dad loose his job' two worried children says on the poster from the Social Democratic Party. Also note that only dad is mentioned as a potential victim to unemployment. Most Danish women had no regular paid job in the early 1950's. The father usually being the only provider of family income.

The posters were a quick project, but one that clearly sets the time frame on my little layout. Like real election posters my model posters will not hang around Nystrup Gravel permanently but will only be fitted on special occasions.

Wednesday 5 October 2022

Wooden Building Finished

With some work I finally had a two storey building completely covered in red stained boards with three openings for window frames and glazing. The last stage of the construction aimed at getting the windows and the basic roof finished as well as fitting interior lights on the upper floor. With that accomplished I can now call the building finished.

A quick snapshot of the finished wooden building. As can be seen it really isn't more than a simple relief building pushed up against the backscene. The building's depth closest to the camera is only 4 cm and where the track enters ca. 8 cm. 

The building is built on an inner structure of foamboard covered in coffee stirrer boards. To keep all boards to equal distance from the ground I used a long stick attached to the building while adding the individual boards. By fitting each board tight against the stick it was quite easy to keep all boards to the same height and most of them comparatively vertical.

Fitting the first boards on the lower floor. A square wooden profile attached to the foundation keeps all boards to the same height.

Upper floor board cladding being fitted. Again equal height is obtained by a wooden guide attached to the building. I left the coffee stirrers over-length on purpose to be cut down later.

As I kept the boards over-length I had to cut them following the roof slope. I simply used a junior hacksaw carefully sawing my way along the roofline. I managed to tear off only one board that could easily be glued on again. 

Before getting to work on the windows themselves I prepared the window openings to allow for a horisontal window sill and a correct gradient to allow water to run off. I gave up using small modelling files and sandpaper and picked a file from my toolbox usually used on 1:1 projects. That gave instant progress with minimal effort.

The building completely clad in stained coffee stirrers. Almost all have been cut to the correct slope of the roof. Minor adjustment of window openings in progress.

The window frames used in the building are laser cut frames from a German manufacturer. I bought them at the 3. Schkeuditzer Grossbahntreffen in 2004 without packaging, just wrapped with a rubber band. To fit the building they were reduced in height, painted and fitted with a piece of clear plasticcard for glazing.

I fitted the windows into the openings with Kristal Clear to avoid glue stains on the glazing. The steel sheet window sills were made from softdrink can metal cut and bent to shape then painted and glued under the windows with standard contact glue.

Two cut down window frames painted white and one as originally bought in Germany in 2004. The piece of softdrink can will be cut down and folded to make sills under the windows.

The first painted and glazed window glued in place and test fitted with sill made from aluminium from a softdrink can.


One window fitted with sheet metal sill painted white. In this gruesome close-up I can see I should have taken a bit more care when fitting and cutting the boards. 

Lights are simply small two 12 V bulbs fitted into holes made in a piece of black-painted foamboard push-fitted under the roof. Wires are led through a hole in the back wall of the building and held in place with electrical tape. The wires will be connected via connectors (to enable the building to be removed) to wires running under the layout from a central 12 V power source. While it really is a very simple arrangement I have been inspired by other modellers' work with lights and look forward to set up further lamps around the layout as it moves toward a more finished state.

The ultra simple light installation in the building seen with the roof removed. As the lamps are placed high over the windows they spread the light rather well inside the top floor of the building. 

As the interior light was fitted I mounted fascia boards to the sides of the roof and painted them white to match the window frames and sills. I have yet to fit tarpaper to the roof that is painted black as a intermediate solution. With my layout placed rather high above the floor and the building itself being 35 cm high there is not much chance that anyone will actually see the roof from above.


The finished building almost towers over the layout. It's purpose is to hide the track's abrupt end at the wall and to provide a vertical element to an otherwise very flat, little layout.

Despite having a depth of only ca 8 cm where the track enters the building it isn't too obvious seen from a distance. A good cover of black spray paint on the inside and a figure in the doorway helps a long way.

I have mentioned a few things that I may have to go back and add to the building, but apart from that and some weathering the relief building is finished. I will now devote some time to landscaping around the building to settle it in on the layout. 

Monday 3 October 2022

Lights On Nystrup Gravel

With the autumn season having arrived coupled with an old image with light coming from the top floor of a Nystrup Gravel building, I have begun to contemplate how lights on my layout could be laid out.

The Lister (Nystrup loco no. 3) is about to enter one of the buildings at Nystrup Gravel. Probably a late afternoon shunting  manoeuvre before a day's work is over. The lights are turned on in the building's top floor.

I already have two lamps mounted above the doors in the small brick shed in one end of the layout. Interior light is also planned on the top floor of the large building in the other end. As most traffic on a primitive narrow gauge industrial railway would occur during daylight hours more lamps really wouldn't be necessary. As I like a dimly lit layout and have been inspired by several other modellers' work with light, my little layout will receive additional lamps at relevant spots.

Even if scale and theme are quite different I have been very inspired to add lights to my layout by Danish modeller Leif Gjesing Hansen's freelance layout in H0 scale. With clever design and careful work Leif has succeeded in creating a good 'early night-feel' to his Märklin-layout. You will have to be a member of the Danish Facebook group 'Modeltog' to view more of Leif's work. Photo: Leif Gjesing Hansen

Even if the real Nystrup Gravel area was without much proper outside electrical lighting I plan to add two mast mounted lamps at the loading ramp, one halfway between brick shed and wooden building as well as a lamp above the large door in the wooden building. Being a member of the Telegraph Pole Appreciation Society I will naturally mount the lamps on wooden masts and fit dummy electric overhead wires. I'm now in the proces of sourcing isolators and figuring out if the lamps will have to be scratchbuilt. They will probably have to. 

A single lamp can add a lot of atmosphere to a little scene even if photographed outside the layout room. A view from one of my old 1:35 scale modules.