Friday 26 July 2019

Lister Running in Garden

One year after I started my first 16 mm scale kit I could celebrate taking my first loco in that scale in service. In 30 degrees C I laid a few track panels in a shady spot in the garden. With a single Hudson skip my I P Engineering Lister R made its first trip. Everything worked and the speed was easily controlled with the Tx22 controller.
Nystrup Gravel loco no. 3, a Lister R, pulling a single skip on a short provisionally laid garden line.
To celebrate the event I made a short film of the train traversing the 3 m of track. A short distance for the train but a giant leap for me. 16 mm scale, remote control and outside running, all new aspects in my modelling. See the short film below:


With almost every part attached to the loco I could no longer avoid getting the RC-equipment assembled and tested. With the instructions from RC Trains and the invaluable information available on the Peckforton Light Railway blog the proces proceeded without any trouble. With the cicuit finished I followed the instruction on how to bind the receiver to transmitter. Binding was easily achieved and with the transmitter on I could drive the motor and wheel assembly back and forth on the worktable.
The RC installation test assembled on the worktable. The RCT-Rx65c receiver can be seen fixed to the assembly in the lower left of the image.
With the electronic and mechanical matters functioning I was ready to prime and paint the loco and glue it to the motor unit. I used my favourite Chaos Black primer as I have found it to provide a good grip on most types of surfaces and to make a good foundation for the covering paints. The major colour is Vallejo Air's  71.285 'Imperial Japanese Army Dark Green'. It covered well on the primed parts and required only two light passes with the air brush.

Two images of the loco shortly before priming. During the building process I have added a number of home made parts far in excess of the number of kit parts I have used. Most are small details but seat box and floor plates are sizable items that are modelled on a Dutch Lister in the collection of the Decauville Smalspoor Museum in the Netherlands.
Detail painting was limited to the lids on petrol and oil tank and some decorative red on brake wheel and the gear lever.

After painting, battery and RC-equipment was fitted. It took some wrestling with wires and components, but in the end everything was fitted. Remaining work is now to finish painting the figure, adding weathering and a fixing a canvas cover for the open rear end of the bonnet. A few white metal parts for detailng is in the mail from Germany and I guess they will help to make my first 16 mm loco a good looking model once it is completely finished. Until then I will keeping enjoying running the loco on my provisional outdoor version of Nystrup Gravel. Fortunately the weather will stay hot and dry the next few days.

Wednesday 24 July 2019

A Simple 16 mm Scale Photo Plank

Until now I have photographed my limited number of 16 mm scale builds on plywood scraps against bushes in my garden - or in the caotic environment of my worktable. In my 1:35 scale modelling times I quickly got a photogenic module finished. I have plans for a small 16 mm scale layout but nothing has materialized so far. After a quick process over a few days I now have a semi-finished photo plank.
The photo plank's first task was to act as a stage for my train of four Hudson skips. With some of my garden's bushes it doesn't look too bad, does it?

I started making the photo plank by choosing a piece of left over plywood from the stash in my shed. On the 60 x 40 plywood I glued foam board for track base and some expanded polystyrene for the slightly raising ground to the rear. Once the glue had dried, I covered everything exept the track base with a layer of plaster.

Sleepers are being glued in place with white glue (PVA).

I used thin wooden profiles for sleepers. They were pre-weathered and surplus from an old 1:35 project. While far too thin to look like scale sleepers I thought that the ballast could serve to hide that. I spiked old H0 Peco Code 100 rails to the sleepers with ancient Roy Link track spikes. While a very small size, rail of that size was in use on narrow gauge industrial railways. With a weight of 7 kg/m it was solid enough for a short train of small skips. The rather coarse flanges of my 16 mm model does bump the occasional spike head so I have to use a rather larger rail size if I choose to scratch build my own track.

My Lister is progressing now. Here the plastered photo plank is used to show the partly primed Lister. Notice the light rail.

With plaster dried and track laid, I painted rails and spikes with two rust colours and the ground a dark brown. I added clusters of grass and some flowers before I ballasted the track with sieved gravel and some chunky chalky stones I had lying around in a bag. I used my usual mix of 50/50 white glue and tap water with some detergent added to make the mix loose surface tension. I dripped the mix over the ballast with a syringe.
Brown colour and clusters of grass added. Rails painted.

Track ballasted. Grass is next.
I skipped any experiments with grass application and simply used some Heki grass mats. The result is green but not great. Another method is called for in the future. Here and there along the track I added some dead leaves from birch seeds I had picked up in the garden. When added under a bush they can pass for dead leaves - better in 16 mm scale than in 1:35.

The photo plank can still do with some drybrushing of the rather harshly coloured grass mats and I plan to fit a wire fence too. Perhaps even a telegraph pole to add a vertical aspect. But the plank already works better than a flat piece of unpainted plywood - and that is what matters.
Along with the photo plank my I P Engineering Lister has evolved. The last bits have been glued on, the loco primed and painted. The RC-equipment was soldered up and I failed to make a disaster out of it. Everything worked and is currently being packed away inside the loco.

Sunday 21 July 2019

Brickworks Museum

I'm on my summer vacation which this year is held on several locations in Denmark. Saves on my carbon footprint and the weather is fine and there is always somthing interesting to see.

In 1960 there was 225 brickworks in Denmark. Today you can count them on two hands. Several structures are preserved across the country to honour the industry and workers. In the sourthern part of Denmark near the German border I visited the Cathrinesminde Brickworks Museum.
What is not to like? Blue sky, beautiful chimney, narrow gauge locomotive and a steel plated substation.
Cathrinesminde Brickworks was opened in 1732, equipped with a ring kiln in 1892 and last used in 1968. See the museum's website for further info. I visited the brickworks with my familiy and was pleased to see that there was a proper reenactment of old fashioned brick making by hand in progress.

The buildings appear to be in good condition and as the brickworks is a small facility the visitor can easily see every operation in a brick's manufacture. It may come as no surprise that one of my motivations for visiting the museum was to see its narrow gauge locomotive.

A rather harmonic industrial locomotive in 600 mm gauge most likely built by a local blacksmith Micheelsen Brothers on the basis of a Ford engine. Last time I saw the loco was in 1986 it was in private ownership. Later in that year it was given to the brickworks museum, the cab removed and over the years it has been repaired and now appears to be operational.
A rear view of the loco and two unpainted standard skips. In the background the old clay pits. Plans for a short track to the pit have been shelved. Upon return to my worktable I will immediately investigate if I can include a steel plated substation next to the track on my coming 1/19 layout.
The brickworks had its own pier for loading finished bricks in shallow vessels for transport. Two of the characteristic wagons for bricks have been preserved and they are exhibited with a full load of bricks. One of them have flangeless wheels and is positioned on a pair of flat rails with a low inner flange.
Wagon with flangeless wheels for transporting finished bricks for shipping.
Apart from old machinery, informative posters and the volunteers reenacting brick making, the brick making process is also illustrated by several large scale models of a quite good quality. I have no idea of the scale, but from a distance it seems that the scale isn't far from 1:22-1:19 range.
The model illustrating loading finished bricks into a small sailing vessel. All work transferring the bricks was done by hand and often by women. Particularly during the Great War when the region was under German rule and the men away fighting.
Earlier in the week I had the chance to ride the 17 km long Mariager-Handest vintage railway. My train was pulled by a very charming diesel electric built by Frichs in 1953 with a whopping 375 hp.
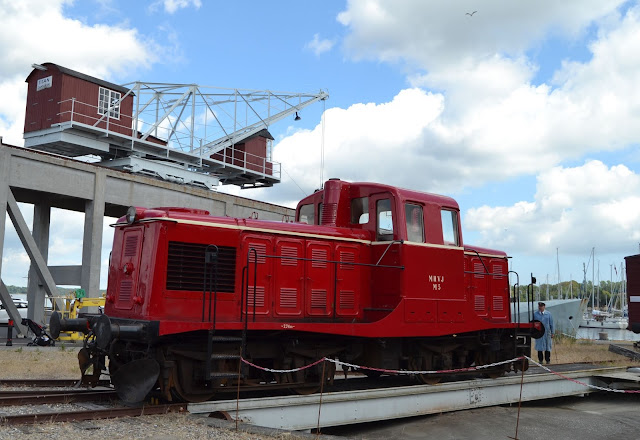
MFVJ M 5 photographed beside the heritage listed Titan crane on Mariager harbour.

Friday 19 July 2019

Hudson Skips With Graphite

As promised in my last post, I have now tested a new way of adding a worn metal effect. Until now I have used soft pencils to make worn edges on metal surfaces. When I weathered my first two skips I found that it took a lot of work to make the insides of the skip look well with graphite from a pencil. With graphite powder the process took only minutes for all four skips and looked much more realistic.

Nystrup Gravel Hudson skip no 52 showing off its weathered inside. It doesn't show too clearly in the image, but the graphite adds a slight sheen to the inside on the parts of the bucket that are polished by exiting gravel.

Graphite powder is used for lubrication and I was fortunate enough to pick up some left overs in the bottom of a can. A very small amount will last a long time even in 16 mm scale. The graphite is easily aquired from lock smiths in small amounts for lubricating locks. The graphite can also be bought in cans or even sacks from specialist dealers.
All four skips empty with buckets raised. Usually unloaded skips were left like this by the workers of the gravel company. It avoided them filling with water when it rained, dead leaves in autumn and snow during winter. Kids (usually boys) from Nystrup often played with the skips and seldom left the buckets tipped when they headed home for dinner. For that reason the workers had drilled holes in the skips as an extra precaution to avoid them filling with water.

To apply the graphite I simply pick up the amount of powder that will stick to my index finger by natural adhesion (moisture and skin oil) and work the powder into the matt paint and varnish on the skips' insides. All it takes is a few passes back and forth with the graphited finger tip. I was careful not to overdo the effect. I was going for a moderate sheen and a smooth texture in contrast to the other matt and 'rough texture' surfaces on the skips. I'm not producing a polished silver fork here!

The four empty skips are ready to be picked up by a loco and propelled to the gravel pits for loading.

Skip 52 and its three stablemates parked on my semi-finished photo plank with 15 lbs/yard rail on wooden sleepers.

Tuesday 9 July 2019

More Skips

My fleet of skips (all 2 of them!) has been doubled. I have finished 2 further Hudson skips from Binnie Engineering kits. As my first 2 kits I also fitted the new ones with the strengthening steel band on top of the tipping body. I modelled the bands well damaged on the two new skips and left a torn and curled up piece sticking up. I assume the piece sticking up will be torn off  after having seen service for a time.
Four Hudson skips in Nystrup Gravel ownership. From left no. 2 and 4 are new (easily distinguishable by the wrong placement of lubricating plug on the axle boxes).
As with the last batch of skips they were easily built and small details added. Continuing last summer's out door modelling trend, the major part of building took place in the garden. Painting and weathering was executed in the same way as with the first two skips I built last year.
Saturday evening in June 2019. Modelling and sipping whisky in the garden.

Both new skips ready for primer, paint and weathering. I have acquired standard Peco 32 mm gauge flex track panels.

I will be trying a new method for adding worn metal effects. A can of powdered graphite.

In stead of applying worn metal effects in the skip bucket with a soft pencil, I have picked up the left overs from a can of graphite from the vintage railway I volunteer on. The powder will hopefully allow me to reproduce the worn insides of the skips better than with a pencil. Stay tuned for the results.